Crochet a Cozy Countryside: The 3D Sheep Valley Blanket Tutorial
“`html
How to Crochet a Sheep Valley Blanket: Step-by-Step Tutorial
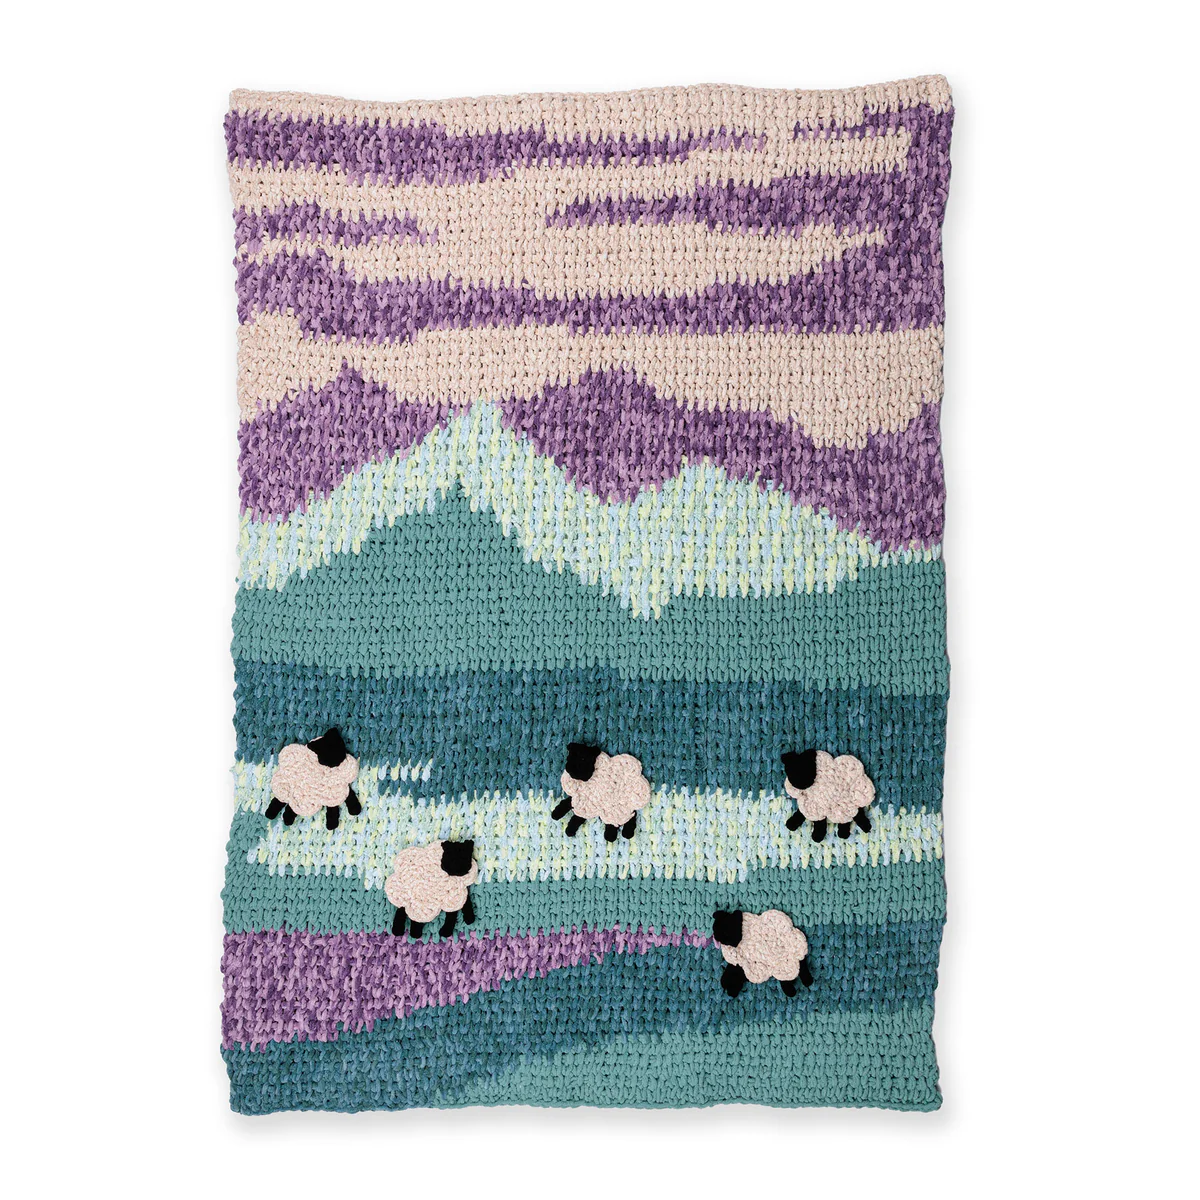
Create a cozy, landscape-inspired masterpiece with this Sheep Valley Blanket. This project features a stunning textured design and adorable 3D sheep appliqués, making it a perfect addition to any home. This pattern is designed for intermediate crocheters and uses super bulky yarn for a thick, plush feel.
Project Details
Finished Size: Approximately 48″ x 56″
Skill Level: Intermediate
Materials Needed
- Super Bulky Yarn:
- Contrast A: Rosemary (approx. 350 yards)
- Contrast B: Teal Stream (approx. 300 yards)
- Contrast C: Purple Sky (approx. 378 yards)
- Contrast D: Meadow (approx. 220 yards)
- Contrast E: Cream (approx. 300 yards)
- Contrast F: Coal (approx. 37 yards)
- Crochet Hooks: 8 mm (L/11) and 15 mm (P/17)
- Other Tools: Yarn needle
Gauges
- Smaller Hook: 7 dc and 4 rows = 4″
- Larger Hook: 5.5 splhdc and 6 rows = 4″
Abbreviations and Special Stitches
- Approx: Approximately
- Ch: Chain(s)
- Hdc: Half double crochet
- Dc: Double crochet
- Sc: Single crochet
- Sl st: Slip stitch
- Tr: Treble crochet
- Picot: Ch 2, slip stitch in 2nd ch from hook
- RS: Right side
- WS: Wrong side
- Splhdc (Split Half Double Crochet): Work a half double crochet between the “legs” at the front and back of the stitch (splitting the stitch) instead of through the top loops. The resulting stitches should look like “V”s on both sides of the work.
Instructions for the Blanket
Note: When working from a chart, wind small balls of the colors needed for each separate area of the design. To change colors, work until the last loops remain on your hook, draw the new color through those loops, and proceed.
Using the larger hook:
Foundation: With Color B, chain 18. With Color A, chain 50.
Row 1 (RS): With Color A, work 1 hdc in the 3rd chain from the hook. Work 1 hdc in each of the next 47 chains. Join Color B in the last stitch. With Color B, work 1 hdc in each of the last 18 chains. Turn. (66 hdc total).
Row 2: Chain 1. Work 1 splhdc in each stitch to the end of the row. Turn.
Following Rows: Repeat the process by following the provided chart. Read the RS rows from right to left and the WS rows from left to right. Continue until 84 rows of the chart are completed. Fasten off.
Creating the Sheep Appliqués (Make 5)
Use the smaller hook for all appliqué pieces.
The Body
With Color E, chain 4.
- Round 1: 2 sc in 2nd ch from hook, 1 sc in next sc, 3 sc in last sc. Do not turn. Working in the opposite side of the foundation chain, 1 sc in next ch, 1 sc in the same space where the first 2 sc were made. Join with a sl st to the first sc. (8 sc)
- Round 2: Ch 1. 2 sc in the same space as the sl st, 2 sc in next sc, 1 sc in next sc, 2 sc in next sc, 3 sc in next sc, 2 sc in next sc, 1 sc in next sc, 2 sc in next sc, 1 sc in the same space where the first 2 sc were made. Join with a sl st to the first sc. (16 sc)
- Round 3: Ch 1. 2 sc in the same space as the sl st, 2 sc in next sc, 1 sc in each of the next 5 sc, 2 sc in next sc, 3 sc in next sc, 2 sc in next sc, 1 sc in each of the next 5 sc, 2 sc in next sc, 1 sc in the same space where the first 2 sc were made. Join with a sl st to the first sc. (24 sc)
- Round 4: Ch 3 (counts as dc). 2 dc in same space as sl st. *Skip next sc, sl st in next sc, skip next sc, 5 dc in next sc. Repeat from * 4 more times. Skip next sc, sl st in next sc, skip next sc, 2 dc in the same space where the first 2 sc were made. Join with a sl st to the top of the ch-3. Fasten off.
The Head
With Color F, chain 2.
- Round 1: In the 2nd chain from hook, work the following all in one stitch: (2 sc, Picot, 1 sc, 1 hdc, 3 tr, 1 hdc, 2 sc, Picot). Join with a sl st to the first sc. Fasten off, leaving a long tail for sewing.
The Legs (Make 4 per sheep)
With Color F, chain 5.
- Row 1: Turn the chain so the back “bumps” are facing up. Working only in the bumps: 1 sl st in the 2nd chain from hook, 1 sl st in each chain to the end. Fasten off, leaving a long tail for sewing.
Final Assembly and Finishing
- Assemble the Sheep: Sew the Head and Legs to the Body. Ensure you identify which way the sheep is facing (3 should face left, 2 should face right).
- 3D Effect: Attach the legs to the Wrong Side (WS) of the Body. Vary the length of the legs slightly to create a 3D standing effect.
- Attach to Blanket: Pin the completed sheep to the blanket according to the assembly diagram. Sew the sheep to the blanket along the 3rd round of the body only. Leave the 5 dc-groups and the legs unsewn to allow them to pop out from the fabric.
“`