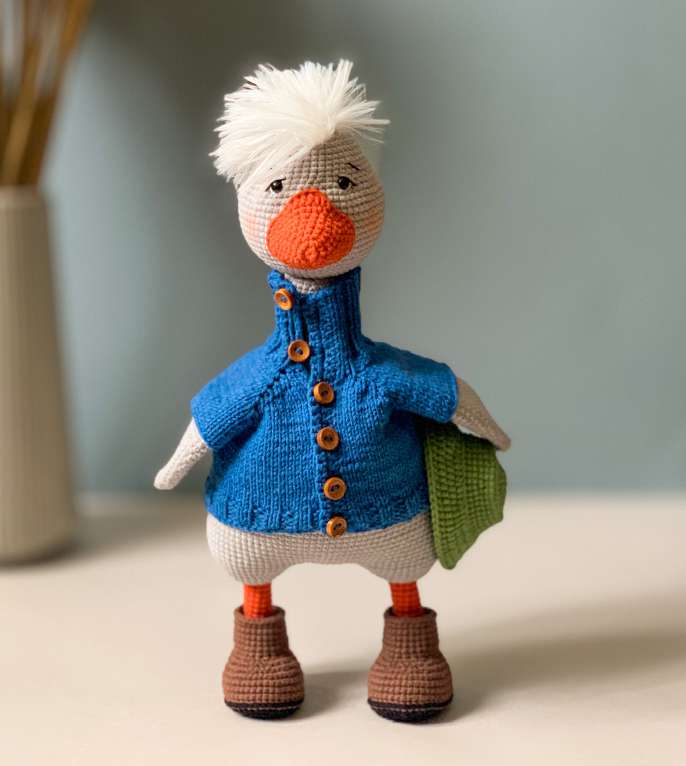
Meet Philipp the Goose – A Full Crochet Amigurumi Pattern Complete
Pattern – Part 4: Head
Work in the main color (light gray). Stitch marker sits at the back.
Round 1: 6 sc in MR [6] Round 2: inc × 6 [12] Round 3: (1 sc, inc) × 6 [18] Round 4: (2 sc, inc) × 6 [24] Round 5: (3 sc, inc) × 6 [30] Round 6: 2 sc, inc, (4 sc, inc) × 5, 2 sc [36] Round 7: (5 sc, inc) × 6 [42] Round 8: 3 sc, inc, (6 sc, inc) × 5, 3 sc [48] Round 9: (7 sc, inc) × 6 [54] Round 10: 4 sc, inc, (8 sc, inc) × 5, 4 sc [60] Round 11: (9 sc, inc) × 6 [66] Rounds 12–21: 66 sc – 10 rounds straight Round 22: (9 sc, dec) × 6 [60] Round 23: 4 sc, dec, (8 sc, dec) × 5, 4 sc [54] Round 24: (7 sc, dec) × 6 [48]
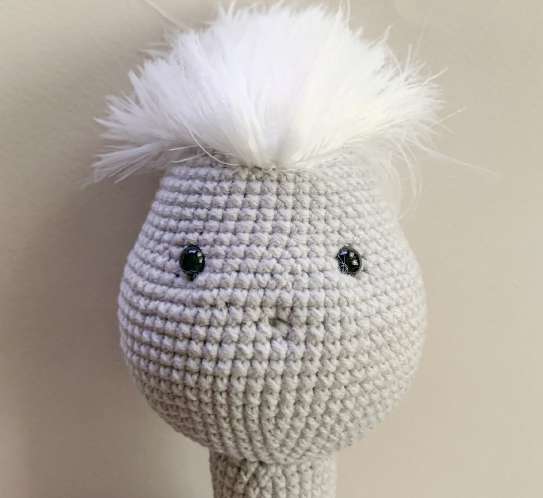
⭐ Install safety eyes now! Place the 6 mm safety eyes between Rounds 22 and 23. The first eye sits 20 sc from the stitch marker; the second eye sits 10 sc from the first. Secure the washers firmly.
Rounds 25–30: 48 sc – 6 rounds straight
Attach the head to the body now. Take the body and insert the cotter pin through the magic ring at the top of the head. Cover with the second disc and twist shut with round-nose pliers. Begin stuffing the head.
Round 31: (6 sc, dec) × 6 [42] Round 32: (5 sc, dec) × 6 [36] Round 33: (4 sc, dec) × 6 [30] Round 34: (3 sc, dec) × 6 [24] Round 35: (2 sc, dec) × 6 [18]
Stuff head fully.
Round 36: (1 sc, dec) × 6 [12] Round 37: dec × 6
Fasten off. Pull yarn through to close, weave in end, remove stitch marker.
Part 5: The Hair Tuft
Using white Lanoso Single yarn, mark a point approximately in the center of the top of the head. Insert your hook under a stitch, catch the yarn, pull it through, and work a sc. Continue crocheting along the top of the head in rows, gradually increasing the number of sc in each row, then decreasing back down (for example: 1 – 3 – 5 – 7 – 9 – 7 – 5 – 3 – 1). This builds a little oval patch of white yarn on top of the head.
Once complete, brush the tuft firmly with a pet slicker brush (puhoder) until the yarn fibers separate and fluff up into a wild, fluffy crest. The transformation from tidy crochet to wild goose hair is truly magical!
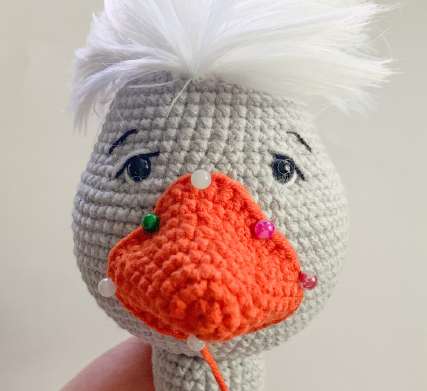
Part 6: Eye Detailing (Cinching the Eyes)
Using your needle and a length of matching yarn, mark 6 points with pins: 2 in the center of the face (this area will be covered by the beak later) and 2 points around each eye. Thread the needle through point 1, exit at point 2, enter at point 3, exit at point 4, enter at point 5, exit at point 6. Pull gently to cinch the eyes inward and create that beautiful sunken, soulful goose expression. Secure the yarn well.
Part 7: Face Embroidery
Using white yarn, stitch the whites of the eyes (small curved stitches below each safety eye). Using gray yarn, create small “eyelid” stitches above each eye. Mark the eyebrow placement, then embroider both eyebrows and the lash line in black yarn. Finally, apply a soft blush of pink powder makeup or dry pastel to the cheeks with a brush. Philipp’s personality is really starting to come through now!

Pattern – Part 8: Beak
Work in orange yarn. The start of the round sits at the bottom of the beak.
Round 1: 6 sc in MR [6] Round 2: inc × 6 [12] Round 3: (3 sc, inc) × 3 [15] Round 4: (4 sc, inc) × 3 [18] Round 5: (5 sc, inc) × 3 [21] Round 6: (6 sc, inc) × 3 [24] Round 7: (3 sc, inc) × 6 [30] Round 8: (4 sc, inc) × 6 [36] Round 9: 15 sc, 6 hdc, 15 sc [36]
Fasten off, leaving a long tail for sewing. Pin the beak in position on the face, covering the two center cinch points. Sew it on firmly, lightly stuffing the beak as you go — just a small amount so it holds its shape without being too stiff.
Pattern – Part 9: Cardigan (Knitted on Circular Needles, Size 2)
Knitting Abbreviations for This Section
- EL = edge stitch (slip first st, knit last st as purl)
- K = knit
- P = purl
- M1 = make 1 (increase)
Cast on 36 stitches + 2 edge stitches = 38 stitches total.
Rows 1–20: EL, (2K, 2P) × 9, EL [38] — 20 rows of 2×2 rib (this forms the collar/neck band)
Row 21 (raglan shaping begins): EL, 1K, M1, 1K, 2M1, 14K, 2M1, 1K, M1, 2K, M1, 1K, 2M1, 14K, 2M1, 1K, M1, 1K, EL [50] Row 22: EL, 48P, EL [50] Row 23: EL, 3K, M1, 1K, 2M1, 16K, 2M1, 1K, M1, 6K, M1, 1K, 2M1, 16K, 2M1, 1K, M1, 3K, EL [62] Row 24: EL, 60P, EL [62] Row 25: EL, 5K, M1, 1K, 2M1, 18K, 2M1, 1K, M1, 10K, M1, 1K, 2M1, 18K, 2M1, 1K, M1, 5K, EL [74] Row 26: EL, 72P, EL [74] Row 27: EL, 7K, M1, 1K, 2M1, 20K, 2M1, 1K, M1, 14K, M1, 1K, 2M1, 20K, 2M1, 1K, M1, 7K, EL [86] Row 28: EL, 84P, EL [86] Row 29: EL, 9K, M1, 1K, 2M1, 22K, 2M1, 1K, M1, 18K, M1, 1K, 2M1, 22K, 2M1, 1K, M1, 9K, EL [98] Row 30: EL, 96P, EL [98] Row 31: EL, 11K, M1, 1K, 2M1, 24K, 2M1, 1K, M1, 22K, M1, 1K, 2M1, 24K, 2M1, 1K, M1, 11K, EL [110] Row 32: EL, 108P, EL [110] Row 33: EL, 13K, M1, 1K, 2M1, 26K, 2M1, 1K, M1, 26K, M1, 1K, 2M1, 26K, 2M1, 1K, M1, 13K, EL [122] Row 34: EL, 120P, EL [122] Row 35: EL, 15K, M1, 1K, 2M1, 28K, 2M1, 1K, M1, 30K, M1, 1K, 2M1, 28K, 2M1, 1K, M1, 15K, EL [134] Row 36: EL, 132P, EL [134] Row 37: EL, 17K, M1, 1K, 2M1, 30K, 2M1, 1K, M1, 34K, M1, 1K, 2M1, 30K, 2M1, 1K, M1, 17K, EL [146] Row 38: EL, 144P, EL [146] Row 39: EL, 19K, M1, 1K, 2M1, 32K, 2M1, 1K, M1, 38K, M1, 1K, 2M1, 32K, 2M1, 1K, M1, 19K, EL [158] Row 40: EL, 156P, EL [158] Row 41: EL, 21K, M1, 1K, 2M1, 34K, 2M1, 1K, M1, 42K, M1, 1K, 2M1, 34K, 2M1, 1K, M1, 21K, EL [170]
Row 42 – Separate sleeves: EL, 24P, bind off 36 stitches, 48P, bind off 36 stitches, 24P, EL [98 remaining] — Important note: when binding off, do NOT count the first slipped stitch; counting starts from the 2nd stitch. The last bound-off stitch goes back on the needle as your first stitch.
Rows 43–52 (body):
- Odd rows: EL, 96K, EL [98]
- Even rows: EL, 96P, EL [98] Work 10 rows.
Rows 53–57: EL, (2K, 2P) × 24, EL [98] — 5 rows of 2×2 rib (bottom hem)
Row 58: Bind off all stitches. Do NOT cut the yarn.
Button Band
Using crochet hook 2.5 mm, insert into the remaining loop from the last bound-off stitch, chain 1, then work sc along the front edge of the cardigan, inserting your hook into each edge stitch. Keep your tension loose — don’t pull tight or the band will pucker.
Row 1: 29 sc, chain 1 Row 2: 1 sc, (chain 2, skip 2 sc, 3 sc) × 5, chain 2, skip 2 sc, 1 sc, chain 1 [29] — these chain-2 spaces are the buttonholes Row 3: 29 sc
Fasten off, weave in end. On the opposite front edge, sew 6 decorative buttons no larger than 10 mm in diameter, aligned with the buttonholes.
Pattern – Part 10: Bucket Hat
Work in green yarn.
Round 1: 6 sc in MR [6] Round 2: inc × 6 [12] Round 3: (1 sc, inc) × 6 [18] Round 4: (2 sc, inc) × 6 [24] Round 5: (3 sc, inc) × 6 [30] Round 6: 2 sc, inc, (4 sc, inc) × 5, 2 sc [36] Round 7: (5 sc, inc) × 6 [42] Round 8: Through back loops only – 42 sc (this creates the brim fold line) Round 9: 42 sc Round 10: (6 sc, inc) × 6 [48] Rounds 11–12: 48 sc – 2 rounds straight
Switch to hdc for the brim:
Round 13: Through back loops only – (2 hdc, inc) × 16 [64] Rounds 14–16: 64 hdc – 3 rounds straight
Finish with 2 slip stitches. Fasten off, weave in end.
Place the hat jauntily on Philipp’s head!
Assembly Summary
- Wings are joined directly during body crocheting in Round 43.
- Legs are joined during body crocheting in Round 4.
- The head is attached to the body via the disc-and-cotter-pin joint system — this allows the head to rotate.
- The beak is sewn on over the eye cinch points.
- Dress Philipp in his cardigan, button it up, and pop the hat on his head.
- Give his cheeks a gentle dusting of pink blush. Step back and admire your work!
Tips for Intermediate Crafters
- Work with stitch markers throughout — this pattern has a lot of color changes and attachment rounds where your markers will save you from losing count.
- Don’t skip the plastic insole inside the feet — it makes a huge difference in how stable Philipp stands.
- Wrap your wire armatures thoroughly in electrical tape before inserting them, both for safety and to prevent the wire from poking through the yarn over time.
- The cardigan’s button band is worked in crochet even though the body is knitted — this gives a beautiful, clean finish and is much easier than a knitted band. Keep your tension loose!
- For the hair tuft, the fluffier the yarn and the more aggressively you brush it, the more gloriously wild Philipp’s hair becomes.
- Pin the beak carefully before sewing — the placement makes an enormous difference to the final expression of the face.