Adorable Crochet Shrimp Pattern: Easy Amigurumi Tutorial
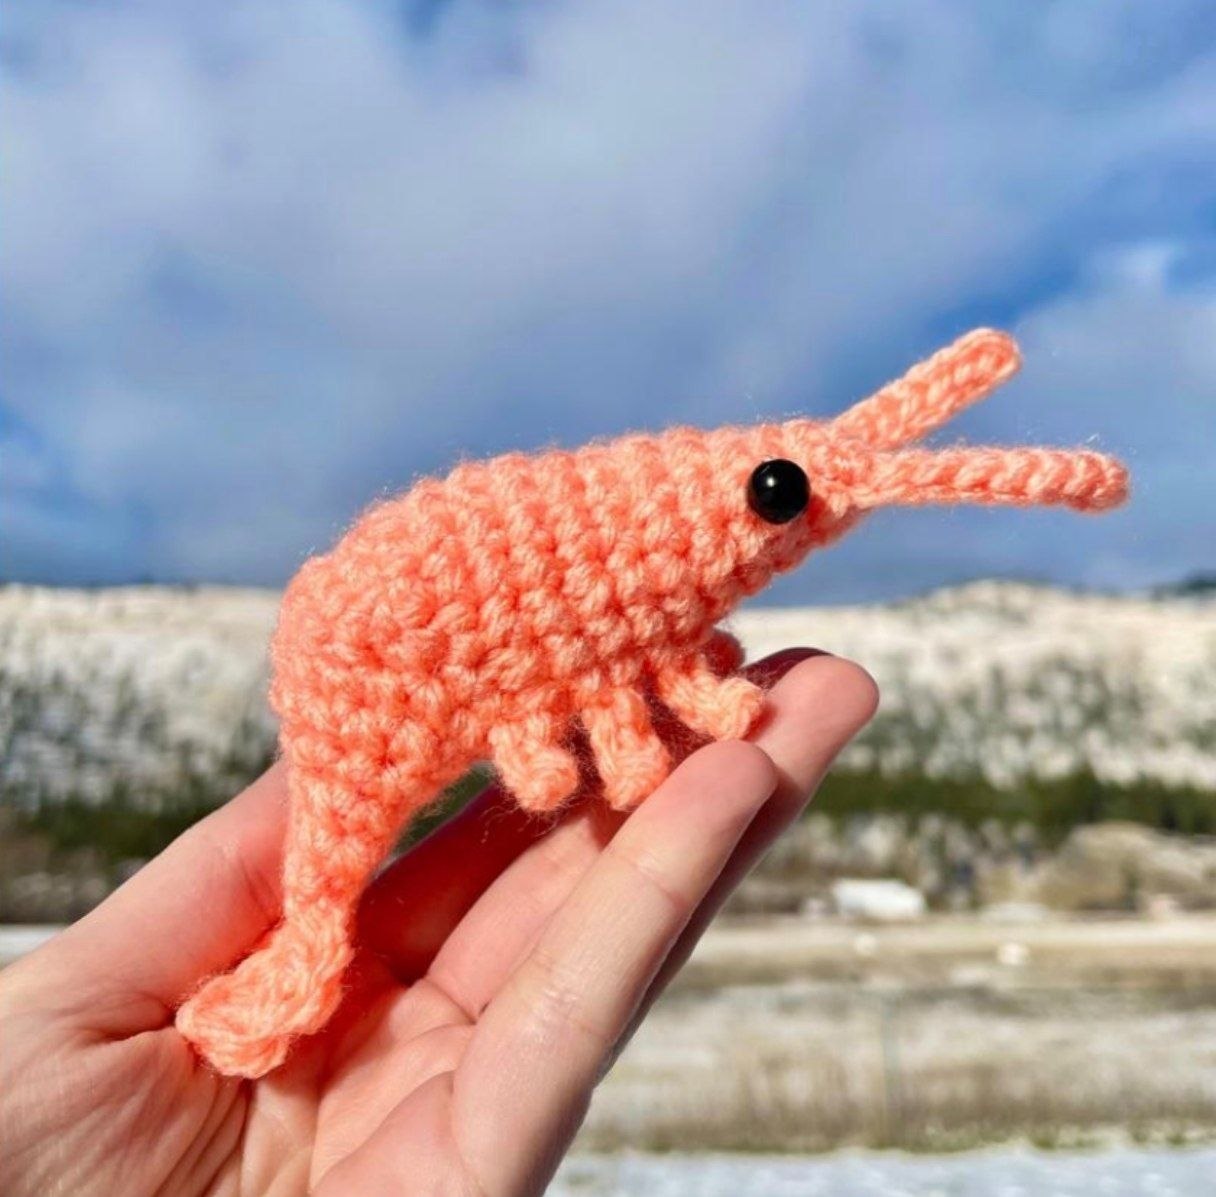
Looking for a quick, cute, and slightly quirky project to add to your amigurumi collection? This crochet shrimp is the perfect weekend project! Whether you are looking for a unique gift, a cute desk companion, or a fun way to use up some scrap yarn, this little crustacean is a delight to make.
This pattern is designed to be beginner-friendly, though it introduces a clever technique to create the characteristic “curve” of a shrimp’s body. By switching from working in continuous rounds to working in rows for a short period, we can give our shrimp its natural shape without needing complex shaping. The finished shrimp measures approximately 5 inches from the antennae to the tail, depending on your tension and yarn choice.
Materials & Abbreviations
To get started, gather the following supplies. While we recommend a peach color for a classic shrimp look, feel free to experiment with different shades of orange, red, or even a whimsical blue!
Materials Needed
- Yarn: Medium weight (4) yarn. Red Heart in “Blushing Peach” is used for the original, but any similar acrylic or cotton blend will work.
- Crochet Hook: Size E (3.5 mm).
- Eyes: 6mm to 8mm safety eyes or small black round beads.
- Stuffing: Polyester fiberfill or scrap yarn.
- Tools: Tapestry needle, stitch marker, and scissors.
US Crochet Terms & Abbreviations
- MR: Magic Ring (or Magic Circle)
- ch: Chain
- sc: Single Crochet
- inc: Increase (two single crochet stitches in the same stitch)
- dec: Decrease (crochet two stitches together; the invisible decrease is recommended for amigurumi)
- sl st: Slip Stitch
- hdc: Half Double Crochet
- dc: Double Crochet
- st(s): Stitch(es)
Step-by-Step Instructions
This pattern is worked primarily in a continuous spiral. Be sure to use a stitch marker to keep track of the beginning of each round.
Part 1: The Body (The Head and Chest)
We begin by shaping the head and adding the first few legs.
- Round 1: Start with a MR and work 6 sc into the ring. (6 sts)
- Round 2: Sc in each st around. (6 sts)
- Round 3: (1 sc, inc) repeat 3 times. (9 sts)
- Round 4: Sc in each st around. (9 sts)
- Round 5: (2 sc, inc) repeat 3 times. (12 sts)
- Round 6: Sc in each st around. (12 sts)
- Round 7: Sc in the first 2 sts. Now we will create the first leg: {ch 4, starting in the 2nd ch from the hook, sl st in the next 3 chs, then sl st back into the body stitch}. Sc in the next 1 st. Repeat the leg sequence {ch 4, sl st in next 3 chs, sl st to body}. Sc in each remaining st until the end of the round. (12 sts)
Pro Tip: If you are using safety eyes, place them now! Position them between rounds 3 and 6 on either side of the head for the cutest expression.
Part 2: The Mid-section and Legs
Continue building the body and adding the remaining legs.
- Round 8: (2 sc, inc) repeat 4 times. (16 sts)
- Round 9: Sc in the first 2 sts, work a leg (repeat the leg sequence from Round 7), sc in the next 3 sts, work another leg, then sc in each remaining st until the end of the round. (16 sts)
- Round 10: Sc in each st around. (16 sts)
- Round 11: Sc in the first 2 sts, work a leg, sc in the next 4 sts, work another leg, then sc in each remaining st until the end of the round. (16 sts)
Part 3: Creating the Body Curve
To get the shrimp’s curved shape, we will stop working in spirals and instead work in rows. Important: Do not chain at the start of these rows. Simply turn your work and crochet directly into the last stitch of the previous row.
- Row 12: Turn, sc 8. (Stop one stitch before the end of the row. This creates a “step” we will use later).
- Row 13: Turn, sc 7. (Again, stop one stitch before the end).
- Row 14: Turn, sc 6. (Stop one stitch before the end).
- Row 15: Turn, sc 6. Now, work 1 sc into the “step” (the skipped stitch from Row 14). You have now reached the end of the row.
Begin stuffing the body now. Stuff lightly as you move toward the tail to keep the shrimp’s shape flexible.
Part 4: Finishing the Body
Now we return to working in rounds to close the body and form the tail.
- Round 16: Sc 8, work 1 sc into the next “step” (the skipped stitch from Row 13), then sc in the remaining 7 sts. (16 sts)
- Round 17: Sc in each st around. (16 sts)
- Round 18: (1 sc, dec) repeat 5 times, sc in the last st. (11 sts)
- Round 19: Sc in each st around. (11 sts)
- Round 20: (1 sc, dec) repeat 3 times, sc in the last 2 sts. (8 sts)
- Round 21: Sc in each st around. (8 sts)
Fasten off, leaving a tail for sewing. Flatten the end of the body and use a whipstitch or running stitch to sew the opening closed.
Accessories
Tail Fins (Make 2)
- Ch 5. Starting in the 2nd ch from the hook: 1 hdc, 1 dc, 1 hdc, 1 sc.
- Fasten off, leaving a long tail for sewing.
Antennae (Make 2)
- Ch 9. Starting in the 2nd ch from the hook: sl st in each ch across.
- Fasten off, leaving a long tail for sewing.
Finishing & Assembly
Now it’s time to bring your shrimp to life!
- The Tail: Place the two tail fins side-by-side and sew them together at the base, then sew them securely to the end of the body.
- The Antennae: Sew the antennae to the sides of the nose (the very beginning of the project). Make sure they are symmetrical.
- Final Touches: Give your shrimp a little squeeze to ensure the stuffing is evenly distributed and the curve looks natural.
Tips for Success
Perfecting the Curve
The “step” method used in Rows 12-15 is what gives the shrimp its personality. When working these rows, maintain a firm tension. If your stitches are too loose, the curve may look saggy or create gaps in the fabric.
The Invisible Decrease
To keep the body smooth and prevent holes, use the invisible decrease. Instead of inserting your hook through both stitches, insert it into the front loops only of the next two stitches, then complete the sc. This creates a much cleaner finish.
Customizing Your Shrimp
Want a jumbo shrimp? Simply use a larger hook and a bulkier yarn (like a chunky chenille yarn). The stitch counts remain the same, but the final size will increase significantly!