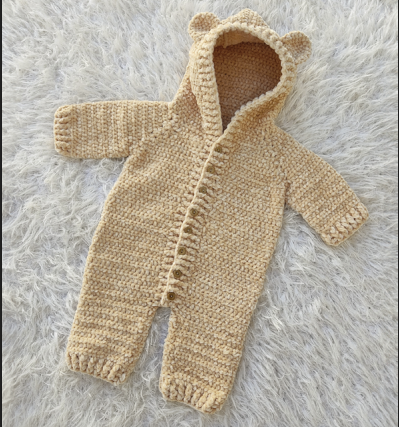
Cozy Up Your Little One: A Beginner-Friendly Plush Onesie Crochet Pattern
The Sleeves (Make 2)
The sleeves are worked in continuous rounds, joined at the end of each round.
- Start at Yoke: Find the armhole openings on your yoke. You will be working your stitches directly into these spaces.
- Work in Rounds: Work in double crochet (dc) stitches in a continuous spiral (or joined rounds, whichever you prefer) until the sleeve measures 4 inches long.
- Cuff Ribbing: Finish the sleeve with 3 rounds of the “Crochet Rib st” (from the chart). Fasten off and weave in all your ends. Repeat all steps to make the second sleeve.
The Hood
The hood is worked directly onto the neckline of the onesie.
- Foundation Row: Make 60 double crochet (dc) stitches evenly along the neckline edge of your onesie.
- Work the Hood: Continue working back and forth in rows until the hood measures 5.5 inches from where you started it. Fasten off.
Putting It All Together: Assembly & Finishing
You’re so close! Now we bring all the pieces together.
- Close the Hood: Fold the hood in half so the two short sides meet. Using your tapestry needle and yarn, sew the top seam of the hood closed.
- Add the Button Band: Work 4 rows of the “Crochet Rib st” (from the chart) along the entire open front edge of the onesie and all around the front opening of the hood. This creates a neat, sturdy edge for your buttons.
- Sew on the Ears: Refer to the picture for placement. Using the long tails you left, sew the two ears onto the top of the hood.
- Close the Leg Seam: Sew up the small gap you left between the legs.
- Attach the Buttons: Overlap the left front panel over the right front panel. Mark where you want your buttons to go, spacing them evenly along the ribbed edge. Sew the 8 buttons securely onto the right front panel (the one underneath). Make sure they line up with the buttonholes created by the ribbing on the left side.
A Quick Note for Beginners
- Trust the Chart: Charts can look intimidating, but they are just a visual map of the pattern. Compare each symbol to your “Abbreviations Cheat Sheet” and take it one stitch at a time.
- Count Your Stitches: It’s easy to accidentally lose or gain a stitch, especially when working with plush yarn. Placing a stitch marker in your first and last stitch of each row can be a lifesaver!
- Chenille Yarn Tips: This type of yarn is beautiful but can be a little slippery. Work at a comfortable, steady pace. If you make a mistake, slowly pull the yarn to undo your stitches to avoid breaking the plush fibers.
And there you have it! A gorgeous, handmade plush onesie, created with love. We hope you enjoy making this cozy creation as much as we enjoyed sharing it with you. Happy crocheting
Pages: 1 2