DIY Crochet Sun Pillow Pattern: A Cute and Easy Amigurumi Tutorial
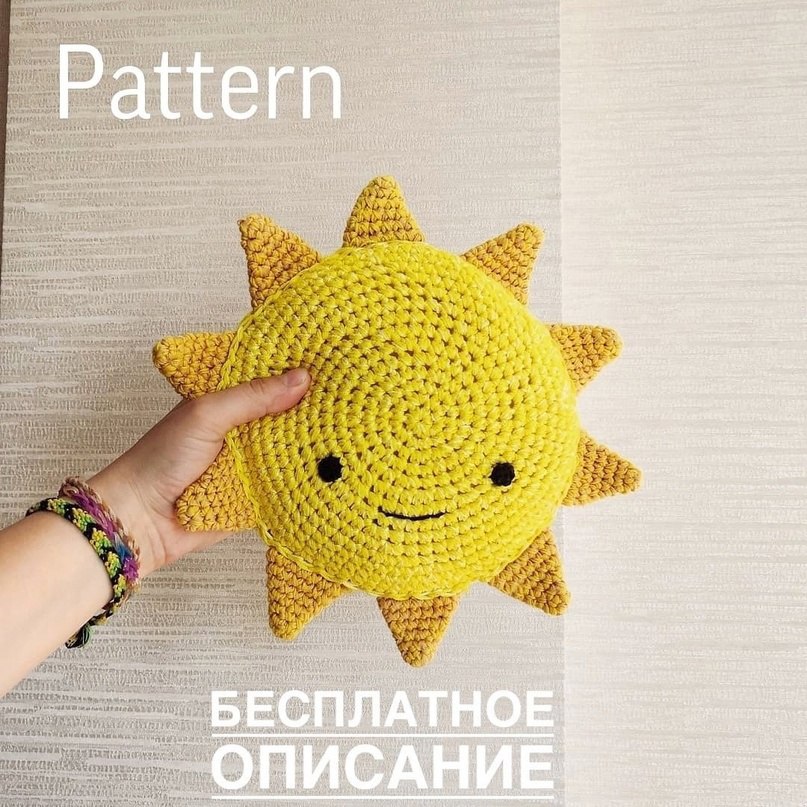
Are you looking for a way to brighten up a nursery, a child’s bedroom, or even your own living room decor? This adorable Crochet Sun Pillow is the perfect project! With its cheerful smiley face and sunny yellow rays, this plush pillow is designed to bring a little bit of warmth and joy wherever it sits. Not only is it a wonderful decorative piece, but it also makes a thoughtful, handmade gift for baby showers or birthdays.
The best part about this pattern is that it is incredibly beginner-friendly. If you know the basics of crochet—like how to make a magic ring and work single crochets—you are well on your way to creating this sunshine masterpiece. In this tutorial, I will walk you through every single step, from crafting the perfect sunny base to assembling the rays, ensuring you have a professional-looking result that you can be proud of.
Materials & Abbreviations
Before we pick up our hooks, let’s make sure you have everything you need. To achieve that dense, high-quality amigurumi look where the stuffing doesn’t peek through the stitches, I recommend using slightly thicker yarn or multiple strands.
Materials
- Crochet Hook: A 6mm (approximately J/10) crochet hook is recommended. Using a slightly larger hook for the yarn helps create a firm, tight fabric that is perfect for pillows.
- Yarn: You can use a variety of yarns, but for the best results, I suggest a cotton blend or 100% cotton.
- Option 1: Use a cotton blend such as Alize Cotton Baby Soft or YarnArt Jeans.
- Option 2: For a thicker, more textured pillow, use two strands of cotton yarn held together at once (such as VITA Cotton Charm or any standard medium-weight cotton).
- Colors: Bright yellow for the body and rays, and a small amount of black yarn or embroidery floss for the face.
- Stuffing: High-quality polyester fiberfill (often called poly-fill or sintepon) to keep the sun plump and soft.
- Tools: A large-eye tapestry needle (to sew the pieces together), scissors, and a stitch marker to keep track of your rounds.
Abbreviations
This pattern uses standard US crochet terms. Please ensure you are using US terminology to avoid any confusion with stitch heights!
- MR: Magic Ring (also known as a magic circle)
- ch: Chain
- sc: Single crochet
- inc: Increase (working two single crochets into the same stitch)
- dec: Decrease (joining two stitches into one)
- st(s): Stitch(es)
- R: Round
Step-by-Step Instructions
The Sun Body
You will need to crochet two identical circular pieces to create the front and back of your sun pillow. These rounds will expand in a spiral to create a flat circle, which we will then stuff to create the pillow shape.
Round 1: Start with a Magic Ring and work 6 sc into the ring. (6 sts)
Round 2: *1 sc, inc* repeat 6 times. (12 sts)
Round 3: *2 sc, inc* repeat 6 times. (18 sts)
Round 4: *3 sc, inc* repeat 6 times. (24 sts)
Round 5: *4 sc, inc* repeat 6 times. (36 sts)
Round 6: *5 sc, inc* repeat 6 times. (42 sts)
Round 7: *6 sc, inc* repeat 6 times. (48 sts)
Round 8: *7 sc, inc* repeat 6 times. (54 sts)
Round 9: *8 sc, inc* repeat 6 times. (60 sts)
Round 10: *9 sc, inc* repeat 6 times. (66 sts)
Round 11: *10 sc, inc* repeat 6 times. (72 sts)
Round 12: *11 sc, inc* repeat 6 times. (78 sts)
Round 13: *12 sc, inc* repeat 6 times. (84 sts)
Round 14: *13 sc, inc* repeat 6 times. (90 sts)
Rounds 15-16: Work 1 sc in every stitch around. (90 sts)
Note: If you want a larger sun pillow, you can continue adding increase rounds. Just remember that you must finish with at least two rounds of plain single crochet (no increases) to create a stable edge for sewing.
The Sun Rays
You will need to make 10 rays. These are small, pointed pieces that will be sewn around the edge of the sun.
Starting: Work 4 sc into a Magic Ring. (4 sts)
Round 1: *1 sc, inc* repeat 2 times. (6 sts)
Round 2: *2 sc, inc* repeat 2 times. (8 sts)
Round 3: *3 sc, inc* repeat 2 times. (10 sts)
Round 4: *4 sc, inc* repeat 2 times. (12 sts)
Round 5: *5 sc, inc* repeat 2 times. (14 sts)
Round 6: *6 sc, inc* repeat 2 times. (16 sts)
Note: If you chose to make a much larger sun body, you can make the rays longer by adding more rounds. To do this, simply increase the number of stitches between your increases by one stitch in every new round.
The Face
Once your two sun circles are finished, choose one to be the “front” face. Using black yarn or black embroidery floss and your tapestry needle, embroider a simple happy face. You can do two small solid black circles for eyes and a gentle curved line for the smile. This is where you can add your own personality—maybe give your sun some rosy cheeks with a little bit of pink yarn!
Assembly
This is the most important part to get right! We are going to sew the two large circles together while simultaneously sandwiching the rays between them.
To make the math work perfectly, we will use a specific rhythm. Each ray, when sewn, will effectively occupy 8 stitches of the circle’s circumference, and there will be a 1-stitch gap between each ray. This ensures all 90 stitches of your sun body are accounted for (10 rays x 8 stitches + 10 gaps x 1 stitch = 90 stitches).
- Place your “front” circle (the one with the face) on a flat surface.
- Thread your tapestry needle with the yellow yarn.
- Pick up one stitch on the front circle and pull it through to the back.
- Take your first ray and place it against the edge. Sew through two stitches of the ray to secure it to the front piece.
- Now, take the second circle (the back) and sew it to the ray by going from the back to the front.
- Continue this pattern: 1 stitch from the front, 2 stitches through the ray, 1 stitch from the back, leaving a 1-stitch gap before the next ray.
- Repeat this process until all 10 rays are attached and the circles are joined.
Finishing
Before you close the last few stitches of the sun body, stop! You need to stuff your sun. Take your polyester fiberfill and stuff the sun through the opening. Make sure to push the stuffing into the ends of the rays as well so they stay pointed and firm. Once the sun is plump and feels soft, use your tapestry needle to sew the remaining stitches closed, weaving the yarn into the inside of the pillow to hide the tail.
Tips
- Tension is Key: When working with amigurumi, try to keep your stitches tight. If your stitches are too loose, the white stuffing will show through the yellow yarn, which can look a bit messy.
- Use Stitch Markers: Since you are working in continuous rounds, it is very easy to lose your place. Always use a stitch marker to identify the first stitch of every round.
- The “Two-Strand” Trick: If you find your sun feels a bit floppy, try holding two strands of yarn together while you crochet. This will make the fabric much thicker and more durable.
- Perfecting the Rays: If you want your rays to be even more “pointy,” you can add a few decreases at the very end of the ray pattern, though the current pattern creates a lovely, soft triangular shape.