How to Crochet a Cute Amigurumi Baby Bunny: A Step-by-Step Tutorial
Are you looking for a quick, adorable, and heartwarming crochet project? There is nothing quite like a tiny amigurumi animal to brighten up a desk, a nursery, or a bookshelf. This miniature Baby Bunny is the perfect project for crocheters who love “pocket-sized” companions. With its cozy little scarf and chubby proportions, this bunny is a total crowd-pleaser.
In this detailed tutorial, we will walk through every single stitch required to create this little guy. Whether you are a beginner looking to practice your amigurumi basics or an intermediate crafter looking for a relaxing afternoon project, this guide is designed to help you succeed. We will cover everything from the initial magic ring to the final decorative button on his tiny scarf.
Introduction
Amigurumi, the Japanese art of knitting or crocheting small, stuffed yarn creatures, relies heavily on tight tension and consistent stitch counts. This Baby Bunny is designed to be worked in rounds, creating a dense fabric that prevents your stuffing from peeking through. This project is particularly wonderful because it utilizes small amounts of yarn, making it an excellent way to use up your leftover scraps.
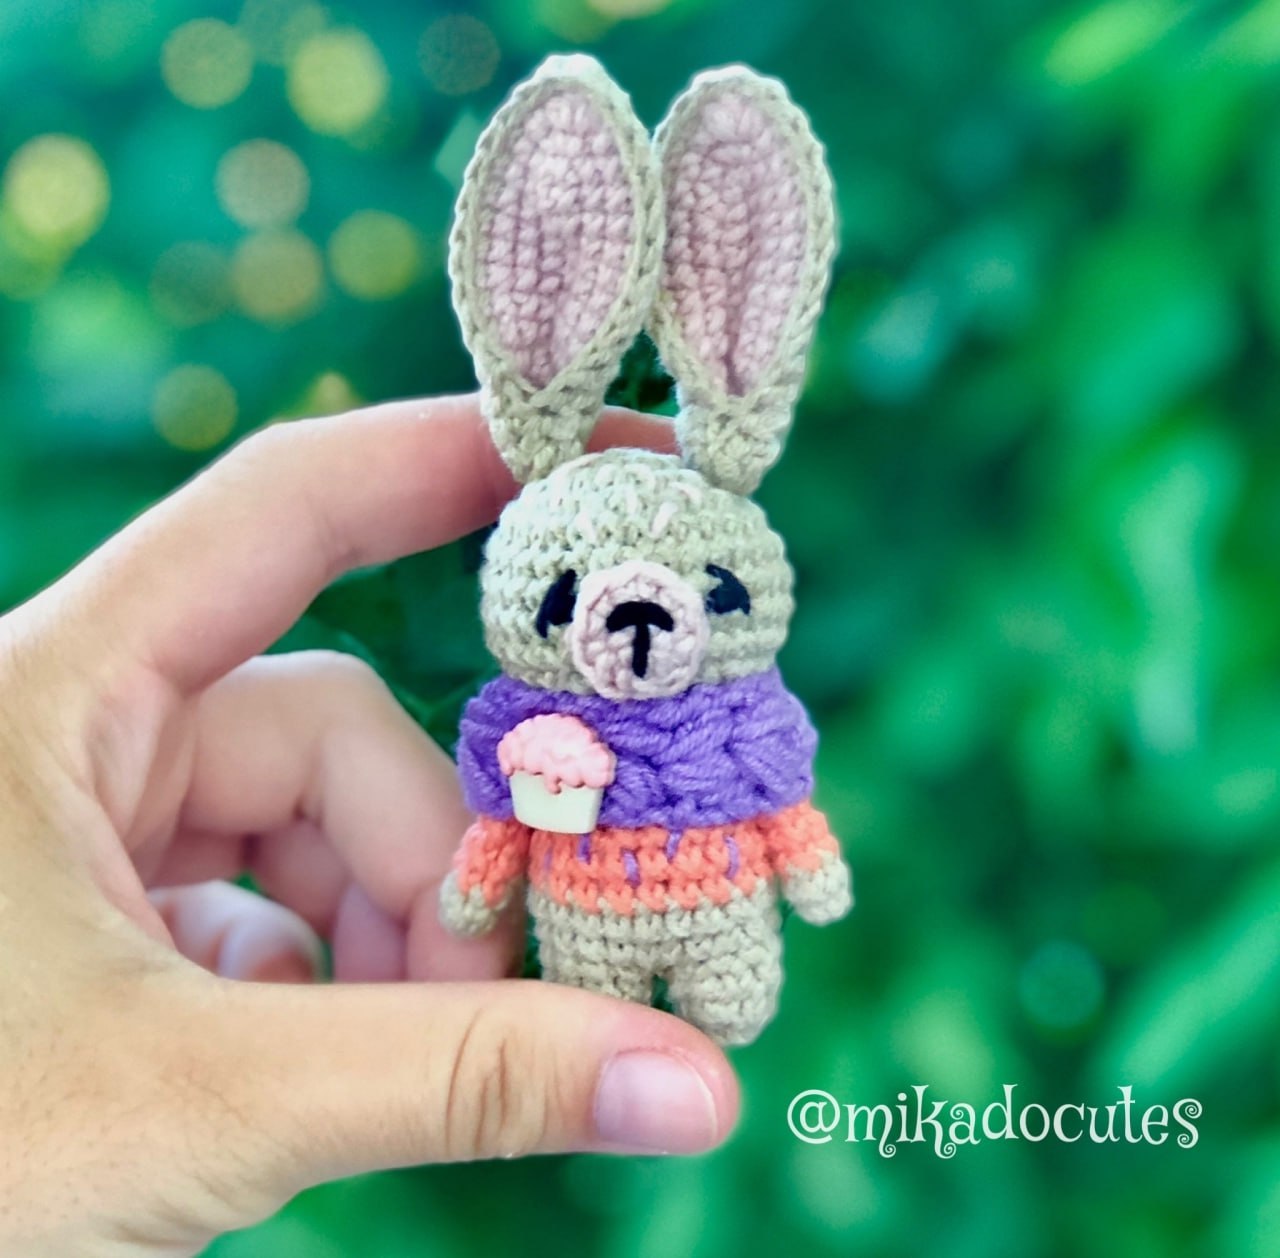
The finished bunny is a miniature size, roughly 3 to 4 inches tall depending on your tension and the specific yarn weight you choose. He features a color-blocked body, long expressive ears, and a charming shell-stitch scarf. Grab your hook and let’s get started on making your very own crochet bunny friend!
Materials & Abbreviations
Materials Needed
To achieve the look seen in the photos, I recommend using a cotton/acrylic blend yarn. This provides the structure needed for amigurumi while remaining soft to the touch.
- Yarn: Sport weight or DK weight yarn (approx. 160 yards per 50g). You will need the following colors:
- Beige (Main body color)
- Pale Pink (Ear interiors)
- Orange (Body detail and arm detail)
- Lilac/Purple (Scarf)
- Black (For facial details)
- Crochet Hook: 2.00 mm (or the size recommended to achieve a very tight tension).
- Stuffing: Polyester fiberfill.
- Notions:
- Stitch markers (essential for working in rounds).
- Tapestry needle for sewing and weaving in ends.
- Pins or long needles to hold pieces in place before sewing.
- A small decorative button for the scarf.
Abbreviations (US Terms)
Please ensure you are using US terminology to follow this pattern correctly. If you are used to UK terms, please note the differences in stitch names.
- MR: Magic Ring (or Magic Circle)
- ch: Chain
- sc: Single crochet
- inc: Increase (2 sc in one stitch)
- dec: Invisible decrease (decrease 2 stitches together)
- hdc: Half double crochet
- dc: Double crochet
- sl st: Slip stitch
- R: Round
- BLO: Back loop only
- FLO: Front loop only
- Cluster Stitch: A group of 3 hdc worked into a single stitch with a shared top.
Step-by-Step Instructions
The Legs (Make 2)
Use Beige yarn.
R1: 6 sc in a MR (6)
R2: (inc, sc) repeat 3 times (9)
R3: 9 sc (9)
For Leg 1: Work 1 sl st, fasten off, and weave in the end.
For Leg 2: Work 3 more sc, then do not fasten off. You will continue directly into the body construction.
The Body
Start with Beige yarn. Attach Leg 1 to your hook.
R1: inc, 8 sc along the edge of Leg 1, inc, 8 sc along the edge of Leg 2 (20)
R2-3: 20 sc (20) (Beige)
Switch to Orange yarn.
R4-5: 20 sc (20)
R6: 4 sc, dec, 8 sc, dec, 4 sc (18)
R7-8: 18 sc (18)
R9: (dec, sc) repeat 6 times (12)
Fasten off, leaving a long tail for sewing the head. Stuff the body firmly with fiberfill.
The Head
Use Beige yarn.
R1: 6 sc in a MR (6)
R2: 6 inc (12)
R3: (inc, sc) repeat 6 times (18)
R4: (sc, inc, sc) repeat 6 times (24)
R5: (3 sc, inc) repeat 6 times (30)
R6-9: 30 sc (30)
R10: (3 sc, dec) repeat 6 times (24)
R11: (sc, dec, sc) repeat 6 times (18)
R12: (dec, sc) repeat 6 times (12)
Fasten off, leave a long tail for sewing, and stuff the head well.
The Arms (Make 2)
Start with Beige yarn.
R1: 6 sc in a MR (6)
R2: 6 sc (6)
Switch to Orange yarn.
R3-7: 6 sc (6)
To create the arm shape, fold the piece in half. In R7, work 2 sc through both layers of the folded edge.
For Arm 1: Fasten off and hide the end.
For Arm 2: Fasten off, but leave a long tail for sewing.
The Ears (Make 2)
The ears are worked in two parts: an inner piece and an outer piece, which are then joined.
Inner Ear
Use Pale Pink yarn. Chain 11. Starting from the 2nd chain from the hook, work around the chain.
R1: (3 sc in the first stitch, 8 sc) repeat 2 times (22)
R2: sc, 3 sc in one stitch, 10 sc, 3 sc in one stitch, 9 sc (26)
R3: 2 sc, inc, 12 sc, (1 hdc, 1 dc, 1 hdc) in one stitch, 10 sc (29), sl st to close. Fasten off.
Outer Ear
Use Beige yarn. Chain 11. Starting from the 2nd chain from the hook, work around the chain.
R1: (3 sc in the first stitch, 8 sc) repeat 2 times (22)
R2: sc, 3 sc in one stitch, 10 sc, 3 sc in one stitch, 9 sc (26)
R3: 2 sc, inc, 12 sc, (1 hdc, 1 dc, 1 hdc) in one stitch, 10 sc (29)
R4: Place the inner pink piece against the outer beige piece with the “right sides” facing outward. Work 29 sc around the entire perimeter of both joined pieces. Fasten off, leaving a long tail. To finish the ear shape, fold the bottom tip inward and secure it with a needle and thread.
The Scarf
Use Lilac yarn. Worked in rows.
Foundation: Chain 6.
R1: Starting in the 4th chain from the hook: (hdc, ch, hdc), dc in the last chain. Fasten off/turn.
R2: 2 ch (turning chain), work only into the chain spaces from the previous row: (hdc, ch, hdc), dc in the last chain space.
R3-10: Repeat R2 for 8 more rows.
Finishing
Assembly
This is where your bunny truly comes to life! Follow these steps carefully:
- Head to Body: Pin the head to the body using stitch markers. Ensure it is centered. Using the long tail from the body, sew the head to the body with a whip stitch.
- Ears: Position the ears on top of the head. They should be slightly angled outwards for a cute look. Sew them securely through both the head and the ear layers.
- Arms: Sew the arms to the sides of the body, just below the neck area.
- Face: Using black yarn and a very fine needle, embroider a small “T” shape or two small vertical lines to create the nose and mouth. You can also add tiny eyes if you prefer.
- The Scarf: Wrap the lilac scarf around the bunny’s neck. Sew the two ends together at the back of the neck. Finally, sew your small decorative button to the front of the scarf to complete the look.
Tips
To ensure your bunny looks professional and polished, keep these tips in mind:
- Invisible Decreases: When working decreases, always use the “invisible decrease” method (working only through the front loops of the next two stitches). This prevents large gaps in your amigurumi.
- Tension is Key: If you see stuffing poking through your stitches, your tension is too loose. Try using a smaller hook or pulling your stitches tighter.
- Stuffing: Don’t be afraid to stuff the head and body firmly, but be careful not to overstuff the neck area, or the head might sit crookedly.
- Color Changes: To keep color changes looking clean, pull the new color through the last two loops of the previous stitch when you finish the last stitch of the old color.