DIY Crochet Bunny Rattle Pattern: A Soft & Sweet Baby Comforter Tutorial
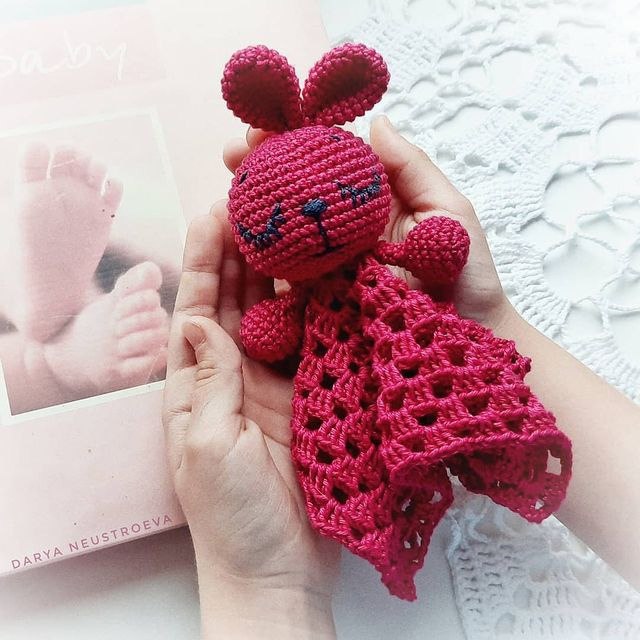
Are you looking for the perfect, handmade gift for a baby shower or a new arrival? There is something incredibly special about a handmade “lovey” or comforter. Not only is it a beautiful addition to a nursery, but it also provides a soft, tactile companion for infants to snuggle with during naptime. This adorable crochet bunny rattle—a mini comforter—is the perfect project for intermediate beginners looking to practice amigurumi techniques and lace work.
This project combines a sturdy, cute bunny head with a delicate, lacy crochet square, creating a multi-textured toy that babies love to touch. In this tutorial, we will walk through every step, from crafting the bunny’s head to creating the lacy base, ensuring you have a professional-looking finished product.
Materials & Abbreviations
Before you pick up your hook, gather your supplies. For baby items, I highly recommend using soft, breathable materials like 100% cotton or a high-quality cotton-acrylic blend. Avoid using anything with long fibers that could shed or pose a choking hazard.
Supplies Needed
- Yarn: Medium weight (Size 4) cotton or cotton-blend yarn in your choice of color (the sample uses a vibrant raspberry pink).
- Crochet Hook: 3.5mm (E) or 4.0mm (G) hook, depending on your tension.
- Stuffing: Polyester fiberfill for the head and arms.
- Embroidery Thread: Dark blue or black for the facial features.
- Tapestry Needle: For sewing pieces together and embroidery.
- Scissors.
- Optional: A small rattle bell to insert inside the head during stuffing.
Abbreviations (US Terms)
- MR: Magic Ring
- Ch: Chain
- Sl st: Slip stitch
- Sc: Single crochet
- Dc: Double crochet
- Inc: Increase (2 stitches in the same stitch)
- Dec: Decrease (sc 2 stitches together)
- St(s): Stitch(es)
- Rnd: Round
Step-by-Step Instructions
The Bunny Head
The head is worked in continuous rounds to create a seamless amigurumi sphere. Start with your chosen pink yarn.
- Rnd 1: 6 sc in a magic ring (6)
- Rnd 2: 6 inc (12)
- Rnd 3: (1 sc, 1 inc) repeat 6 times (18)
- Rnd 4: (2 sc, 1 inc) repeat 6 times (24)
- Rnd 5: (3 sc, 1 inc) repeat 6 times (30)
- Rnd 6: (4 sc, 1 inc) repeat 6 times (36)
- Rnd 7: (5 sc, 1 inc) repeat 6 times (42)
- Rnd 8: (6 sc, 1 inc) repeat 6 times (48)
- Rnds 9-14: Sc in each st around (48)
- Rnd 15: (6 sc, 1 dec) repeat 6 times (42)
- Rnd 16: (5 sc, 1 dec) repeat 6 times (36)
- Rnd 17: (4 sc, 1 dec) repeat 6 times (30)
- Rnd 18: (3 sc, 1 dec) repeat 6 times (24)
- Rnd 19: (2 sc, 1 dec) repeat 6 times (18)
- Rnd 20: (1 sc, 1 dec) repeat 6 times (12)
- Rnd 21: 6 dec (6)
Fasten off, leaving a long tail for sewing. Stuff the head firmly with fiberfill. If you are making the rattle version, ensure the bell is securely tucked into the center of the stuffing.
The Bunny Ears
Make two ears using the same yarn as the head.
- Rnd 1: 6 sc in a magic ring (6)
- Rnd 2: 6 inc (12)
- Rnd 3: (1 sc, 1 inc) repeat 6 times (18)
- Rnds 4-6: Sc in each st around (18)
- Rnd 7: (7 sc, 1 dec) repeat twice (16)
- Rnd 8: (6 sc, 1 dec) repeat twice (14)
- Rnd 9: (5 sc, 1 dec) repeat twice (12)
- Rnd 10: 12 sc
Do not stuff the ears. Instead, fold them in half lengthways and crochet through both layers along the open edge to seal them. Leave a long tail for sewing to the head.
The Bunny Arms
Make two arms.
- Rnd 1: 6 sc in a magic ring (6)
- Rnd 2: 6 inc (12)
- Rnd 3: (1 sc, 1 inc) repeat 6 times (18)
- Rnds 4-6: Sc in each st around (18)
- Rnd 7: (1 sc, 1 dec) repeat 6 times (12)
- Rnd 8: 6 dec (6)
- Rnds 9-12: 6 sc (6)
Stuff only the bottom portion of the arm. Fold the arm in half and crochet through both sides to close. Leave a tail for sewing.
The Lacy Comforter Base
The base is a decorative lacy square. To achieve the square shape seen in the photo, work the increases at the four corners.
- Rnd 1: 5 dc in a magic ring.
- Rnd 2: [1 dc, ch 1] in each st around.
- Rnd 3: [2 dc, ch 1] in each st around.
- Rnd 4: [3 dc, ch 1] in each st around.
- Rnd 5: [4 dc, ch 1] in each st around.
- Rnd 6: [5 dc, ch 1] in each st around.
- Rnd 7: [6 dc, ch 1] in each st around.
Note: To ensure the piece remains a square rather than a circle, when you reach the corner stitches, work your increases (e.g., 2 dc, ch 1, 2 dc) into that single corner stitch.
Finishing
Assembly
- Attach the Head: Using your tapestry needle and the tail from the head, sew the base of the head to the center of the lacy square.
- Attach the Ears: Position the ears on the top of the head, roughly 1/3 of the way down from the top, and sew securely.
- Attach the Arms: Sew the arms to the sides of the head, just below the ear level.
- Embroider the Face: This is where your bunny comes to life! Using dark embroidery thread, stitch two simple curved lines for eyes and a small nose/mouth shape. As seen in the photo, a whimsical, slightly uneven “smile” adds lots of character.
Tips for Success
Safety First
When making items for babies, safety is the number one priority. While many crocheters use plastic safety eyes, for an infant toy, embroidery is much safer. It eliminates the risk of small parts becoming detached. Always give your finished item a “tug test” to ensure all parts are securely attached.
Tension and Gauge
Since this toy will be handled and squeezed, try to maintain a tight, consistent tension. This prevents the stuffing from peeking through the stitches. If your stitches feel a bit loose, consider dropping down a hook size.
Washing Instructions
Handmade baby items will eventually need cleaning. I recommend hand washing this bunny in cool water with a mild, baby-safe detergent. Lay it flat on a towel to air dry. Avoid using a dryer, as the heat can affect the shape of the amigurumi and the texture of the cotton yarn.
Happy crocheting!