How to Crochet a Cute Capybara Amigurumi: A Step-by-Step Tutorial
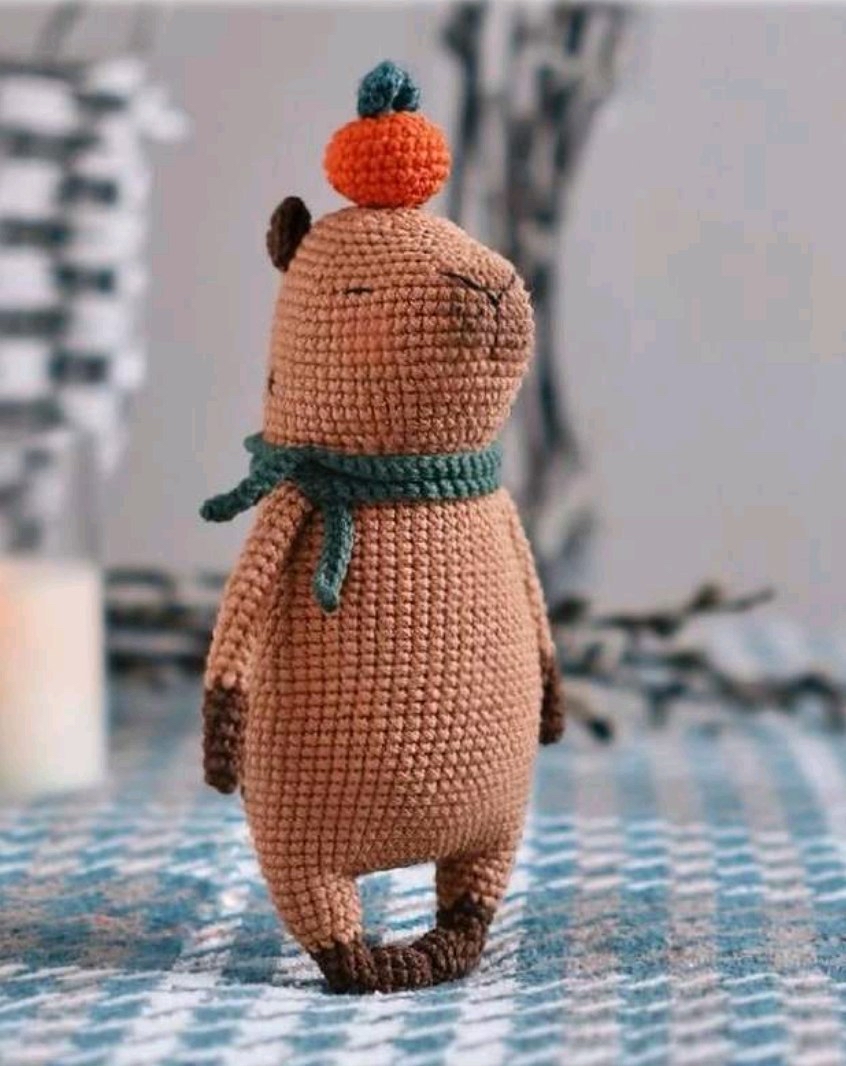
If you are looking for your next adorable crochet project, look no further! The capybara has become a total internet sensation, and for good reason—these giant rodents are the epitome of chill. In this tutorial, I will walk you through how to create your very own crochet capybara amigurumi. This little guy is approximately 7 to 8.5 inches tall, making it the perfect size for a desk companion, a nursery decoration, or a unique gift for a friend.
This pattern is designed to be beginner-friendly. While you should have a basic understanding of amigurumi techniques, I have broken everything down into simple, easy-to-follow steps. Grab your hook and some cozy yarn, and let’s get started!
Materials & Abbreviations
To ensure your capybara turns out looking professional and sturdy, I recommend using cotton-blend yarn. This provides excellent stitch definition, which is crucial for amigurumi.
Materials Needed
- Yarn (Cotton Blend preferred):
- Body: Light brown or tan (approximately 360 yards)
- Feet, Arms, and Ears: Dark brown (approximately 175 yards)
- Scarf: Green (approximately 175 yards)
- Orange Accessory: Orange and Green (approximately 175 yards)
- Crochet Hook: 1.25 mm (or a size that creates a tight tension)
- Stuffing: Polyfill or similar synthetic fiberfill
- Wire: 1 mm gauge wire (for poseable arms)
- Tools: Large sewing needle, stitch markers, scissors, and pins
- Detailing: Pastel (dry or oil-based) for shading and blushing
Abbreviations (US Terms)
- MR: Magic Ring
- Ch: Chain
- Sl st: Slip stitch
- Sc: Single crochet
- Hdc: Half double crochet
- Dc: Double crochet
- Tr: Treble crochet
- Inc: Increase (2 sc in one stitch)
- Dec: Decrease (sc 2 together)
Step-by-Step Instructions
The Legs and Body
We will begin by crocheting the legs and then joining them to create the body. This creates a seamless, sturdy base.
First Leg
Start with dark brown yarn.
- Round 1: 6 sc in a MR (6)
- Round 2: (inc, sc) x 3 (9)
- Rounds 3-4: 9 sc (9)
- Rounds 5-6: 5 hdc, 4 dc (9)
- Round 7: 1 dc, 5 hdc, 3 dc (9)
- Round 8: 9 sc (9)
- Round 9: 8 sc, inc (10)
Switch yarn color to light brown.
- Round 10: 1 sc, inc, 4 sc, inc, 3 sc (12)
- Round 11: (3 sc, inc) x 3 (15)
- Round 12: 14 sc (Do not end the round yet)
Second Leg
Crochet the second leg exactly like the first leg from Rounds 1 through 11. For Round 12, work 15 sc.
Connecting the Body
Do not cut the yarn from the second leg. We will now join the two legs together.
- Setup: Chain 10 and join it to the first leg using a sl st.
- Round 13: 15 sc around the first leg, 10 sc on one side of the chain, 15 sc around the second leg, 10 sc on the other side of the chain (50)
- Round 14: 15 sc, inc, 8 sc, inc, 15 sc, inc, 8 sc, inc (54)
- Round 15: 15 sc, inc, 10 sc, inc, 15 sc, inc, 10 sc, inc (58)
Important: At this stage, stuff the legs and the beginning of the body firmly with polyfill.
Body Shaping
To make the body look more natural, we will work the next few rounds. To ensure the start of the row is on the side, work 8-9 sc before marking your new starting point.
- Rounds 16-30: 58 sc (15 rounds)
- Round 31: (dec, 27 sc) x 2 (56)
- Round 32: 56 sc
- Round 33: (dec, 26 sc) x 2 (54)
- Round 34: 54 sc
- Round 35: (dec, 25 sc) x 2 (52)
- Round 36: 52 sc
- Round 37: (dec, 24 sc) x 2 (50)
- Round 38: 50 sc
- Round 39: (dec, 23 sc) x 2 (48)
- Round 40: 48 sc
- Round 41: (dec, 22 sc) x 2 (46)
- Round 42: 46 sc
- Round 43: (dec, 21 sc) x 2 (44)
- Round 44: 44 sc
- Round 45: (dec, 20 sc) x 2 (42)
- Round 46: (dec, 19 sc) x 2 (40)
- Rounds 47-49: 40 sc (3 rounds)
The Head
Shift the starting point by 1-3 sc so the increase section is centered on the front of the head.
- Round 50: 27 sc, 6 inc, 5 sc (48)
- Rounds 51-52: 48 sc (2 rounds)
- Round 53: 32 sc, 6 inc, 10 sc (54)
- Round 54: 54 sc
- Round 55: 33 sc, inc, 9 sc, inc, 10 sc (56)
- Rounds 56-58: 56 sc (3 rounds)
- Round 59: 23 sc, dec, 29 sc, dec (54)
- Round 60: 54 sc
- Round 61: 23 sc, dec, 27 sc, dec (52)
- Round 62: 52 sc
- Round 63: dec, 19 sc, dec, 8 sc, (dec, 2 sc) x 4, 5 sc (46)
- Round 64: 29 sc, 5 dec, 7 sc (41)
- Round 65: 27 sc, 5 dec, 4 sc (36)
- Round 66: 2 sc, (3 sc, dec) x 3, 10 sc, dec, 3 sc (30)
- Round 67: (dec, 3 sc) x 6 (24)
- Round 68: (dec, 2 sc) x 6 (18)
- Round 69: (dec, 1 sc) x 6 (12)
- Round 70: MR close tightly.
The Arms
Start with dark brown yarn.
- Round 1: 6 sc in a MR (6)
- Rounds 2-6: 6 sc (5 rounds)
Switch to light brown yarn.
- Round 7: 5 sc, inc (7)
- Rounds 8-20: 7 sc (13 rounds)
Lightly stuff the arms and insert a piece of wire for poseability. Fold the arm in half and work 3 sc through both sides to close. Repeat for the second arm.
The Ears
Use dark brown yarn.
- Round 1: 5 sc in a MR (5)
- Round 2: inc, 2 hdc in one stitch, (dc, tr, dc) in one stitch, 2 hdc in one stitch, inc (11)
Fasten off, leaving a long tail for sewing.
Accessories: Scarf and Orange
The Scarf
Using green yarn, chain 130. Work 129 dc in the opposite direction of the chain. Fasten off.
The Orange & Leaves
Orange: Use orange yarn. R1: 6 sc in MR. R2: 6 inc (12). R3: (1 sc, inc) x 6 (18). R4: (2 sc, inc) x 6 (24). R5-7: 24 sc. R8: (2 sc, dec) x 6 (18). R9: (1 sc, dec) x 6 (12). R10: Close. Stuff the orange.
Leaves: Use green yarn. R1: 5 sc in MR. R2: inc, 2 hdc in one stitch, (dc, tr, dc) in one stitch, 2 hdc in one stitch, inc (11). Make two leaves.
Finishing
Now comes the magic part—assembly! Use pins to mark where everything goes before sewing.
- Attach Arms: Sew the arms symmetrically to the sides of the body at the level of Rounds 45-46.
- Attach Ears: Sew the ears to the top of the head at the level of Rounds 63-65.
- Face Details:
- Embroider the nose at the level of Rounds 56-61.
- Embroider the eyes between Rounds 60 and 61.
- Use brown pastel to shade the nose and add a little blush to the cheeks. You can also use pastel to add tiny freckles!
- Back Details: Use pins to mark lines on the back and embroider small stripes to give the capybara character.
- Final Touches: Sew the orange (with the leaves attached) onto the top of the head, and wrap the green scarf around the neck.
Tips
- Symmetry is Key: When making the legs, ensure they end on the same row so the capybara sits evenly. If needed, add or subtract one sc to make them match.
- Tension Matters: Keep your stitches tight to prevent the stuffing from showing through.
- Use Markers: Always use a stitch marker at the start of your rounds, especially when working in continuous spirals.