Adorable Crochet Monkey Pattern: A Step-by-Step Amigurumi Guide
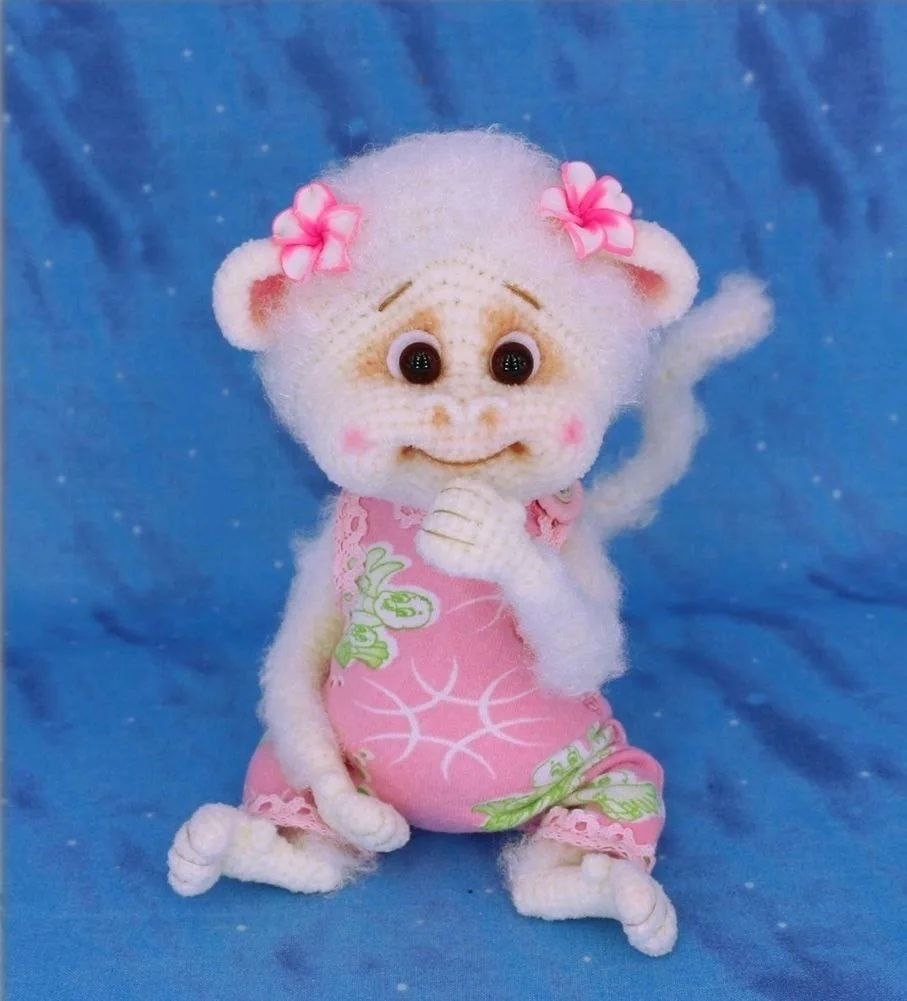
Are you looking for your next fun amigurumi project? This adorable, poseable crochet monkey is the perfect blend of charm and skill. Whether you want to create a unique gift for a child or add a whimsical character to your own collection, this little monkey is sure to bring a smile to your face. This tutorial is designed to be beginner-friendly, guiding you through the process of creating limbs, a body, a head, and even a cute little outfit!
Materials & Abbreviations
To ensure your monkey turns out just as cute as the photos, please gather the following supplies. Note that we will be using two different hook sizes to create different textures for the face and limbs.
Required Materials
- Main Yarn: Approximately 2 skeins of an acrylic/wool blend yarn (such as Adelia Valeri, 160 yards per 50g).
- Muzzle & Paw Yarn: A smaller weight yarn for the face and hands (such as Alpina Andre Classic).
- Crochet Hooks: 2.25 mm (B-1) for the main body and 1.75 mm (C-2) for the face and paws.
- Stuffing: Polyester fiberfill.
- Wire: Approximately 1 yard of 1/16 inch (1.5 mm) copper wire for the limbs and tail.
- Wire Covers: Medical tape or similar tape to wrap the wire ends for safety.
- Joints: 5 split pins (cotter pins) and 10 metal disks (5/8 inch for limbs and 3/4 inch for the head).
- Safety Eyes: Small plastic safety eyes.
- Details: Small amount of white felt (for eye whites), brown embroidery floss (for brows and mouth), and light brown sewing thread (for fingers/toes).
- Shading: Dry pastels for adding a soft, realistic glow to the cheeks and face.
- Clothing: A small scrap of fabric (approx. 8 x 12 inches), matching thread, and optional lace or buttons.
Stitch Abbreviations (US Terms)
- ch: chain
- sc: single crochet
- inc: increase (2 sc in one stitch)
- dec: decrease (sc 2 stitches together)
- dc: double crochet
- sl st: slip stitch
Note: This pattern is worked in a continuous spiral. Do not join rounds with a slip stitch. To keep your spiral straight, we recommend adding an extra stitch at the end of every 4-5 rows to act as a marker.
Step-by-Step Instructions
The Arms
We begin the arms using the smaller 1.75 mm hook to ensure the hands are tight and detailed.
Right Arm
R1: Ch 4. Starting in the 2nd ch from the hook: inc, sc, 4 sc in the last ch. Working down the other side of the chain: sc, inc (10)
R2: inc, 3 sc, inc x 2, 3 sc, inc (14)
R3-5: 14 sc (14)
R6: 6 sc, dec, 4 sc, dec (12)
R7: 12 sc (12)
R8: 5 sc, 3 dc in one stitch (this forms the little finger bump), 6 sc (12)
R9: (dec, 4 sc) x 2 (10)
R10: (3 sc, dec) x 2 (8)
R11: 8 sc (8)
Cut the wire (approx. 6 inches), bend one end, and wrap it in tape. Insert into the arm and lightly stuff, keeping the hand part flat.
Switch to the 2.25 mm hook and larger yarn for the forearm and elbow:
R12-20: 8 sc (8)
R21: inc, 6 sc, inc (10)
R22: 10 sc (10)
R23: dec, 6 sc, dec (8)
Stuff the elbow area lightly.
R24: dec, 6 sc (7)
R25: inc, 6 sc (8)
R26: (3 sc, inc) x 2 (10)
R27: (inc, 4 sc) x 2 (12)
R28-31: 12 sc (12)
R32: (dec, 4 sc) x 2 (10)
R33: dec x 5 (5)
Fasten off and weave in ends.
Repeat these exact steps for the Left Arm, but for R8, work 11 sc after the finger bump instead of 6, to maintain symmetry.
The Legs
Use the 1.75 mm hook for the feet.
Right Leg
R1: Ch 5. Starting in the 2nd ch from hook: inc, 2 sc, 4 sc in the last ch, working down the other side: 2 sc, inc (12)
R2: inc, 4 sc, inc x 2, 4 sc, inc (16)
R3-6: 16 sc (16)
R7: dec, 4 sc, dec, 8 sc (14)
R8: 6 sc, dec, 4 sc, dec (12)
R9: 12 sc (12)
R10: 5 sc, 3 dc in one stitch (finger bump), 6 sc (12)
Note: For the left leg, R10 is 11 sc after the bump.
Follow the instructions for both legs similarly. After R11, insert the prepared wire into the foot, stuff lightly, and keep the foot flat.
Switch to the 2.25 mm hook for the lower leg:
R12: (Both legs) 12 sc (12)
R13-14: 10 sc (10)
R15: 5 sc, ch 3, skip 4 stitches, sc (9)
R16: (sc, dec) x 3 (6)
Fasten off.
Continue with the lower leg using the 2.25 mm hook:
R17: 3 sc in the chain from R15 (heel), 4 sc along the foot (7)
R18-19: 7 sc (7)
R20: 5 sc, inc, sc (8)
R21-22: 8 sc (8)
R23: 5 sc, inc x 2, sc (10)
R24-26: 10 sc (10)
R27: 5 sc, dec x 2, sc (8)
Stuff the knee area.
R28: 8 sc (8)
R29: 2 sc, inc, 3 sc, inc, sc (10)
R30: 10 sc (10)
R31: 2 sc, inc x 2, 3 sc, inc x 2, sc (14)
R32-33: 14 sc (14)
R34: 3 sc, dec, 5 sc, dec, 2 sc (12)
R35: 2 sc, dec, 4 sc, dec, 2 sc (10)
R36: dec x 5 (5)
Fasten off.
The Tail and Ears
Tail: Use the 2.25 mm hook. Ch 2, 6 sc in the first ch (6). Work in a spiral of sc until desired length (approx. 6 inches). Insert wire and fasten off.
Ears: Use the 1.75 mm hook. Ch 2, inc, sc, 4 sc in the last ch, sc, inc (10). R2: inc x 2, 5 sc, inc, 5 sc, inc x 4, 11 sc, inc x 2 (39). Work several more rounds to create the shape. Fold the ear in half and sc through both layers to close. Sew onto the head.
The Body
Use the 2.25 mm hook.
R1: Ch 2, 6 sc in first ch (6)
R2: inc x 6 (12)
R3: (inc, sc) x 6 (18)
R4: sc, inc, (2 sc, inc) x 5, sc (24)
R5: (3 sc, inc) x 6 (30)
R6: 2 sc, inc, (4 sc, inc) x 5, 2 sc (36)
R7: (5 sc, inc) x 6 (42)
R8: 3 sc, inc, (6 sc, inc) x 5, 3 sc (48)
R9-16: 48 sc (48)
Important: Between R7 and R8, insert the leg split pins. After R16, insert the tail wire into the body near the marker.
R17: 11 sc, dec, (2 sc, dec) x 6, 11 sc (41)
R18: 4 sc, dec, 29 sc, dec, 4 sc (39)
R19: 39 sc (39)
R20: 10 sc, dec, (sc, dec) x 6, 9 sc (32)
R21: 2 sc, dec, 24 sc, dec, 2 sc (30)
R22-23: 30 sc (30)
R24: 6 sc, dec, 14 sc, dec, 6 sc (28)
R25-28: 28 sc (28)
R29: (5 sc, dec) x 4 (24)
R30: 24 sc (24)
R31: sc, dec, (2 sc, dec) x 5, sc (18)
R32: (sc, dec) x 6 (12)
R33: dec x 6 (6)
Stuff the body firmly. If you want a weighted feel, you can add glass beads inside the belly area before finishing the stuffing.
The Head
Use the 1.75 mm hook.
R1: Ch 14. Starting in 2nd ch from hook: inc, 11 sc, 4 sc in last ch, working down other side: 11 sc, inc (30)
R2: inc x 2, 5 sc, inc, 5 sc, inc x 4, 11 sc, inc x 2 (39)
R3: inc, 5 sc, 5 sc, (sc, inc) x 2, (inc, sc) x 2, 11 sc, (sc, inc) x 2, 11 sc, inc, sc (50)
R4: sc, inc, 48 sc (51)
R5-7: 51 sc (51)
R8: 24 sc, (3 sc in one) x 2, 23 sc, dec (54)
R9: dec, 21 sc, inc x 3, 2 sc, inc x 3, 22 sc, dec (58)
R10: 58 sc (58)
R11: 28 sc, inc x 2, 28 sc (60)
R12: 29 sc, (3 sc in one) x 2, 29 sc (64)
Switch to 2.25 mm hook:
R13-19: 64 sc (64)
R20: 10 sc, dec, sc, dec, 14 sc, dec, 2 sc, dec, 14 sc, dec, sc, dec, 10 sc (58)
R21: 58 sc (58)
R22: 9 sc, dec, sc, dec, 12 sc, dec, 2 sc, dec, 12 sc, dec, sc, dec, 9 sc (52)
R23: 52 sc (52)
R24: 9 sc, (3 sc in one) x 2, 28 sc, (3 sc in one) x 2, 9 sc (48)
R25: 3 sc, dec, (6 sc, dec) x 5, 3 sc (42)
R26: (5 sc, dec) x 6 (36)
R27: 2 sc, dec, (4 sc, dec) x 5, 2 sc (30)
Insert the head split pin and disk between R15 and R16.
R28: (3 sc, dec) x 6 (24)
R29: sc, dec, (2 sc, dec) x 5, sc (18)
R30: (sc, dec) x 6 (12)
R31: dec x 6 (6)
Fasten off.
Finishing
Face Assembly & Shaping
This is the most important step for bringing your monkey to life! We will use a needle and thread to create indentations for the eyes and mouth.
Eye Sockets
- Mark four points on the face: two for the corners of the mouth (near the bottom of the snout) and two for the eye sockets (roughly halfway up the face).
- For the eye sockets, insert your needle at point 1, pull it through to point 3. Move the needle back to point 1, making several stitches to pull the fabric inward. Repeat for the other side. This creates the “hollow” look of the eyes.
Eyes, Nose, & Mouth
- Eyes: Cut small circles or ovals from white felt and glue them into the eye sockets. Then, attach your plastic safety eyes.
- Mouth & Brows: Using brown embroidery floss, stitch a small smile and delicate eyebrows.
- Nose: Make 2-3 small loose stitches, wrap the thread tightly around them to create a small “knot” or bump, and sew it in the center of the snout.
- Blush: Use dry pastels to add a soft pink to the cheeks for an extra cute effect.
Assembly
Sew the head to the body, the arms to the upper body, and the legs to the bottom of the body. Ensure all wires are securely tucked away and covered with tape so they don’t poke through the crochet.
The Outfit
Using your fabric pattern, cut out a front and back piece. If you are sewing by hand, leave a 1/4 inch (5 mm) seam allowance. If using a machine, 3/8 inch (1 cm) is ideal. Don’t forget to cut a small hole in the back of the romper for the tail! Sew the pieces together, add buttons or lace, and dress your monkey!
Tips for Success
- Tension is Key: When making the hands and feet, use very tight tension so the stuffing doesn’t show through.
- Wire Safety: Always wrap the ends of your wires in tape before inserting them into the toy to prevent them from piercing the crochet.
- Shading: When using pastels, apply them lightly with a small brush or cotton swab. It’s easier to add more than to take it away!
- Make it Yours: Feel free to change the yarn colors or add accessories like little hats or bows to make your monkey unique.