Adorable Crochet Moose Pattern: Step-by-Step Amigurumi Tutorial
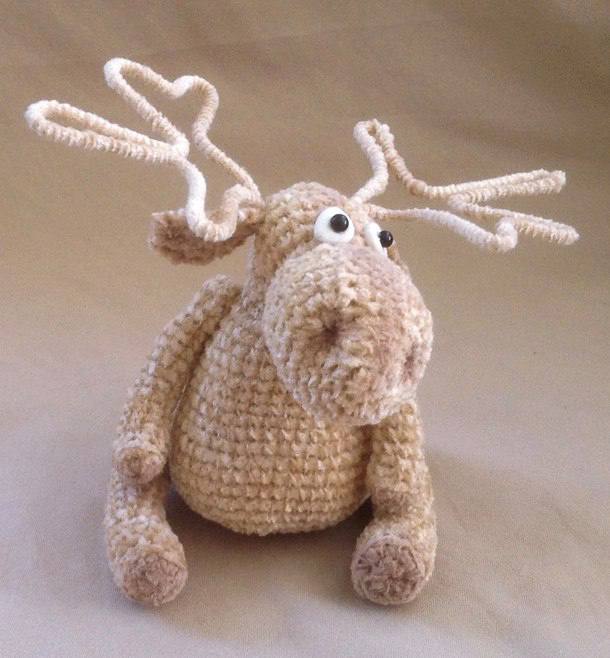
Looking for a cozy, cuddly project to add to your amigurumi collection? This crochet moose pattern is the perfect blend of quirky charm and snuggly texture. Using a plush velvet yarn, you’ll create a whimsical little friend that is as much a piece of art as it is a toy. Whether you are an intermediate crocheter or a brave beginner, this detailed guide will walk you through every stitch to create your own woodland companion.
This project is unique because the head and body are worked as one continuous piece, giving the moose a seamless, organic look. We will also be using a simple wire armature for the antlers and limbs to ensure your moose can hold its pose!
Materials & Abbreviations
To get started, gather your supplies. To achieve the look in the photos, a short-pile velvet or chenille yarn is recommended. This gives the moose that characteristic “fuzzy” feel.
Materials Needed
- Yarn: Approximately 1-2 oz (20g) of velvet or chenille yarn in a light brown or tan shade.
- Crochet Hook: 1.6mm hook (or whatever size best suits your yarn to ensure tight stitches that don’t show the stuffing).
- Wire: Craft wire for the antlers and limb supports.
- Joints: 10-12mm plastic safety disks and pins for the arms and legs.
- Stuffing: High-quality polyester fiberfill.
- Eyes: White and black polymer clay (or 3mm safety eyes and white felt/clay for the whites of the eyes).
- Additional Tools: Fabric tape, strong embroidery thread for sculpting, yarn needle, and clear-drying glue.
Abbreviations (US Terms)
- ch: chain
- sc: single crochet
- inc: increase (2 sc in one stitch)
- dec: decrease (sc 2 together)
- sl st: slip stitch
- sc3tog: single crochet 3 together (decrease 3)
- BLO: back loop only
- ( ) x N: repeat the instructions inside the parentheses N times
Step-by-Step Instructions
Pro Tip: Because velvet yarn can be difficult to see, always use a stitch marker to keep track of the beginning of your rounds. If you find your stitches are shifting, don’t be afraid to use a “shift stitch” (a chain 1) to realign your marker with the center of the piece.
The Left Leg
Start with a magic ring or ch 2, working into the second chain from the hook.
- Rnd 1: 6 sc (6)
- Rnd 2: 6 inc (12)
- Rnd 3: 12 sc in BLO. (Following rounds are worked through both loops).
- Rnds 4-6: 12 sc (12)
- Rnd 7: 3 sc, 1 dec, 4 sc, 1 inc, 2 sc (12)
- Rnds 8-9: 12 sc (12)
- Rnd 10: 3 sc, 1 dec, 4 sc, 1 inc, 2 sc (12)
- Rnds 11-12: 12 sc (12)
- Rnd 13: 3 sc, 1 dec, 4 sc, 1 inc, 2 sc (12)
- Rnd 14: 12 sc (12)
- Rnd 15: 3 sc, 1 dec, 4 sc, 1 inc, 2 sc (12)
- Rnd 16: 12 sc (12)
- Rnd 17: 3 sc, 1 dec, 4 sc, 1 inc, [Place joint marker here], 2 sc (12)
- Rnd 18: 12 sc (12)
Insert the wire and the plastic joint disk/pin. Stuff the leg firmly.
- Rnd 19: 4 dec, 4 sc (8). Continue decreasing until closed. Fasten off.
The Right Leg
The right leg is a mirror image of the left.
- Rnd 1: 6 sc (6)
- Rnd 2: 6 inc (12)
- Rnd 3: 12 sc in BLO.
- Rnds 4-6: 12 sc (12)
- Rnd 7: 2 sc, 1 inc, 4 sc, 1 dec, 3 sc (12)
- Rnds 8-9: 12 sc (12)
- Rnd 10: 2 sc, 1 inc, 4 sc, 1 dec, 3 sc (12)
- Rnds 11-12: 12 sc (12)
- Rnd 13: 2 sc, 1 inc, 4 sc, 1 dec, 3 sc (12)
- Rnd 14: 12 sc (12)
- Rnd 15: 2 sc, 1 inc, 4 sc, 1 dec, 3 sc (12)
- Rnd 16: 12 sc (12)
- Rnd 17: 2 sc, [Place joint marker here], 1 inc, 4 sc, 1 dec, 3 sc (12)
- Rnd 18: 12 sc (12)
Insert wire and joint disk. Stuff firmly.
- Rnd 19: 4 sc, 4 dec (8). Continue decreasing until closed. Fasten off.
The Left Arm
- Rnd 1: 6 sc (6)
- Rnd 2: (1 sc, 1 inc) x 3 (9)
- Rnd 3: 9 sc in BLO.
- Rnds 4-6: 9 sc (9)
- Rnd 7: 2 sc, 1 inc, 3 sc, 1 dec, 1 sc (9)
- Rnd 8: 9 sc (9)
- Rnd 9: 2 sc, 1 inc, 3 sc, 1 dec, 1 sc (9)
- Rnds 10-11: 9 sc (9)
- Rnd 12: 2 sc, 1 inc, 3 sc, 1 dec, 1 sc (9)
- Rnd 13: 9 sc (9)
- Rnd 14: 4 sc, [Place joint marker here], 5 sc (9)
- Rnd 15: 9 sc (9)
Insert wire and joint disk. Stuff firmly.
- Rnd 16: 2 dec, 1 sc, 2 dec (5). Decrease until closed. Fasten off.
The Right Arm
- Rnd 1: 6 sc (6)
- Rnd 2: (1 sc, 1 inc) x 3 (9)
- Rnd 3: 9 sc in BLO.
- Rnds 4-6: 9 sc (9)
- Rnd 7: 1 sc, 1 dec, 3 sc, 1 inc, 2 sc (9)
- Rnd 8: 9 sc (9)
- Rnd 9: 1 sc, 1 dec, 3 sc, 1 inc, 2 sc (9)
- Rnds 10-11: 9 sc (9)
- Rnd 12: 1 sc, 1 dec, 3 sc, 1 inc, 2 sc (9)
- Rnd 13: 9 sc (9)
- Rnd 14: 5 sc, [Place joint marker here], 4 sc (9)
- Rnd 15: 9 sc (9)
Insert wire and joint disk. Stuff firmly.
- Rnd 17: 2 dec, 1 sc, 2 dec (5). Decrease until closed. Fasten off.
The Ears (Make 2)
Ears are worked in rows rather than rounds. Chain 1 at the start of each row.
- Row 1: 3 sc (3)
- Row 2: 3 sc (3)
- Row 3: 1 sc, 1 inc, 1 sc (4)
- Row 4: 4 sc (4)
- Row 5: 1 sc, 1 dec, 1 sc (3)
- Row 6: 3 sc (3)
- Row 7: sc3tog. Fasten off.
The Head and Body (One Piece)
This is the main part of the moose. Keep your marker centered on the muzzle.
The Muzzle and Head
- Rnd 1: 6 sc (6)
- Rnd 2: 6 inc (12)
- Rnd 3: 1 sc, (1 inc, 2 sc) x 3, 1 inc, 1 sc (16)
- Rnd 4: (2 sc, 1 inc) x 2, 4 sc, (1 inc, 2 sc) x 2 (20)
- Rnd 5: 2 sc, 1 inc, 14 sc, 1 inc, 2 sc (22)
- Rnd 6: 2 sc, 1 inc, 16 sc, 1 inc, 2 sc (24)
- Rnds 7-11: 24 sc (24)
- Rnd 12: 5 sc, 1 dec, 10 sc, 1 dec, 5 sc (22)
- Rnd 13: 9 sc, 2 dec, 9 sc (20)
- Rnd 14: 2 sc, 1 dec, 12 sc, 1 dec, 2 sc (18)
- Rnd 15: 2 sc, [Sculpting Marker 1], 2 sc, 1 dec, 6 sc, 1 dec, 2 sc, [Sculpting Marker 2], 2 sc (16)
- Rnd 16: (2 sc, 1 inc) x 2, 4 sc, (1 inc, 2 sc) x 2 (20)
- Rnd 17: 5 sc, 1 inc, 8 sc, 1 inc, 5 sc (22)
- Rnd 18: 22 sc (22)
The Neck and Antler Holes
- Rnds 19-20: 9 sc, 4 sl st, 9 sc (22)
- Rnd 21: 1 sc, (1 dec, 2 sc) x 2, 4 sl st, (2 sc, 1 dec) x 2, 1 sc (18)
- Rnd 22: 1 sc, 1 dec, 1 ch, skip 1 st, 3 sc, 4 sl st, 3 sc, 1 ch, skip 1 st, 1 dec, 1 sc (16)
- Rnd 23: 1 sc, 1 dec, 1 sc in the ch-arch, 3 sc, 4 sl st, 3 sc, 1 sc in the ch-arch, 1 dec, 1 sc (14)
- Rnd 24: 5 sc, 4 sl st, 5 sc (14)
Creating the Antlers: Shape your craft wire into moose antlers. Wrap the wire tightly with your tan yarn, securing the ends with a small dab of clear glue. Leave long tails of wire extending from the bottom of the antlers; these will act as the neck support and go deep into the body. Insert the antlers into the holes created in Round 22.
The Body
- Rnd 25: 5 sc, 4 inc, 5 sc (18)
- Rnd 26: 1 sc, 1 dec, 12 sc, 1 dec, 1 sc (16)
- Rnd 27: 1 sc, 1 dec, 3 sc, 1 inc, 2 sc, 1 inc, 3 sc, 1 dec, 1 sc (16)
- Rnd 28: 16 sc (16)
- Rnd 29: 1 sc, 1 dec, 3 sc, 1 inc, 2 sc, 1 inc, 3 sc, 1 dec, 1 sc (16)
- Rnd 30: (3 sc, 1 inc) x 2, (1 inc, 3 sc) x 2 (20)
- Rnd 31: 3 sc, 1 inc, 4 sc, 1 inc, 2 sc, 1 inc, 4 sc, 1 inc, 3 sc (24)
- Rnd 32: 6 sc, [Arm Marker], 1 inc, 10 sc, 1 inc, [Arm Marker], 6 sc (26)
- Rnd 33: 2 sc, 1 inc, 4 sc, 1 inc, 10 sc, 1 inc, 4 sc, 1 inc, 2 sc (30)
- Rnd 34: 7 sc, 1 inc, 14 sc, 1 inc, 7 sc (32)
- Rnd 35: 32 sc (32)
- Rnd 36: 8 sc, 1 inc, 14 sc, 1 inc, 8 sc (34)
- Rnd 37: 13 sc, 1 inc, 6 sc, 1 inc, 13 sc (36)
- Rnd 38: 6 sc, 1 inc, 4 sc, 1 inc, 12 sc, 1 inc, 4 sc, 1 inc, 6 sc (40)
- Rnd 39: 17 sc, 1 inc, 4 sc, 1 inc, 17 sc (42)
- Rnd 40: 3 sc, 1 inc, 4 sc, 1 inc, 6 sc, 1 inc, 10 sc, 1 inc, 6 sc, 1 inc, 4 sc, 1 inc, 3 sc (48)
Assembly Note: Attach and sew the arms into place. Begin stuffing the body firmly as you progress.
- Rnd 41: (4 sc, 1 inc) x 2, 5 sc, 1 inc, 3 sc, 1 inc, 8 sc, 1 inc, 3 sc, 1 inc, 5 sc, (1 inc, 4 sc) x 2 (56)
- Rnds 42-43: 56 sc (56)
- Rnd 44: 10 sc, [Leg Marker], 36 sc, [Leg Marker], 10 sc. Without joining the round, ch 6, then work 5 sl st back down the chain. Sl st into the next stitch of the round to close.
- Rnd 45: 56 sc (56)
- Rnd 46: 16 sc, 1 dec, 5 sc, 1 dec, 6 sc, 1 dec, 5 sc, 1 dec, 16 sc (52)
- Rnd 47: (3 sc, 1 dec) x 2, (2 sc, 1 dec) x 4, (1 dec, 2 sc) x 4, (1 dec, 3 sc) x 2 (40)
- Rnd 48: (2 sc, 1 dec) x 10 (30)
Assembly Note: Attach and sew the legs into place.
- Rnd 49: (3 sc, 1 dec) x 6 (24)
- Rnd 50: (2 sc, 1 dec) x 6 (18)
- Rnd 51: 18 sc (18)
- Rnd 52: (1 sc, 1 dec) x 6 (12)
- Rnd 53: 6 dec (6)
Fasten off and weave in ends.
Finishing
Now comes the part where your moose truly comes to life! The sculpting and detailing are what give the animal its expression.
The Muzzle and Nostrils
Locate the markers from Round 15. Using a strong thread, insert your needle at Marker 1, bring it out where the nostril should be, move a few stitches to the side, and go back in. Pull tight to create a small indentation. Repeat for Marker 2. Use a bit of dark brown paint or a fabric marker to darken the nostrils.
The Eyes
Mold small, oval shapes out of white polymer clay. For the pupils, you can either use tiny black polymer clay beads or 3mm safety eyes. If using safety eyes, push the post through the clay before baking. Once baked, glue the eyes onto the head.
Final Touches
- Ears: Sew the ears directly under the base of the antlers.
- Toning: Use soft pastels or watered-down acrylic paint to lightly shade the hooves, the tip of the nose, and the inside of the ears for a more realistic look.
Tips for Success
- Taming Velvet Yarn: Velvet yarn can be slippery. If you lose your place, use a crochet needle to gently pull the yarn aside and find the center of the “V” of the stitch.
- Stuffing: Stuff the muzzle and head very firmly. This prevents the fabric from sagging and helps the sculpting markers work more effectively.
- The Armature: When inserting the antler wire, make sure it reaches all the way down into the belly of the moose. This prevents the head from flopping over.
- Customization: Feel free to change the yarn color! A deep chocolate brown or a greyish-tan also makes for a wonderful moose.