Radiant Motifs Crochet Tote Bag Pattern: A Colorful Step-by-Step Tutorial
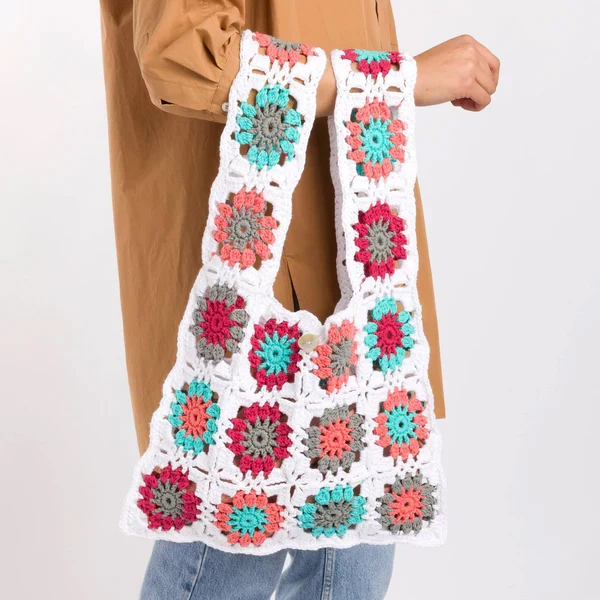
Looking for a vibrant, stylish project to add to your crochet collection? This Radiant Motifs Tote is the perfect blend of artistic flair and practical utility. With its striking colorful centers and crisp white borders, this bag is a showstopper that is surprisingly beginner-friendly. Whether you are heading to the farmer’s market, the beach, or just running errands, this sturdy cotton tote is designed to handle your daily essentials while looking effortlessly chic.
This pattern uses a “join-as-you-go” method, meaning you won’t have to spend hours sewing separate squares together at the end. Instead, you’ll build your bag motif by motif, creating a seamless and strong fabric. Let’s dive into the details and start crafting!
Materials & Abbreviations
To achieve the best results, we recommend using a sturdy, medium-weight cotton yarn. Cotton is ideal for tote bags because it has very little stretch and is highly durable.
Supplies Needed
- Yarn: Medium weight (Category 4) cotton yarn in the following colors:
- Color A (White): Approx. 280 yards (3 balls)
- Color B (Light Blue/Overcast): Approx. 115 yards (1 ball)
- Color C (Red): Approx. 70 yards (1 ball)
- Color D (Orange/Tangerine): Approx. 106 yards (1 ball)
- Color E (Teal/Seabreeze): Approx. 100 yards (1 ball)
- Crochet Hook: Size G/6 (4 mm) or a size needed to obtain gauge.
- Notions: Stitch markers, a yarn needle for weaving in ends, and one 3/4″ diameter button.
Abbreviations (US Terms)
- Alt: Alternate
- Approx: Approximately
- Beg: Beginning
- Ch: Chain
- Dc: Double crochet
- Rep: Repeat
- Rnd(s): Round(s)
- RS: Right side
- Sc: Single crochet
- Sl st: Slip stitch
- Sp(s): Space(s)
- St(s): Stitch(es)
- Tog: Together
- WS: Wrong side
- Yoh: Yarn over hook
Gauge & Measurements
Finished Size: Approximately 17″ wide x 12″ tall (excluding the handles).
Gauge: 15 sc and 17 rows = 4″. Each completed motif should be approximately 4.25″ square.
Step-by-Step Instructions
The bag is composed of 34 total motifs. The first motif is created independently, and every subsequent motif is joined to the previous one during the final round of crochet. This creates the structure of the bag as you go.
The First Motif (Motif 1)
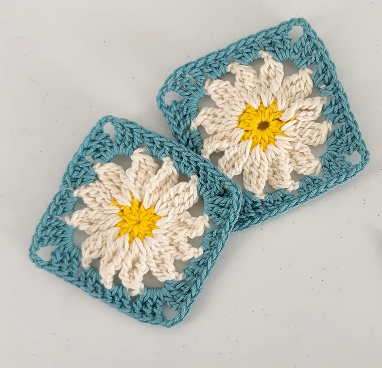
This motif sets the stage for the rest of the bag. We will use two different colors for the center and the decorative ring, and white for the outer square.
Round 1: Using Color 1, chain 5. Join with a slip stitch to the first chain to form a ring. Chain 1, then work 12 single crochet into the ring. Join with a slip stitch to the first sc.
Round 2: Chain 4 (this counts as your first double crochet and a chain-1 space). Work 1 dc in the next sc, then chain 1. Repeat this sequence (1 dc, ch 1) around the entire circle. Join with a slip stitch to the 3rd chain of the starting ch-4. Break Color 1. You should now have 12 dc and 12 ch-1 spaces.
Round 3: Join Color 2 with a slip stitch into any ch-1 space. Chain 3. Now we will create the first cluster stitch: Yarn over and draw up a loop, yarn over and draw through 2 loops on the hook; repeat this once more in the same space, then yarn over and draw through all loops on the hook. Chain 2. In the next ch-1 space, work a cluster (yoh, draw up loop, yoh, draw through 2 loops) 3 times, then draw through all loops. Chain 2. Work a cluster in the next ch-1 space, then chain 5. Repeat the sequence (cluster in next ch-1 space, ch 2) twice, then work a cluster in the next ch-1 space and chain 5. Repeat this entire process two more times around the motif. Join with a slip stitch to the top of the first cluster. Break Color 2.
Round 4: Join Color A (White) with a slip stitch in any corner ch-5 space. Chain 3. In the same corner space, work (3 dc, ch 3, 4 dc). Now work the sides: (ch 3, 1 sc in next ch-2 space) twice. In the next corner ch-5 space, work (ch 3, 4 dc, ch 3, 4 dc). Repeat the side and corner sequences until you return to the start. Join with a slip stitch to the top of the first ch-3 and fasten off.
Joining Subsequent Motifs
For all remaining motifs, work Rounds 1 through 3 exactly as you did for Motif 1. The difference happens in Round 4, where you will join the new motif to the existing ones.
Joining on One Side
Join Color A with a slip stitch in any corner ch-5 space. Work the first corner as usual (ch 3, 3 dc, ch 3, 4 dc). Work the first side (ch 3, 1 sc in next ch-2 space twice, ch 3). In the next corner, work (4 dc, ch 3, 4 dc). Work the second side. Now, instead of a standard corner, work 4 dc in the corner space, chain 1, and join with a slip stitch to the corner ch-3 of the adjacent motif. Continue working into the adjacent motif as described in the pattern to secure the bond, then finish the rest of your current motif’s round. Join with a slip stitch to the first ch-3 and fasten off.
Joining on Two Sides
This is used for the corners and edges of the bag. Follow the same process as the one-side join, but repeat the joining sequence (sl st to adjacent motif, 4 dc in corner) on two different sides of the motif before completing the round. This locks the motif firmly into the grid.
Color Combinations
To get the “Radiant” look, follow this color guide for your 34 motifs (Color 1 is the center, Color 2 is the ring):
- E as Col 1, D as Col 2: 5 motifs
- D as Col 1, E as Col 2: 1 motif
- B as Col 1, C as Col 2: 5 motifs
- C as Col 1, B as Col 2: 2 motifs
- B as Col 1, E as Col 2: 5 motifs
- E as Col 1, B as Col 2: 1 motif
- B as Col 1, D as Col 2: 4 motifs
- D as Col 1, B as Col 2: 4 motifs
- E as Col 1, C as Col 2: 7 motifs total
Finishing
Once all your motifs are joined into a large rectangular piece, it’s time to turn that fabric into a bag.
Join Sides and Bottom
Fold the piece in half to align the sides and bottom edges. With the right side (RS) facing you, join Color A with a slip stitch through both layers at the top left corner. Work a row of single crochet down the side, put 3 sc in the bottom corner, work sc evenly across the bottom edge, put 3 sc in the opposite corner, and work sc up the other side to the top right corner. Do not fasten off yet!
Strap Edging
Working through only the single thickness of the strap, work a row of single crochet along the side of the strap to the side seam. Join with a slip stitch into the seam and fasten off. Repeat this process for the opposite strap.
Inner Edging and Closure
Join Color A with a slip stitch at the base of the left strap at the inner edge. Work single crochet evenly across the top edge of the bag, along the side of the inner strap, across the opposite top edge, and back down the inner strap. Join with a slip stitch to the first sc and fasten off.
Button Loop: Join Color A to the center of the back top edge. Chain 14. Slip stitch back into the 10th chain from your hook. Chain 4 and join with a slip stitch to the first sc. Fasten off. Finally, sew your 3/4″ button to the front of the bag so it aligns perfectly with your loop.
Tips for Success
- Tension Control: Since this bag uses cotton yarn, be mindful of your tension. If your squares are pulling or curling, try loosening your stitches slightly.
- Weaving in Ends: With 34 motifs and multiple color changes, you will have many ends to weave in. Do this as you go to prevent the bag from becoming a “nest” of yarn threads at the end.
- Blocking: For a more professional look, lightly steam block your completed bag. This will help the motifs lay flat and give the tote a crisp, defined shape.
- Stitch Markers: Use stitch markers in the corner spaces of your motifs. It is very easy to miss a space when you are focusing on joining the squares together.