Stitch Your Own Cozy Autumn Companion: Free Crochet Pumpkin Doll Pattern
“`html
Adorable Crochet Pumpkin Doll Free Pattern
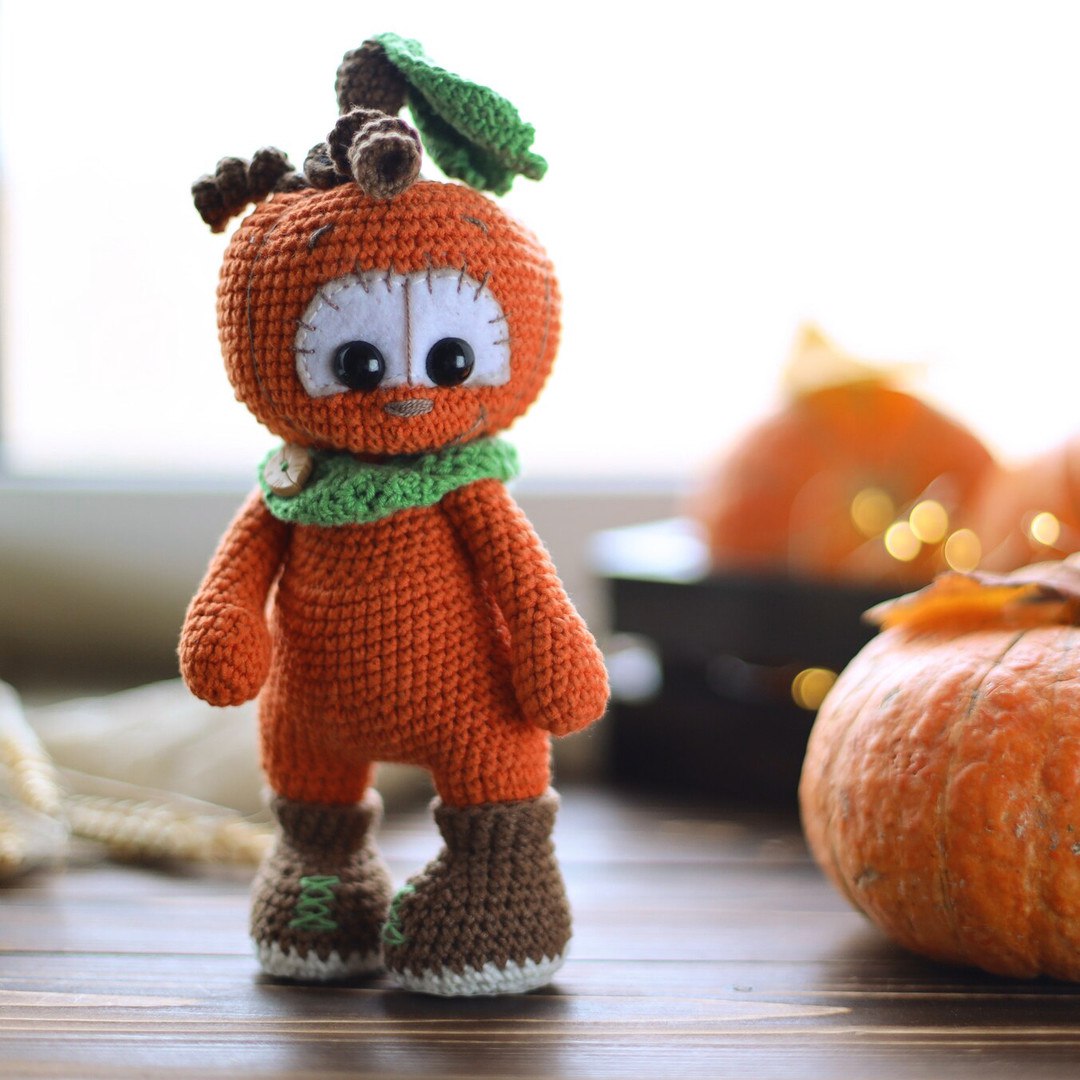
Bring some autumnal charm to your home with this cute crochet pumpkin doll! This detailed guide will walk you through creating a whimsical, pumpkin-headed friend perfect for fall decor or as a unique gift. This pattern uses amigurumi techniques to create a stylized character with a soft, huggable feel.
Materials Needed
- Yarn:
- White: For the soles of the boots.
- Brown: For the boots and stem.
- Orange: For the main body and head.
- Green: For the scarf and leaf.
- Crochet Hook: 1.75 mm.
- Joints & Hardware:
- T-joints (2x20mm) – 3 pieces.
- Joint Disks: 12mm (4 pieces for arms), 18mm (1 piece for body), 22mm (1 piece for head).
- Safety Eyes: 10-12mm diameter.
- Other Supplies:
- Stuffing (fiberfill/holofiber).
- Thin plastic (for boot insoles).
- Felt (for the face piece) or cream-colored yarn.
- Embroidery thread (dark brown) for facial details.
- Pliers for joints.
- Decorative button for the scarf.
Abbreviations (US Terms)
- MR: Magic Ring
- sc: Single Crochet
- inc: Increase
- dec: Decrease
- ch: Chain
- sl st: Slip Stitch
- hdc: Half Double Crochet
- dc: Double Crochet
- tr: Treble Crochet
- FLO: Front Loop Only
- BLO: Back Loop Only
Note: This pattern is worked in a continuous spiral. Please use a stitch marker to track the beginning of each round.
Step-by-Step Instructions
1. The Arms (Make 2)
Using orange yarn:
- Round 1: 6 sc in MR (6)
- Round 2: 6 inc (12)
- Round 3: (3 sc, inc) * 3 (15)
- Rounds 4-6: 15 sc (15)
- Round 7: 5 sc, 3 dec, 4 sc (12)
- Round 8: (4 sc, dec) * 2 (10)
- Rounds 9-18: 10 sc (10)
Assembly Note: Lightly stuff the arm. Install the joint connector at Round 16.
- Round 19: 5 dec (5)
Fasten off and weave in ends.
2. The Legs and Boots
Soles (Make 2 – White Yarn):
- Round 1: Ch 5. Starting in 2nd ch from hook: 3 sc, 3 sc in last ch. Turn to work on other side of chain: 2 sc, inc (10)
- Round 2: inc, 2 sc, 3 inc, 2 sc, 2 inc (16)
- Round 3: sc, inc, 3 sc, (inc, sc) * 3, sc, (inc, sc) * 2 (22)
- Round 4: (10 sc, inc) * 2 (24)
- Round 5: 24 sc (24)
Fasten off. Cut a piece of thin plastic to fit the size of the sole (approx. size of rounds 3-4) and place it inside.
Boots (Brown Yarn):
Repeat Rounds 1-5 of the sole. Place the white sole and plastic insert between the white and brown parts. Now, crochet through both layers simultaneously (working clockwise).
- Rounds 6-10: 24 sc (24)
- Round 11: 8 sc, 4 dec, 8 sc (20)
- Round 12: 8 sc, 2 dec, 8 sc (18)
- Round 13: 7 sc, 2 dec, 7 sc (16)
- Round 14: 16 sc in FLO (16)
- Rounds 15-16: 16 sc (16)
Fasten off and stuff the boot.
Legs (Orange Yarn):
Attach orange yarn to the BLO (back loops) of Round 14 of the boot.
- Rounds 17-18: 16 sc (16)
- Round 19: 10 sc, inc, 5 sc (17)
- Round 20: 11 sc, inc, 5 sc (18)
- Round 21: 11 sc, inc, 6 sc (19)
- Round 22: 5 sc, sl st.
Second Leg: Repeat as the first leg until Round 19, but change the increase position:
- Round 19: 5 sc, inc, 10 sc (17)
- Round 20: 5 sc, inc, 11 sc (18)
- Round 21: 6 sc, inc, 11 sc (19)
- Round 22: 12 sc, sl st.
Do not fasten off; we will now join the legs to create the body.
3. The Body
Using orange yarn:
- Round 23: Ch 6. Join with a sl st to the first leg. Work 19 sc around the first leg, 6 sc across the chain, 19 sc around the second leg, and 6 sc across the remaining chain (50)
- Rounds 24-29: 50 sc (50)
- Round 30: (23 sc, dec) * 2 (48)
- Round 31: 48 sc (48)
- Round 32: (22 sc, dec) * 2 (46)
- Round 33: 46 sc (46)
- Round 34: (21 sc, dec) * 2 (44)
- Round 35: (20 sc, dec) * 2 (42)
- Round 36: 42 sc (42)
- Round 37: 18 sc. (Move marker to the center of the back).
- Round 38: 15 sc, 6 dec, 15 sc (36)
- Rounds 39-41: 36 sc (36)
Note: At Round 41, mark the positions where the arms will be attached.
- Round 42: (4 sc, dec) * 6 (30)
- Rounds 43-44: 30 sc (30)
- Round 45: (3 sc, dec) * 6 (24)
Install the arms here.
- Round 46: 24 sc (24)
- Round 47: (2 sc, dec) * 6 (18)
- Round 48: 18 sc. (Install the head joint disk here).
- Round 49: (sc, dec) * 6 (12)
- Round 50: 6 dec.
Fasten off and stuff the body firmly.
4. The Head
Using orange yarn:
- Round 1: 6 sc in MR (6)
- Round 2: 6 inc (12)
- Round 3: (sc, inc) * 6 (18)
- Round 4: (2 sc, inc) * 6 (24)
- Round 5: (3 sc, inc) * 6 (30)
- Round 6: (4 sc, inc) * 6 (36)
- Round 7: (5 sc, inc) * 6 (42)
- Round 8: (6 sc, inc) * 6 (48)
- Round 9: (7 sc, inc) * 6 (54)
- Round 10: (8 sc, inc) * 6 (60)
- Rounds 11-20: 60 sc (60)
Attach the head to the body and begin stuffing.
- Round 21: (8 sc, dec) * 6 (54)
- Round 22: (7 sc, dec) * 6 (48)
- Round 23: (6 sc, dec) * 6 (42)
- Round 24: (5 sc, dec) * 6 (36)
- Round 25: (4 sc, dec) * 6 (30)
- Round 26: (3 sc, dec) * 6 (24)
- Round 27: (2 sc, dec) * 6 (18)
- Round 28: (sc, dec) * 6 (12)
- Round 29: 6 dec.
Fasten off and finish stuffing.
5. Accessories
The Stem: Using brown yarn:
- Round 1: 6 sc in MR (6)
- Round 2: 6 inc (12)
- Rounds 3-4: 12 sc (12)
- Round 5: (4 sc, dec) * 2 (10)
- Rounds 6-7: 10 sc (10)
- Round 8: (4 sc, inc) * 2 (12)
- Round 9: (3 sc, inc) * 3 (15)
- Round 10: 15 sc in BLO (15)
- Round 11: (4 sc, inc) * 3 (18)
- Round 12: 5 sc, ch 21, in 2nd ch from hook: 20 inc, 1 sc, ch 26, in 2nd ch from hook: 25 inc, 12 sc.
Lightly stuff the stem and fasten off.
The Leaf: Using green yarn (worked in rows):
- Row 1: Ch 14. Starting in 2nd ch: 12 sc, 6 sc in last ch. Turn to work on other side of chain: 9 sc, ch 1.
- Row 2: 11 sc, 3 sc in 1, 13 sc, ch 1.
- Row 3: 26 sc, ch 1.
- Row 4: 25 sc, ch 1.
- Row 5: 24 sc, ch 1.
- Row 6: 13 sc.
Fasten off.
The Face Piece: Using cream yarn (or white felt):
If crocheting:
- Round 1: 6 sc in MR (6)
- Round 2: 6 inc (12)
- Round 3: (sc, inc) * 6 (18)
- Round 4: 18 sc (18)
- Row 5: sc, 2 hdc, dc, 2 tr, dc, hdc, sl st, hdc, dc, 2 tr, dc, 2 hdc, sc.
Edge the piece with sc and fasten off.
The Scarf: Using green yarn:
- Start with a chain that fits the neck circumference + 1-2 cm (approx. 40 ch + 1 ch for turning).
- Row 1: (sc, dc) in 1st ch, skip next ch, repeat to end. End with dc, ch 1.
- Row 2: Skip sc, in dc work (dc, sc), repeat to end. End with dc, ch 1.
- Row 3: (sc, dc) in dc, skip sc.
Repeat Rows 2 and 3 until the desired scarf width is reached. Finish the final row with sc.
Final Assembly and Finishing
Creating the Pumpkin Shape
To give the head its pumpkin ridges, divide the head into four equal sections. Use a long needle and dark brown embroidery thread. Insert the needle at the top center and bring it out near the neck, leaving a long tail at the top. Bring the needle back into the top and out at the neck on the opposite side. Repeat this for the other two sections. Pull the thread gently—do not overtighten, or the head will flatten.
Adding Final Details
- Stem & Leaf: Sew the stem to the top of the head and attach the leaf to the stem.
- The Face: Pin the face piece to the head. To create eye sockets, use the embroidery thread to make diagonal stitches from the base of the neck up to the eye area (create two indentations).
- Face Finishing: Sew or glue the face piece in place. Attach safety eyes. Embroider the eyebrows, a small nose, a smile, and decorative “stitches” around the edges of the face piece.
- The Scarf: Wrap the scarf around the neck and secure it with a decorative button.
Your adorable Crochet Pumpkin Doll is now complete! Enjoy your handmade autumn companion.
“`