How to Crochet a Beautiful Lace Cardigan: A Step-by-Step Tutorial
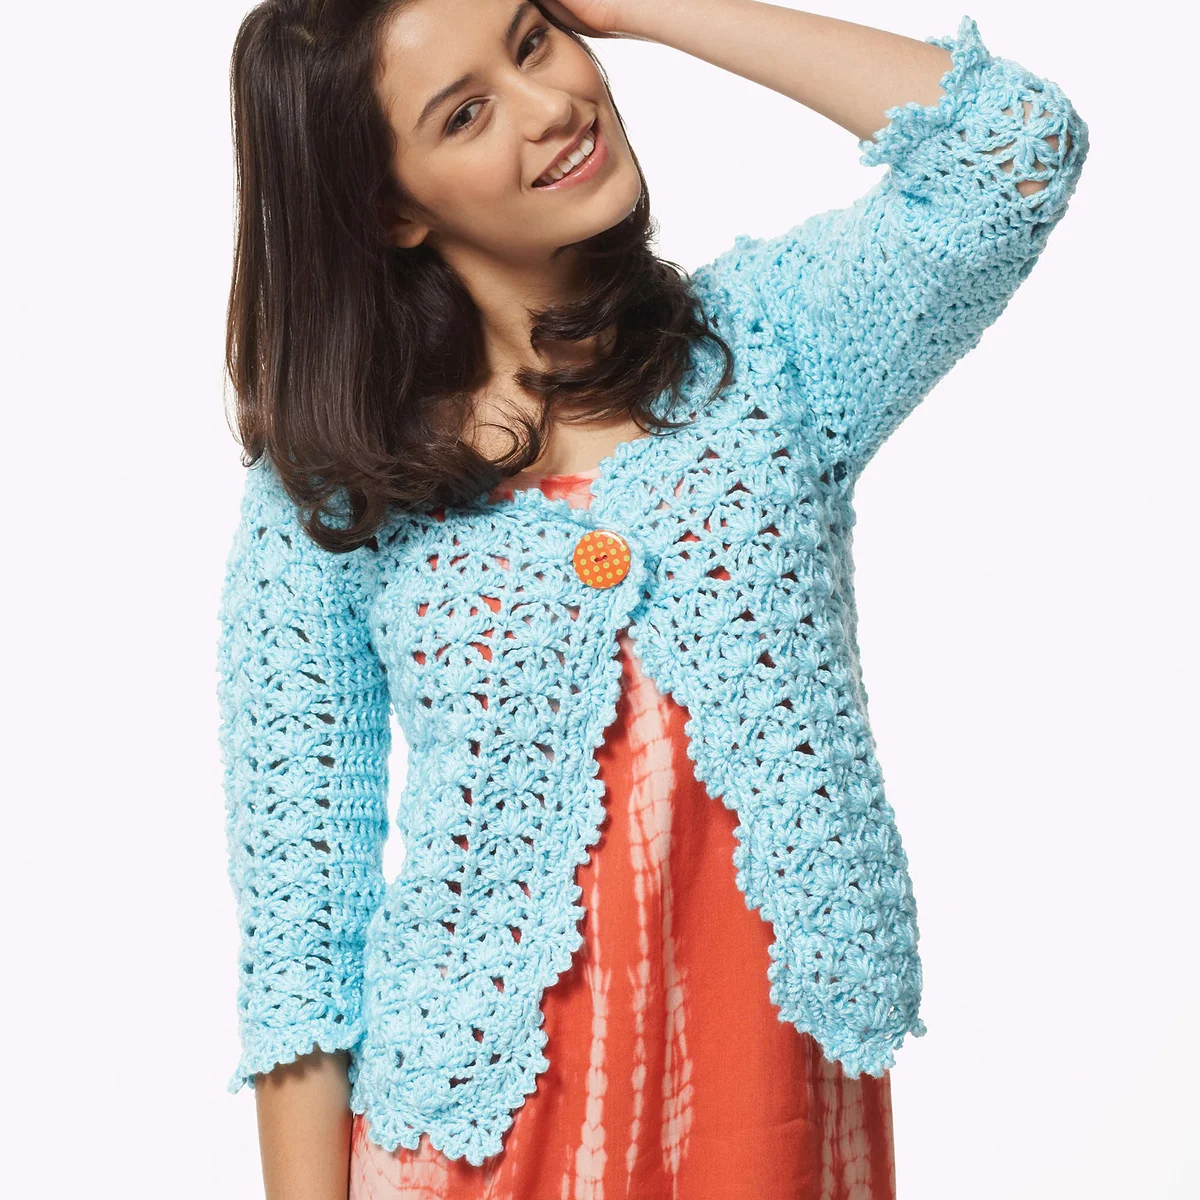
There is something timeless about a lace crochet cardigan. Whether you are looking for a lightweight layer for a spring evening or a sophisticated piece to dress up a simple tee and jeans, this pattern is the perfect project. With its delicate shell stitches and a relaxed fit, this cardigan blends elegance with comfort.
This project is designed for intermediate crocheters. You will practice working with shell stitches, shaping armholes, and creating a professional-looking picot edge. The result is a breathable, feminine garment that looks far more complicated than it actually is to make.
Materials & Abbreviations
To get started, gather your materials. For this project, a medium-weight yarn with a slight sheen (like a satin or bamboo blend) works best to highlight the lace details.
Materials Needed
- Yarn: Medium weight (4) satin-finish yarn. You will need approximately 4 to 8 balls (roughly 800 to 1,600 yards), depending on your size.
- Crochet Hook: 5 mm (H-8) or a size that allows you to maintain the correct gauge.
- Notions: One snap fastener, one decorative button, yarn needle, and stitch markers.
Gauge
13 double crochet (dc) and 7 rows = 4″ square. Checking your gauge is crucial for garments to ensure the final piece fits correctly.
Abbreviations (US Terms)
- Beg: Beginning
- Ch: Chain
- Dc: Double crochet
- Sc: Single crochet
- Sl st: Slip stitch
- Sp(s): Space(s)
- RS/WS: Right Side / Wrong Side
- Yoh: Yarn over hook
- Shell: A special cluster stitch worked as follows: In one stitch, work a cluster (Yoh, draw up a loop, Yoh and draw through 2 loops twice, then Yoh and draw through all 3 loops), chain 3, and work another cluster.
Step-by-Step Instructions
This cardigan is worked in pieces and then seamed together. The sizing follows this format: XS/S (M, L, XL, 2/3XL, 4/5XL). Please use the numbers that correspond to your chosen size.
The Body
The body is worked in one piece up to the armholes. Begin by chaining 107 (119, 131, 143, 167, 191).
Foundation Row (RS): Work 1 dc in the 4th chain from the hook. To create the shell, miss the next 2 chains, then work the shell stitch into the next chain. Miss 2 chains and work 1 dc in the next chain. Repeat this sequence across the row, ending with 1 dc in the last chain. You should have 17 (19, 21, 23, 27, 31) shells total. Turn.
Row 1: Chain 3 (counts as dc). Work 1 dc in the next dc, chain 3, and work 1 sc into the top of the shell. Chain 3. Repeat from the asterisk to the last 2 dc, working 1 dc in each. Turn.
Row 2: Chain 3 (counts as dc). Work 1 dc in the next dc, then work a shell into the next sc. Repeat from the asterisk to the last 2 dc, working 1 dc in each. Turn.
Continue repeating Row 1 and Row 2 until the piece measures 10 inches from the beginning, ending on a WS row.
Dividing for Armholes and Front Panels
Now we will split the work to create the front panels and the back.
Right Front: Work the pattern across the first 4 (5, 5, 5, 6, 7) shells, ending with 1 dc in the next dc. Turn and leave the remaining stitches unworked. Work the shell pattern until the armhole measures 3 (3, 5, 5, 6, 6) inches. To shape the neck, begin decreasing by omitting the last 2 (2, 2, 2, 3, 3) shells on the WS rows. Continue until the armhole total measures 8 (8, 9, 9, 10, 11) inches. Fasten off.
Back Panel: Join yarn with a slip stitch to the next dc after the right front. Work the pattern across the next 7 (7, 9, 11, 13, 15) shells. Repeat the armhole and neck shaping process as described for the front, ensuring the back reaches a total armhole height of 8 (8, 9, 9, 10, 11) inches. Fasten off.
Left Front: Repeat the instructions for the Right Front, mirroring the shaping.
The Sleeves
Chain 35 (35, 35, 41, 41, 47).
Foundation Row: Work 1 dc in the 4th chain from hook. *Miss 2 chains, work a shell in the next chain, miss 2 chains, and work 1 dc in the next chain.* Repeat across, ending with 1 dc in the last chain. You should have 5 (5, 5, 6, 6, 7) shells. Turn.
Row 1: Ch 3 (counts as dc). Work 1 dc in next dc, ch 3, 1 sc in top of shell, ch 3. Repeat across to the last 2 dc, working 1 dc in each. Turn.
Row 2: Ch 3 (counts as dc). Work 1 dc in next dc, shell in next sc. Repeat across to the last 2 dc, working 1 dc in each. Turn.
Row 3: Repeat Row 1.
Row 4 (Increase Row): Ch 3, 1 dc in first dc, work the pattern across, and work 2 dc in the final dc. Turn.
Repeat the last two rows 3 (5, 6, 5, 7, 7) more times. Continue in pattern until the sleeve measures 10 (10, 11, 11, 11, 11) inches. To shape the sleeve cap, work a dc2tog (double crochet two together) at the beginning and end of the rows for 4 (4, 5, 6, 7, 8) rows. Fasten off.
Finishing
Assembly
Lay your pieces flat. Sew the shoulder seams first, then sew the sleeves into the armholes, aligning your markers. Finally, sew the side seams and the underarm sleeve seams using a mattress stitch for an invisible finish.
The Edging
Outer Edge: Join yarn at the bottom of the right front. Work a border of single crochet (sc) up the front edge, around the neckline, and down the left front. Follow the stitch counts provided in the pattern to ensure a smooth curve around the neck and corners. Join with a slip stitch. For the second round, create a picot edge by working: *miss 3 sc, (1 dc, ch 2, sl st in top of dc, ch 1) 5 times in next sc, miss 3 sc, 1 sc in next sc.* Repeat around.
Sleeve Edge: Join yarn at the sleeve seam. Work a round of sc around the foundation chain. In the second round, repeat the picot stitch process used for the outer edge to create a delicate lace trim.
Final Touches
Sew the snap fastener to the top corner of the neckline to keep the cardigan closed. Sew the decorative button in place as a finishing touch.
Tips for Success
Maintain Consistent Tension
Lace patterns can easily become too tight or too loose. If you find your shells are curling, try moving up a half-size in your hook. The garment should have a soft, fluid drape.
Blocking is Key
To really make those shells “pop,” I highly recommend wet blocking your finished cardigan. Pin the garment to its final measurements on a blocking mat, spray with water, and let it dry completely. This will even out your stitches and give the lace a professional, boutique look.
Choosing Your Yarn
While a satin-finish yarn is suggested for elegance, this pattern also looks wonderful in a matte cotton or a lightweight wool blend for a more casual, rustic vibe.