How to Crochet a Simple Chevron Baby Blanket: Easy Step-by-Step Pattern
There is nothing quite as cozy or thoughtful as a handmade baby blanket. Whether you are preparing for a new arrival in your own family or crafting a gift for a baby shower, a chevron pattern is a timeless choice. The classic zig-zag design adds a touch of visual interest and professional flair, but it is surprisingly simple to achieve—even if you are a beginner!
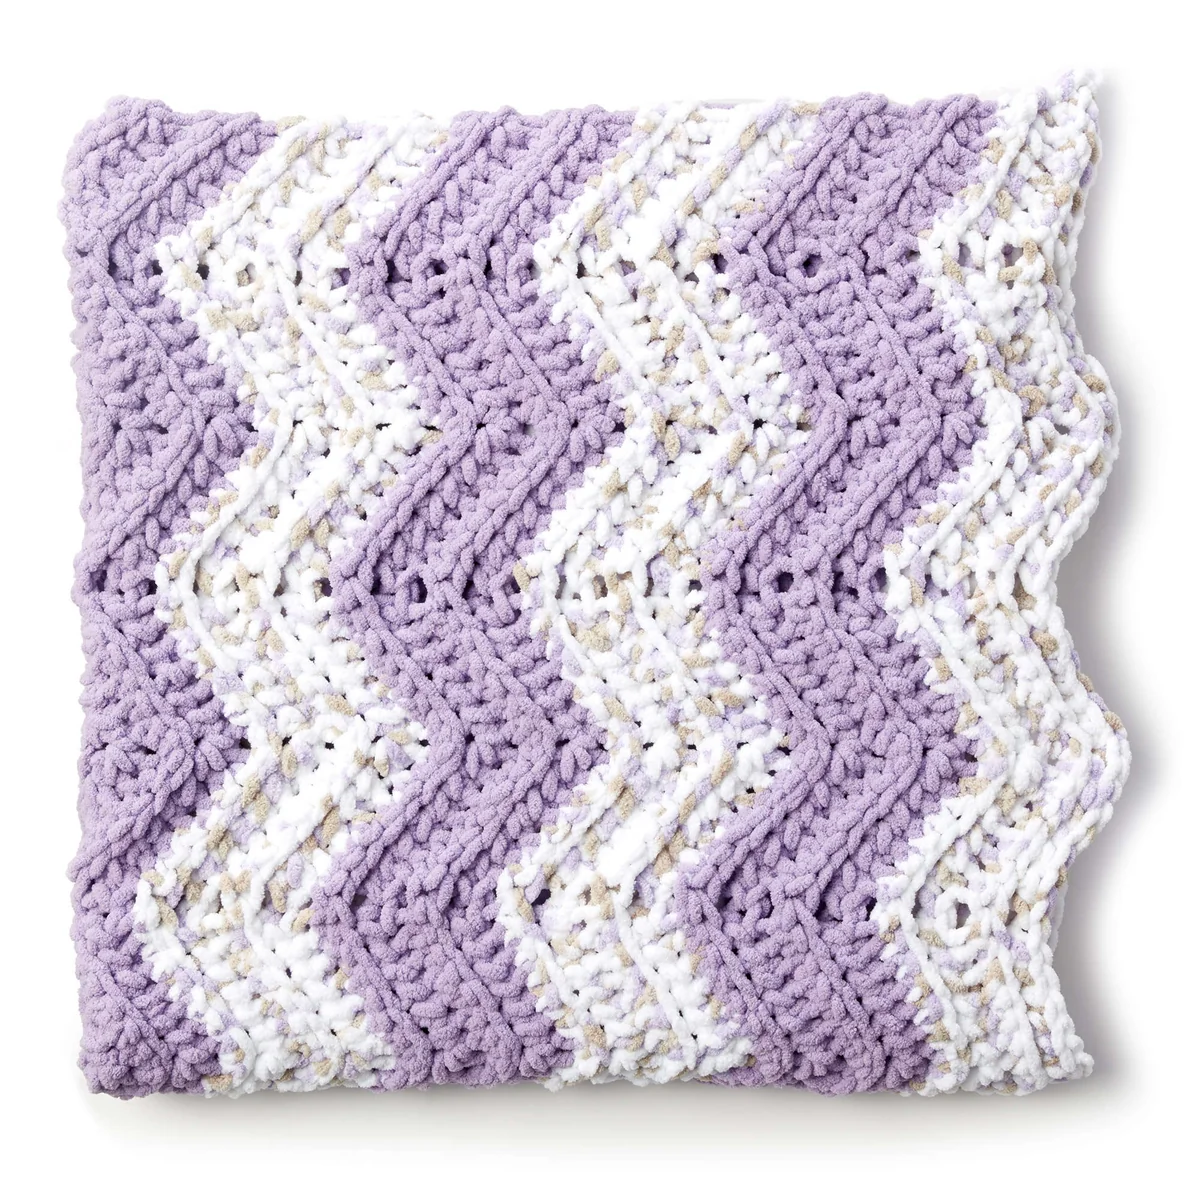
This Simple Chevron Baby Blanket is designed specifically for those who want a plush, chunky result without spending months on a single project. By using a bulky baby yarn and a larger hook, this blanket works up quickly while remaining incredibly soft. The secret to the beautiful texture of this particular pattern is the use of “back loop only” stitches, which creates a ribbed effect that complements the chevron peaks and valleys. Let’s dive into the details and get your hook moving!
Materials & Abbreviations
Before you begin, gather your supplies. To get the look shown in the pattern, we recommend a soft, plush baby yarn in two coordinating colors. This creates a striking striped effect that highlights the chevron shape.
Supplies Needed
- Yarn: Bulky weight baby yarn. You will need two contrasting colors.
- Color A: Approximately 246 yards
- Color B: Approximately 194 yards
- Crochet Hook: Size US L/11 (8 mm) or whichever size is necessary to obtain the gauge listed below.
- Notions: Yarn needle for weaving in ends and sharp scissors.
Pattern Gauge
To ensure your blanket ends up the correct size, check your gauge after the first few rows. A gauge of 7 single crochet stitches and 8 rows should equal a 4-inch square. If your square is too small, try a larger hook; if it is too large, try a smaller hook.
Abbreviations (US Terms)
- ch: chain
- sc: single crochet
- st(s): stitch(es)
- BLO: back loop only
- RS: right side
- rep: repeat
Step-by-Step Instructions
The finished measurements for this blanket are approximately 38 inches wide by 42 inches long. This makes it a perfect size for a crib, a stroller, or simply for snuggling a newborn.
The Stripe Pattern
To keep your colors consistent, we will follow a specific “Stripe Pattern.” This creates a balanced look throughout the blanket:
- Work 4 rows with Color A.
- Work 4 rows with Color B.
These 8 rows together make up one full repeat of the stripe sequence.
The Foundation and Row 1
Starting with Color A, create your foundation chain. Chain 86. This will determine the width of your blanket.
Row 1 (Right Side): We will now establish the chevron shape.
- Work 2 single crochet (sc) in the 2nd chain from the hook. This creates your first “peak.”
- Work 1 sc in each of the next 6 chains.
- Skip the next 1 chain. This creates the “valley.”
- Work 1 sc in each of the next 6 chains.
- Work 3 sc in the next chain. This creates another “peak.”
- Repeat the sequence (1 sc in next 6, skip 1, 1 sc in next 6, 3 sc in next) across the chain.
- End the final repeat by working 2 sc in the last chain. Turn your work.
Row 2 and Beyond
Row 2 is where the magic happens. From this point forward, all stitches are worked into the back loops only (BLO). Instead of inserting your hook under both loops of the “V” at the top of the stitch, insert it only into the loop furthest away from you. This creates a distinct ridge on the right side of the blanket.
Row 2: Chain 1. Working in BLO throughout the entire row:
- Work 2 sc in the first stitch.
- Work 1 sc in each of the next 6 stitches.
- Skip the next 2 stitches. (Note: We skip two stitches here to maintain the chevron angle).
- Work 1 sc in each of the next 6 stitches.
- Work 3 sc in the next stitch.
- Repeat the sequence (1 sc in next 6, skip 2, 1 sc in next 6, 3 sc in next) across the row.
- End the final repeat by working 2 sc in the last stitch. Turn your work.
Completing the Blanket
Now that you have established the pattern in Row 2, the rest of the blanket is simple repetition. Continue repeating Row 2, maintaining the Stripe Pattern (4 rows of Color A, then 4 rows of Color B).
Keep working until the blanket measures approximately 42 inches from the beginning. To ensure the blanket looks symmetrical, make sure you end the project with a final block of 4 rows of Color A.
Finishing
Once you have reached the desired length of 42 inches, it is time to wrap up your project. Cut your yarn, leaving a tail of about 6 to 10 inches. Pull the loop through the final stitch and pull tight to secure it.
Using your yarn needle, weave the remaining tail and any other yarn ends from color changes back into the stitches of the blanket. Make sure to weave them in a zig-zag motion so they don’t pop out over time. Give your blanket a gentle shake or a light steam if needed to help the chevrons settle into their natural shape.
Tips for Success
Mastering the Back Loop Only (BLO)
If you are new to BLO, don’t worry! The easiest way to identify the back loop is to look at the top of your stitch. You will see two parallel strands of yarn. The back loop is the one furthest away from you. Working into only this loop prevents the blanket from curling and gives it that unique, ribbed texture.
Maintaining Consistent Tension
When working chevron patterns, it is easy to accidentally pull the “valleys” too tight or make the “peaks” too loose. Try to keep a relaxed grip on your yarn. If you notice the blanket is becoming too narrow or too wide, double-check that you are skipping exactly 2 stitches in the valleys of Row 2.
Choosing Your Colors
While we used a light lilac and a printed lilac for this version, the chevron pattern looks great with any combination. For a high-contrast look, try a dark navy and a crisp white. For a softer, modern feel, try various shades of the same color (ombre style) or a palette of muted pastels.
Counting Your Stitches
Because this pattern involves skipping stitches and adding multiple stitches into one, it is a good idea to count your stitches at the end of every few rows. This ensures that you haven’t accidentally added or dropped a stitch, which would cause the zig-zags to shift off-center.