Bloom Into Cuteness: Crochet These Adorable Easter Babies in Pots!
“`html
Adorable Crochet Easter Babies in Pots: Step-by-Step Amigurumi Pattern
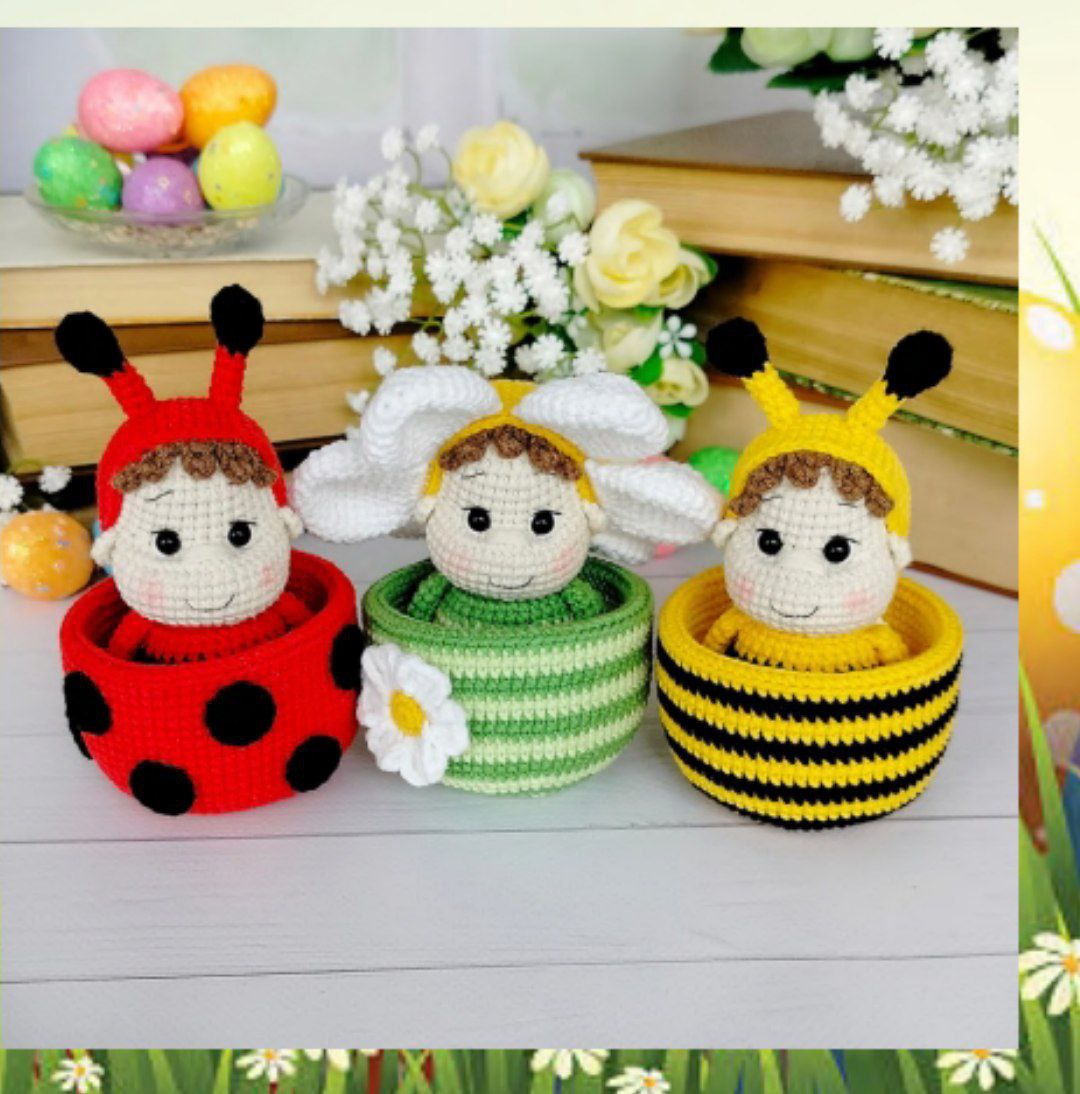
Bring some spring cheer to your home with these darling Easter Babies in Pots! This detailed guide will walk you through creating three cute characters: a Bee, a Ladybug, and a Daisy. Each baby sits snugly in its own themed crochet pot, making them perfect for Easter decorations or handmade gifts.
Materials and Tools
- Yarn: Cotton blend yarn (such as YarnArt Jeans) in the following colors:
- Red, Black, Yellow, Light Green, Green, White, Beige, and Brown.
- Eyes: 5-6 mm safety eyes or glue-on half-beads (3 pairs total).
- Embroidery Thread: Thin black sewing thread for facial details.
- Stuffing: High-quality polyester fiberfill.
- Crochet Hook: 1.5 mm hook (or a size suitable for your chosen yarn).
- Other Tools: Sewing needle, pins for positioning, fabric glue, scissors, and pink dry pastel for cheeks.
Crochet Notes and Abbreviations
This pattern uses US terminology and is worked in a continuous spiral. Do not join the rounds with a slip stitch unless specified. Use a stitch marker to track the beginning of each row.
- AR: Adjustable ring / Magic ring
- ch: Chain
- sc: Single crochet
- hdc: Half double crochet
- dc: Double crochet
- tr: Treble crochet
- sl st: Slip stitch
- inc: Increase (2 sc in 1 stitch)
- dec: Decrease (sc2tog)
- BLO: Back loops only
- FLO: Front loops only
- (…)x: Repeat the sequence inside the parentheses the specified number of times
- shst: Shift stitch (used to adjust the marker position to keep the piece centered)
Part 1: The Bee Baby
The Hands (Make 2)
Work with beige yarn.
- 6 sc in AR (6)
- (1 sc, 1 inc) x 3 (9)
- 9 sc (9)
- 1 sc, 1 dec, 6 sc (8)
- 1 dec, 6 sc (7)
Change to yellow yarn. Cut the beige thread and fasten off.
- Rows 6-11: 7 sc per row (7)
Fold the hand in half and connect both sides with 3 sc to create a flat end. Fasten off and hide the thread.
Body and Head
Work with yellow yarn. Stuff as you go.
- 6 sc in AR (6)
- 6 inc (12)
- (1 sc, 1 inc) x 6 (18)
- 1 sc, 1 inc, (2 sc, 1 inc) x 5, 1 sc (24)
- (3 sc, 1 inc) x 6 (30)
- 2 sc, 1 inc, (4 sc, 1 inc) x 5, 2 sc (36)
- (5 sc, 1 inc) x 6 (42)
- BLO: 42 sc (42)
- Rows 9-10: 42 sc (42)
Change to black yarn (do not cut the yellow thread; carry it along).
- Rows 11-13: 42 sc (42)
Change to yellow yarn.
- Rows 14-15: 42 sc (42)
Change to black yarn.
- (5 sc, 1 dec) x 6 (36)
- Rows 17-18: 36 sc (36)
Change to yellow yarn. Cut the black thread and fasten off.
- 2 sc, 1 dec, (4 sc, 1 dec) x 5, 2 sc (30)
- 30 sc (30)
Attaching Hands and Finishing the Body
- 6 sc, attach first hand (bend inward) and crochet 3 sc together with the hand, 12 sc, attach second hand (bend inward) and crochet 3 sc together with the hand, 6 sc (30)
- (3 sc, 1 dec) x 6 (24)
- 1 sc, 1 dec, (2 sc, 1 dec) x 5, 1 sc (18)
Change to beige yarn. Cut the yellow thread and fasten off.
- BLO: 18 inc (36)
- (5 sc, 1 inc) x 6 (42)
- Rows 26-31: 42 sc (42)
The Face and Cheeks
- 11 sc, 10 dec, 11 sc (32)
- Rows 33-37: 32 sc (32)
Eyes: Insert safety eyes between rows 33 and 34, with 4 sc between them.
- (14 sc, 1 dec) x 2 (30)
- (3 sc, 1 dec) x 6 (24)
- 1 sc, 1 dec, (2 sc, 1 dec) x 5, 1 sc (18)
- (1 sc, 1 dec) x 6 (12)
- 6 dec (6)
Fasten off and sew the hole closed.
Needle Sculpting for Realistic Eyes
To give the baby a cute expression, use a needle and thread to pull the face into shape:
- Point 1 & 2: Located between rows 32 and 33 (the eyes).
- Point 3: The center of the adjustable ring (top of the head).
- Insert needle at Point 3 and pull through to Point 1. Repeat this process on both sides of the eye to create a small indentation. Repeat for the other eye using Point 2.
Hat, Ears, and Antennae
Hat (Yellow Yarn):
- 6 sc in AR (6)
- 6 inc (12)
- (1 sc, 1 inc) x 6 (18)
- 1 sc, 1 inc, (2 sc, 1 inc) x 5, 1 sc (24)
- (3 sc, 1 inc) x 6 (30)
- 2 sc, 1 inc, (4 sc, 1 inc) x 5, 2 sc (36)
- (5 sc, 1 inc) x 6 (42)
- 3 sc, 1 inc, (6 sc, 1 inc) x 5, 3 sc (48)
- Rows 9-13: 48 sc (48)
Finish with a slip stitch and fasten off.
Ears (Make 2 – Beige Yarn): Ch 2, in the 2nd chain from hook, work 5 sc. Fasten off.
Antennae (Make 2): Work with black yarn.
- 6 sc in AR (6)
- 6 inc (12)
- Rows 3-4: 12 sc (12)
- 6 dec (6)
Change to yellow yarn. Rows 6-10: 6 sc per row. Fasten off.
Wings, Bangs, and Final Assembly
Wings (Make 2 – White Yarn):
- 6 sc in AR (6)
- 6 inc (12)
- (1 sc, 1 inc) x 6 (18)
- 1 sc, 1 inc, (2 sc, 1 inc) x 5, 1 sc (24)
- (3 sc, 1 inc) x 6 (30)
- Rows 6-10: 30 sc (30)
- (3 sc, 1 dec) x 6 (24)
- 24 sc (24)
- 1 sc, 1 dec, (2 sc, 1 dec) x 5, 1 sc (18)
- 18 sc (18)
- (1 sc, 1 dec) x 6 (12)
- 12 sc (12)
Fold in half and connect sides with 6 sc.
Bangs (Brown Yarn): (5 ch, starting from 2nd ch from hook, 4 sc on chain) x 5. Fasten off.
Assembly: Sew on the bangs, ears (between rows 29-32), hat, antennae, and wings (between rows 22-23). Use pink dry pastel to add a soft tint to the cheeks.
The Bee Pot
Work with yellow yarn. Do not stuff.
- 6 sc in AR (6)
- 6 inc (12)
Change to black yarn.
- (1 sc, 1 inc) x 6 (18)
- 1 sc, 1 inc, (2 sc, 1 inc) x 5, 1 sc (24)
Change to yellow yarn.
- (3 sc, 1 inc) x 6 (30)
- 2 sc, 1 inc, (4 sc, 1 inc) x 5, 2 sc (36)
Change to black yarn.
- (5 sc, 1 inc) x 6 (42)
- 3 sc, 1 inc, (6 sc, 1 inc) x 5, 3 sc (48)
Change to yellow yarn.
- (7 sc, 1 inc) x 6 (54)
- 4 sc, 1 inc, (8 sc, 1 inc) x 5, 4 sc (60)
Change to black yarn.
- (9 sc, 1 inc) x 6 (66)
- 5 sc, 1 inc, (10 sc, 1 inc) x 5, 5 sc (72)
Alternate 2 rows of yellow and 2 rows of black until row 24. Then work 1 row of yellow (72 sc).
- BLO: 72 sc (72)
- BLO: 72 sc (72)
Work in both loops again.
- Rows 28-37: 72 sc (72)
- 5 sc, 1 dec, (10 sc, 1 dec) x 5, 5 sc (66)
- (9 sc, 1 dec) x 6 (60)
- 4 sc, 1 dec, (8 sc, 1 dec) x 5, 4 sc (54)
- (7 sc, 1 dec) x 6 (48)
- 3 sc, 1 dec, (6 sc, 1 dec) x 5, 3 sc (42)
- (5 sc, 1 dec) x 6 (36)
- 2 sc, 1 dec, (4 sc, 1 dec) x 5, 2 sc (30)
- (3 sc, 1 dec) x 6 (24)
- 1 sc, 1 dec, (2 sc, 1 dec) x 5, 1 sc (18)
- (1 sc, 1 dec) x 6 (12)
- 6 dec (6)
Fasten off. Fold the pot in half (inner wall inside) to create a sturdy double-bottom base.
Part 2: The Ladybug Baby
To create the Ladybug, follow the exact same steps as the Bee, with these modifications:
- Colors: Replace all Yellow yarn with Red yarn.
- Wings: Use Red yarn instead of white. After completing the wings, embroider small black circles (spots) on them using black yarn.
- Ladybug Pot: Follow the Bee Pot instructions, but use Red yarn instead of yellow. Use the same black stripes as the Bee pot.
- Spots (Optional for Pot): If you want a spotted pot, use red yarn for the entire pot and crochet small black circles (Ch 3, 11 dc in 3rd ch from hook) and glue them to the outside.
Part 3: The Daisy Baby
To create the Daisy, follow the Bee pattern with these modifications:
- Colors: Replace Yellow with Green and Black with Light Green.
- Daisy Pot: Follow the Bee Pot instructions using Green and Light Green.
- Daisy Hat:
- The Center: Work with yellow yarn. 6 sc in AR (6), 6 inc (12). Finish with sl st and fasten off.
- The Petals (Make 6): Attach white yarn to the center. In one stitch: (sl st, 3 ch, 2 tr, next stitch 1 dc, 2 tr, 3 ch). Repeat 6 times around the center. Fasten off.
- Hat Base: Follow the same hat pattern as the Bee but in green. Attach the petals to the final row of the hat.
Final Assembly
Once your babies and pots are finished, simply place the babies inside their corresponding pots. Use a few stitches to secure them in place if desired. Your Easter babies are now ready to brighten up your spring decor!
“`