Stitch Up Some Holiday Magic: Mini Christmas Ogre Crochet Tutorial
“`html
How to Crochet a Cute Mini Christmas Ogre: Step-by-Step Amigurumi Tutorial
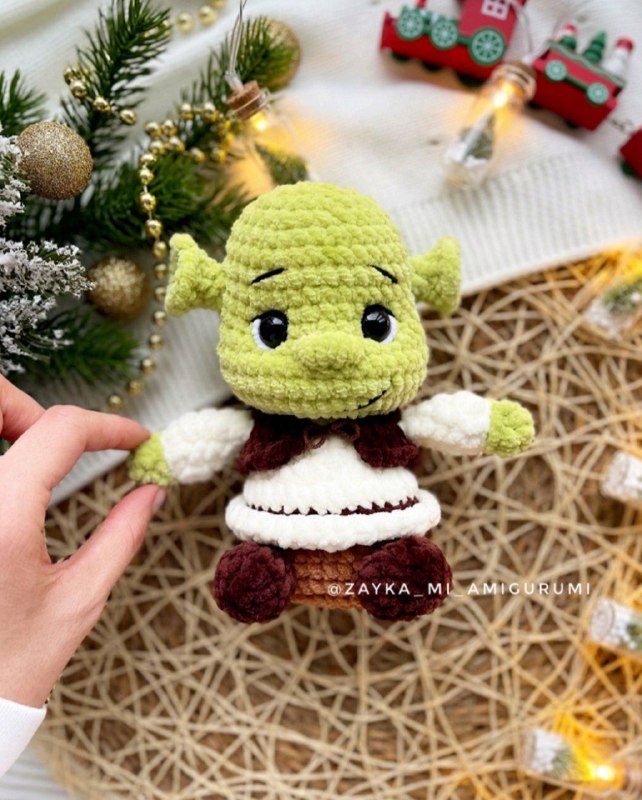
Bring some festive magic to your crochet collection with this adorable mini Christmas Ogre. Perfect as a holiday ornament or a small gift, this chunky amigurumi project is quick to make and incredibly cuddly. Follow this detailed guide to create your own little green friend!
Materials Needed
To achieve the look in the photos, we recommend using plush/chenille yarns for that extra soft, chunky feel.
- Yarn:
- Dark Brown (Plush): For the boots.
- Red (Plush): For the hat.
- Pistachio Green (Plush): For the main body, head, and ears.
- Milk White (Plush): For the shirt and beard.
- Caramel/Tan (Plush): For the pants.
- White (Fine Plush): For eye detailing.
- Black (Cotton/Acrylic Blend): For facial features.
- Brown (Cotton/Acrylic Blend): For the vest ties.
- Hook: 3.5 mm
- Eyes: 14 mm safety eyes
- Stuffing: Fiberfill or polyester stuffing
- Extras:
- Thin elastic band (0.7 mm, approx 30 cm for the beard)
- Strong sewing thread for sculpting
- Tapestry needle, scissors, and a stitch marker
Finished Size: Approximately 15 cm (6 inches).
Crochet Abbreviations (US Terms)
- MR: Magic Ring
- ch: Chain
- st: Stitch
- sc: Single Crochet
- inc: Increase (2 sc in one stitch)
- dec: Decrease (sc 2 together)
- hdc: Half Double Crochet
- dc: Double Crochet
- tr: Treble Crochet
- sl st: Slip Stitch
- BLO: Back Loop Only
- Shift Stitch: A stitch worked as a sc that acts as the turning chain; the following stitch is counted as the first stitch of the round.
The Pattern
Legs (Make 2)
Use Dark Brown yarn. Do not stuff.
- MR: 7 sc (7)
- 7 inc (14)
- 14 sc (14)
- 7 dec (7)
Fasten off and leave a short tail.
Arms (Make 2)
Start with Pistachio Green. Stuff only the bottom part.
- MR: 6 sc (6)
- inc, 5 sc (7)
- 7 sl st (7)
Change to Milk White yarn. Fasten off the green yarn.
- BLO: 7 sl st (7)
- BLO: inc, 6 sc (8)
- 8 sc (8)
- (dec, 2 sc) * 2 (6)
- 6 sc (2 rounds) (6)
Flatten the piece and sc 3 across both sides to close. Fasten off.
Body and Head
Work from the bottom up. Stuff as you go.
Body Section:
Start with Caramel Brown yarn.
- ch 6, starting from 2nd ch from hook: inc, 3 sc, 4 sc in one st, 3 sc, inc (14)
- 2 inc, 3 sc, 4 inc, 3 sc, 2 inc (22)
- (1 sc, inc) * 11 (33) + Shift Stitch
- 2 sc, 3 sc together with the back loops of the first leg, 5 sc, 3 sc together with the back loops of the second leg, 20 sc (33)
- 2 sc, (1 sc, dec, 1 sc) worked through the front loops of the first leg, 5 sc, (1 sc, dec, 1 sc) worked through the front loops of the second leg, 20 sc (33)
- 24 sc (incomplete round). Move your marker here; the start of the round is now at the back center. (33)
Shirt Details:
Change to Milk White yarn.
- 33 sl st (33)
Change to Dark Brown yarn.
- BLO: 33 sl st (33)
Change back to Milk White yarn.
- BLO: 33 sl st (33)
- 33 sc (33) + Shift Stitch
- 8 sc, (dec, 1 sc) * 6, 7 sc (27)
- (2 sc, dec) * 6, 3 sc (21)
- 4 sc, 3 sc together with the first arm, 7 sc, 3 sc together with the second arm, 4 sc (21)
- (4 sc, dec) * 3, 3 sc (18)
Head Section:
Change to Pistachio Green yarn.
- BLO: 18 sc (18)
- 18 inc (36)
- (5 sc, inc) * 6 (42)
- 42 sc (3 rounds) (42) + 2 Shift Stitches
- 8 sc, (1 sc, dec) * 3, 8 sc (center stitches), (dec, 1 sc) * 3, 8 sc (36)
- 36 sc (5 rounds) (36)
Eye Placement: Insert 14mm safety eyes between rounds 22 and 23, with 7 sc between them.
- (4 sc, dec) * 6 (30)
- (3 sc, dec) * 6 (24)
- (2 sc, dec) * 6 (18)
- (1 sc, dec) * 6 (12)
- 6 dec (6)
Fasten off, weave in ends, and close the hole.
Shirt Trim
Flip the doll upside down. Attach Milk White yarn to the back center of the front loops of Round 7. Work 2 ch, and hdc in each loop around (33). Fasten off and weave in ends.
Ears (Make 2)
Use Pistachio Green yarn.
- MR: 5 sc (5)
- 5 sc (2 rounds) (5)
- 5 inc (10)
- (1 sc, inc) * 5 (15)
Fasten off, leaving a long tail. Sew the ears to the sides of the head on rounds 23-24, about 4 sc away from the eyes.
The Vest
Use Dark Brown yarn. This is worked in rows.
- ch 21, starting from 2nd ch: 4 sc, inc, 1 sc, inc, 6 sc, inc, 1 sc, inc, 4 sc (24)
- 1 sc, inc, 1 sc, ch 5, skip 4 st, inc, 8 sc, inc, ch 5, skip 4 st, 1 sc, inc, 1 sc (30)
- 4 sc, 5 sc across the chain, 12 sc, 5 sc across the chain, 4 sc (30)
Fasten off. Put the vest on the body and tie it with a piece of brown thread into a small bow.
Christmas Hat
Start with Red plush yarn.
- MR: 6 sc (6)
- 6 sc (6)
- (2 sc, inc) * 2 (8)
- (3 sc, inc) * 2 (10)
- (4 sc, inc) * 2 (12)
- (5 sc, inc) * 2 (14)
- (6 sc, inc) * 2 (16)
- (7 sc, inc) * 2 (18)
- (8 sc, inc) * 2 (20)
- (9 sc, inc) * 2 (22)
- (10 sc, inc) * 2 (24)
- (7 sc, inc) * 3 (27)
- (8 sc, inc) * 3 (30)
- (9 sc, inc) * 3 (33)
- (10 sc, inc) * 3 (36)
- (8 sc, inc) * 4 (40)
- (9 sc, inc) * 4 (44)
Change to White plush yarn.
- 44 sc (4 rounds) (44)
Fasten off and weave in ends.
Hat Pompom
Use White plush yarn.
- MR: 6 sc (6)
- 6 inc (12)
- (1 sc, inc) * 6 (18)
- 18 sc (3 rounds) (18)
- (1 sc, dec) * 6 (12)
- 6 dec (6)
Stuff the pompom and sew it to the top of the hat.
The Beard
Use White plush yarn. Work in rows.
- ch 20, starting from 2nd ch: 19 sc, ch 1
- 19 sc, ch 1
- 6 sc, 3 tr, ch 1, 1 dtr, ch 1, 3 tr, 6 sc
Fasten off. Take a 30 cm piece of elastic, fold it in half, and tie the ends to the sides of the beard to create a strap.
Final Assembly and Details
Now it’s time to bring your ogre to life with the facial details!
- Eyes: Use strong thread to pull the area above the safety eyes slightly inward to create a more realistic eyelid socket.
- Nose: Using Pistachio Green yarn, embroider a small nose on round 21, exactly between the eyes (covers about 3 sc).
- Eye Highlights: Use a small amount of white yarn to add a “glint” to the outer corner of the safety eyes.
- Eyebrows & Eyelids: Use black thread to embroider the upper lids and eyebrows on round 24 (3 sc each, spaced 5 sc apart).
- Mouth: Embroider a small smile on rounds 17-18 (covers 4 sc). You can use a tiny drop of glue to keep the smile perfectly in place.
Put on the hat, the beard, and the vest. Your mini Christmas Ogre is complete!
“`