How to Crochet an Adorable Zebra Amigurumi: Complete Step-by-Step Pattern
Adorable Crochet Zebra Amigurumi Pattern: A Complete Step-by-Step Guide
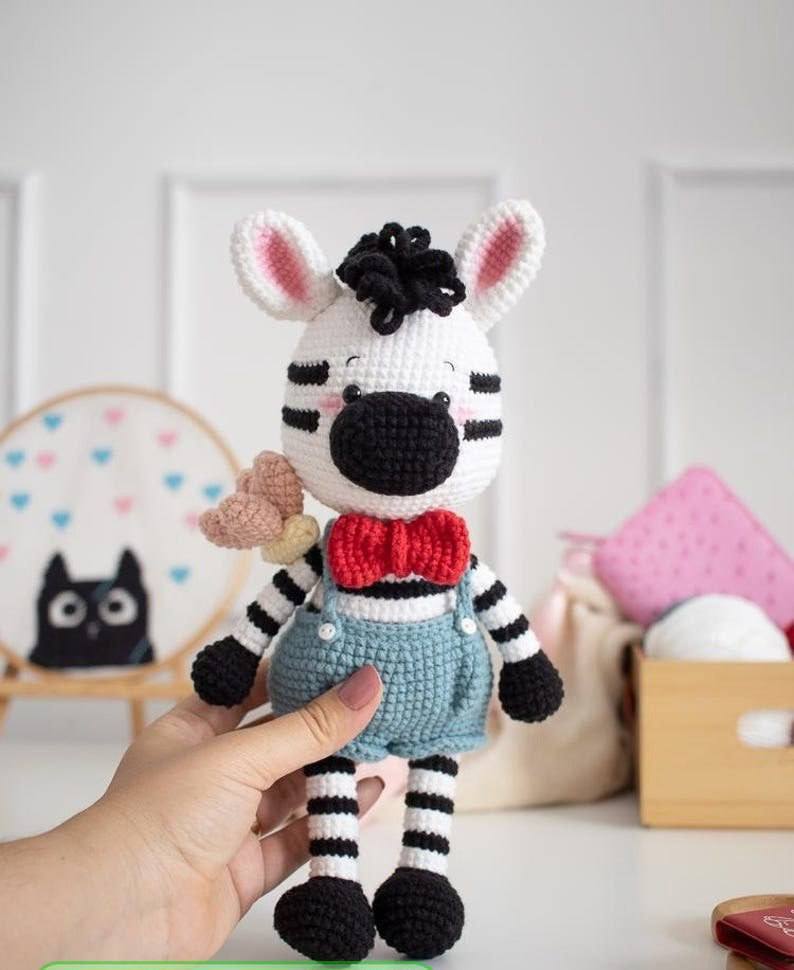
If you are looking for a project that combines classic charm with a bit of a challenge, this adorable crochet zebra is the perfect choice. With its striking stripes, curly mane, and customizable outfits, this amigurumi project is a wonderful way to practice your skills in color changing, shaping, and detailed assembly. Whether you are making a gift for a child or adding to your own collection, this little zebra is sure to bring a smile to anyone’s face.
This pattern is designed for intermediate crocheters. It features some advanced techniques, such as working in the front and back loops to create a 3D relief effect for the stripes, and assembling limbs directly into the body. Let’s dive in and create your own striped friend!
Materials & Abbreviations
Supplies You Will Need
- Yarn: Amigurumi Soft (or a similar smooth cotton/acrylic blend) in the following colors:
- Black
- White
- Red (for the bow tie)
- Yellow (for the butterfly body)
- Pink (for the butterfly wings and dress)
- Blue (for the overalls)
- Crochet Hook: 1.75 mm (or a size that ensures a tight stitch to keep stuffing inside)
- Eyes: 7 mm safety eyes
- Notions:
- Two small white buttons
- Black embroidery thread for facial details
- Fiberfill stuffing
- Cosmetic blush (or pastel chalk/fabric markers) for cheeks and ears
- Tapestry needle and scissors
- Stitch markers and sewing pins
- Optional: Two small strong neodymium magnets (for the butterfly/hand interaction)
Finished Size
- Standing height: Approximately 10 inches (25 cm)
- Sitting height: Approximately 7 inches (18 cm)
US Crochet Terms & Abbreviations
- MR: Magic Ring
- ch: Chain
- sc: Single crochet
- sl st: Slip stitch
- hdc: Half double crochet
- dc: Double crochet
- inc: Increase (2 sc in one stitch)
- dec: Decrease (sc 2 together)
- Triple Inc: 3 sc in one stitch
- BLO: Back loop only
- FLO: Front loop only
Step-by-Step Instructions
The Butterfly Accessory
The zebra carries a little butterfly. We start with the wings and then the body.
Butterfly Wings (Make 2)
Use pink yarn.
- Round 1: 5 sc in MR [5]
- Round 2: 5 inc [10]
- Round 3: (4 sc, inc) x 2 [12]
- Round 4: 12 sc [12]
- Round 5: 2 dec, 5 sc, 3 dec, 7 sc, 1 dec [18]
- Round 6: 1 dec, 3 sc, 3 dec, 3 sc, 2 dec [12]
Fasten off the first wing. For the second wing, do not cut the yarn after Round 6.
Joining the Wings
Place the wings together. Crochet 12 sc around the edge of the first wing, then 12 sc around the edge of the second wing, joining them together. Stuff lightly and sew the center hole closed.
Butterfly Body
Use yellow yarn.
- Round 1: 6 sc in MR [6]
- Round 2: (1 sc, inc) x 3 [9]
- Round 3: 9 sc [9]
- Round 4: (2 sc, inc) x 3 [12]
- Rounds 5-8: 12 sc [12]
Optional Magnet: At Round 7, add a small amount of stuffing and insert a neodymium magnet before finishing. This allows the butterfly to “stick” to the zebra’s hand.
- Round 9: (2 sc, dec) x 3 [9]
- Round 10: 9 sc [9]
- Round 11: (1 sc, dec) x 3 [6]
Close with a magic decrease. Sew the wings vertically onto the body.
The Zebra Head
The head is the most detailed part, requiring a mix of white and black yarn to create the stripes.
Main Head Shape
Use white yarn.
- Round 1: 7 sc in MR [7]
- Round 2: 7 inc [14]
- Round 3: (1 sc, inc) x 7 [21]
- Round 4: 1 sc, inc, (2 sc, inc) x 6, 1 sc [28]
- Round 5: (3 sc, inc) x 7 [35]
- Round 6: 2 sc, inc, (4 sc, inc) x 6, 2 sc [42]
- Round 7: 42 sc [42]
- Round 8: (5 sc, inc) x 7 [49]
- Round 9: 49 sc [49]
- Round 10: (15 sc, inc) x 3, 1 sc [52]
- Round 11: 52 sc [52]
Creating the Stripes
Round 12 is a transition round to shape the face. Crochet as follows: (4 sc, inc) x 3, 1 inc, (1 inc, 1 sc) x 2, 12 sc, (1 sc, inc) x 2, 1 inc, (1 inc, 4 sc) x 3 [64].
Rounds 13-14 (The Relief Stripes): Use a combination of black and white. For the black sections, work 24 sl st in BLO, then 1 sc in FLO. For the white section, work 14 sc. For the remaining black section, work 25 sl st in BLO.
Round 15: 64 sc (25 black, 14 white, 25 black).
Round 16: Use white yarn. 25 sl st BLO, 14 sc, 25 sl st BLO.
Rounds 17-18: 64 sc [64].
Rounds 19-20: Repeat the stripe pattern from Rounds 13-14.
Round 21: Use white yarn. 25 sl st BLO, 14 sc, 25 sl st BLO.
Closing the Head
- Round 22: (7 sc, inc) x 8 [72]
- Rounds 23-25: 72 sc [72]
- Round 26: (7 sc, dec) x 8 [64]
- Round 27: 8 sc, 1 dec, 9 sc, (1 sc, 1 dec) x 2, 12 sc, (1 dec, 1 sc) x 2, 1 dec, 9 sc, 1 dec, 6 sc, 1 dec [56]
- Round 28: (12 sc, dec) x 4 [52]
- Round 29: (11 sc, dec) x 4 [48]
Eyes: Insert 7 mm safety eyes between the stripes, starting at Round 17, with 8 sc between them.
- Round 30: 2 sc, 1 dec, (4 sc, 1 dec) x 7, 2 sc [40]
- Round 31: (3 sc, 1 dec) x 8 [32]
- Round 32: 1 sc, 1 dec, (2 sc, 1 dec) x 7, 1 sc [24]
Stuff the head firmly and fasten off.
The Mane, Ears, and Muzzle
The Mane
Use black yarn. Chain 35. Turning back from the 2nd ch from hook: 34 sc, ch 1, turn. Row 2: 34 sc FLO, ch 1, turn. Row 3: 34 sc BLO. Do not cut yarn.
Creating Curls: Ch 12, then sl st into the next base stitch. Repeat across the entire row. In the following row, work the curls into the front loops of the base to create a dense, curly texture. Sew the mane to the top of the head, hiding the color transitions.
The Ears (Make 2)
Use white yarn.
- Round 1: 6 sc in MR [6]
- Round 2: 6 inc [12]
- Round 3: (3 sc, inc) x 3 [15]
- Round 4: (4 sc, inc) x 3 [18]
- Round 5: (5 sc, inc) x 3 [21]
- Round 6: (6 sc, inc) x 3 [24]
- Rounds 7-10: 24 sc [24]
- Round 11: 8 sc, 4 dec, 8 sc [20]
- Round 12: 6 sc, 4 dec, 6 sc [16]
- Round 13: 6 sc, 3 dec, 4 sc [12]
Flatten the decreased area to create the inner fold of the ear. Sew to the side of the head and apply a bit of pink blush to the inner ear.
The Muzzle
Use black yarn. Chain 8. Starting from the 2nd ch: 1 inc, 5 sc, 1 inc. On the other side of the chain: 6 sc. [15 total].
- Round 2: 2 inc, 5 sc, 3 inc, 4 sc, 1 inc [21]
- Round 3: (1 sc, inc) x 2, 5 sc, (1 sc, inc) x 3, 5 sc, 1 inc [27]
- Round 4: 4 sc, 1 puff stitch (4 hdc in one loop FLO), 6 sc, 1 puff stitch, 15 sc [27]
- Round 5: (1 inc, 2 sc) x 2, 5 sc, (1 inc, 2 sc) x 3, 4 sc, 1 inc, 2 sc [33]
- Round 6: 33 sc [33]
- Round 7: (9 sc, dec) x 3 [30]
Stuff firmly and sew to the head below the eyes.
Arms and Legs
The Arms (Make 2)
Use black yarn for the base. 7 sc in MR, 7 inc [14]. (1 inc, 2 sc) x 4, 1 inc, 1 sc [19]. 3 rounds of 19 sc. Then (2 sc, dec) x 5, 2 sc [14]. Then 1 sc, (dec, 1 sc) x 3, 4 sc [11].
Stripes: Switch to white: 11 sl st BLO. 2 rounds of 11 sc. Switch to black: 11 sl st BLO. 1 round of 11 sc. Repeat this pattern of 1 row relief stitch and 1-2 rows of plain sc until the arm is finished. Stuff the hand firmly but leave the upper arm looser for flexibility.
The Legs (Make 2)
Use black yarn. Chain 6. Starting from 2nd ch: 4 sc, 4 sc in last stitch, then on the other side: 3 sc, 1 inc [13].
- Round 2: 1 inc, 3 sc, 4 inc, 4 sc, 1 inc [19]
- Round 3: 1 sc, 1 inc, 3 sc, (1 inc, 1 sc) x 4, 4 sc, 1 inc, 1 sc [25]
- Round 4: 1 sc, 1 inc, 6 sc, (1 inc, 2 sc) x 4, 4 sc, 1 inc [31]
- Rounds 5-7: 31 sc [31]
- Round 8: 2 sc, (2 sc, dec) x 6, 5 sc [25]
- Round 9: 5 sc, (dec, 1 sc) x 6, 2 sc [19]
- Round 10: 2 sc, (dec, 1 sc) x 5, 2 sc [14]
Add a white cuff: 14 sl st BLO, 2 rounds of 14 sc. Then a black stripe: 14 sl st BLO, 1 round of 14 sc. Continue stripes up the leg.
Finishing & Assembly
The Body
Start with a white base: Chain 6. Turning back: 5 sc, ch 1, turn. Row 2: 5 sc. Now, connect the legs. Crochet 7 sc FLO across the first leg, 5 sc for the belly, and 7 sc FLO across the second leg [38 total].
Continue in white: 7 sc. Then build the body shape: 12 sc, (2 sc, inc) x 3, 8 sc, (2 sc, inc) x 3 [44]. Next round: 12 sc, (1 inc, 3 sc) x 3, 14 sc, (1 inc, 2 sc) x 2 [49]. Then 1 sc, 1 inc, 47 sc [50].
Add stripes to the belly using the same BLO sl st / plain sc method used for the head and arms. Finally, decrease the waist and the upper chest to fit the head. Sew the arms to the sides of the body and the head to the top using an invisible join.
The Tail
Use black yarn. 6 sc in MR, (1 inc, 1 sc) x 3 [9], (2 sc, inc) x 3 [12], (1 inc, 3 sc) x 3 [15]. 2 rounds of 15 sc. (1 dec, 3 sc) x 3 [12]. 5 dec, 2 sc [7]. Switch to white: 7 sl st BLO, 10 rounds of 7 sc. Sew to the back of the body.
Customizing the Outfit
Overalls: Use blue yarn. Chain 50 and join into a ring. Work in spirals. Increase to 65 stitches and create an opening for the tail (ch 6, skip 6 stitches). Crochet legs by splitting the stitches and working tubes. Add straps by chaining and sewing them to the front with small white buttons.
Dress: Use pink yarn. Chain 50 and join into a ring. Increase to 70 stitches. Create a lace hem by skipping stitches and working sc into the third loop. Add straps similar to the overalls.
Bow Tie: Crochet two small red ovals (7 ch base, increasing and decreasing to shape). Sew them together in the center and wrap a small strip of red crochet around the middle to create the knot. Sew to the neck.
Tips for a Perfect Zebra
- Tension is Key: Use a small hook to ensure your stitches are tight. This prevents the fiberfill from showing through, especially on the white sections.
- Clean Color Changes: When switching from white to black, change colors on the last stitch of the previous round for a seamless look.
- Symmetry: Use pins to position the ears, mane, and arms before sewing. This ensures your zebra looks balanced and professional.
- Facial Details: Use a very fine embroidery thread for the eyebrows to keep the expression sweet and subtle.