Adorable Crochet Bear Pattern with Dress: A Complete Step-by-Step Tutorial
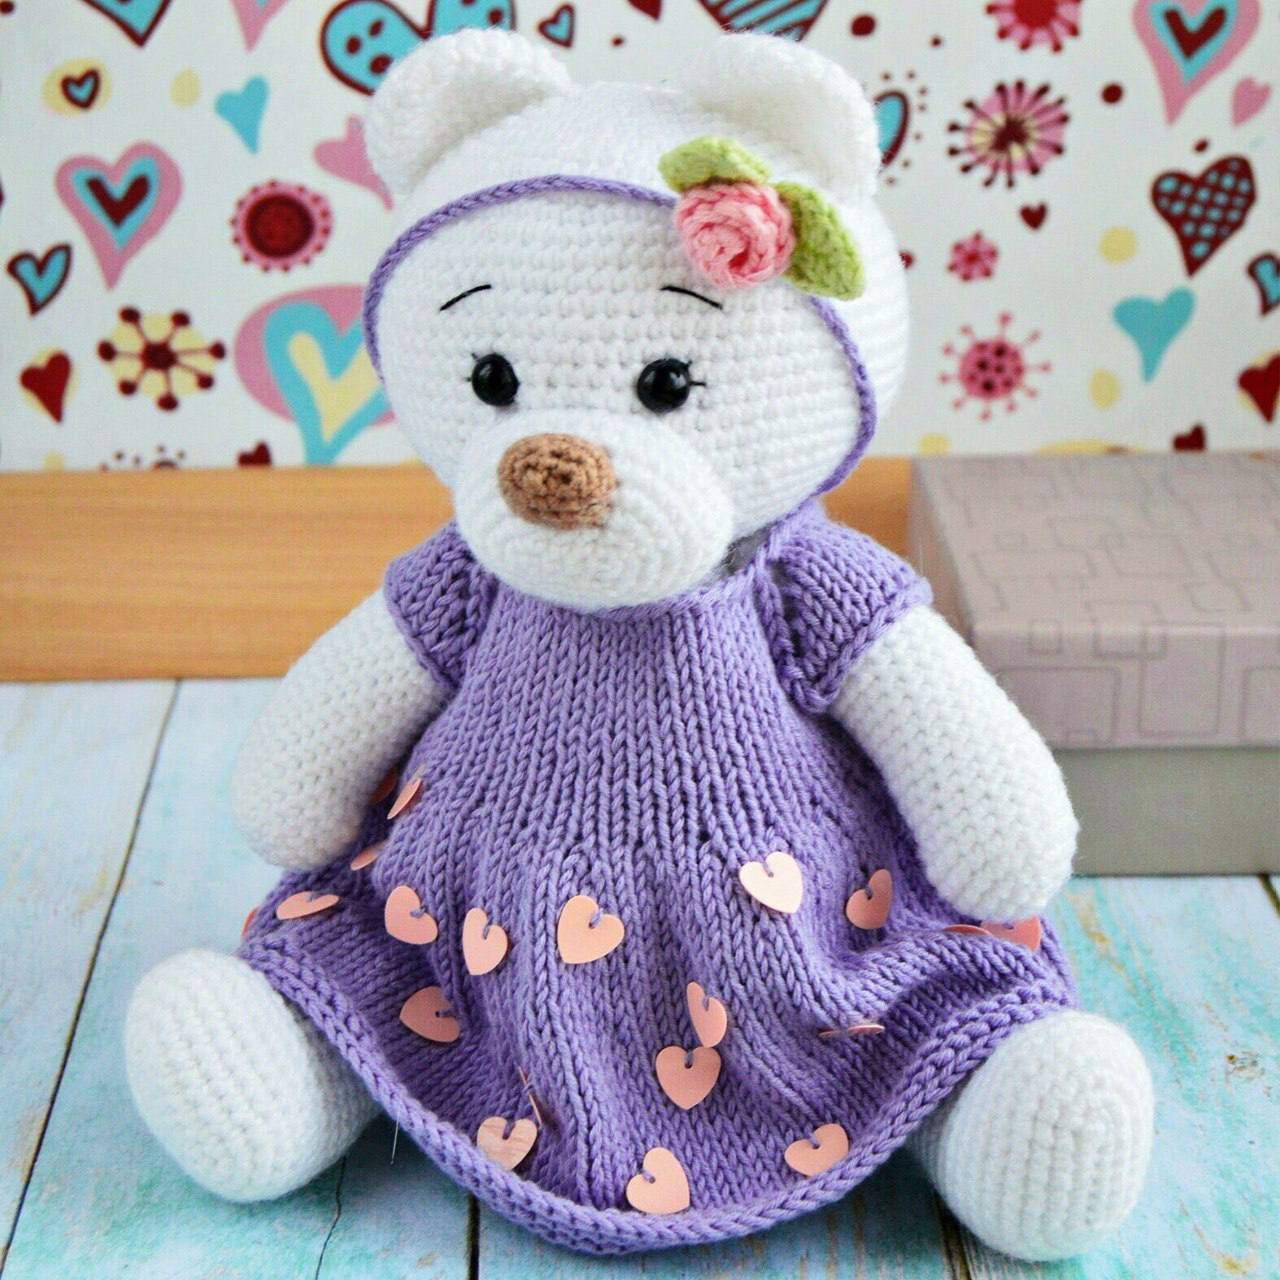
Looking for a heartwarming project to add to your amigurumi collection? This adorable crochet bear is the perfect companion for beginners and experienced makers alike. With its sweet expression, plush texture, and a charming little knitted dress, this bear makes a wonderful gift for a newborn, a child, or anyone who loves cozy, handmade toys.
In this tutorial, we will walk you through every step of creating this little friend, from the rounded head and paws to the detailed accessories. Whether you are looking to practice your shaping or want to try combining crochet and knitting in one project, this pattern has something for everyone. Let’s get started!
Materials & Abbreviations
To achieve the best results, I recommend using a soft, plush yarn to give your bear that “huggable” feel. If you don’t have plush yarn, a soft acrylic or cotton blend works beautifully too.
Materials Needed
- Yarn: Plush chenille yarn (white for the bear, purple for the dress, pink for the rose, and green for the leaves).
- Crochet Hook: 2.0mm (for the main body) and a smaller 1.25mm hook for the nose.
- Knitting Needles: 2.5mm needles for the dress.
- Safety Eyes: 8mm to 10mm black safety eyes.
- Stuffing: High-quality polyester fiberfill.
- Tools: Yarn needle, scissors, and stitch markers.
- Optional: Small heart-shaped sequins for the dress.
Abbreviations (US Terms)
- MR: Magic Ring
- ch: Chain
- sc: Single Crochet
- inc: Increase (2 sc in one stitch)
- dec: Decrease (sc 2 together)
- sl st: Slip Stitch
- hdc: Half Double Crochet
- dc: Double Crochet
- st(s): Stitch(es)
- yo: Yarn Over (Knitting)
Step-by-Step Instructions
The Head
Stuff the head firmly as you go, leaving a bit of room for the muzzle area.
- Round 1: 6 sc in MR (6)
- Round 2: inc in each st around (12)
- Round 3: (1 sc, inc) x 6 (18)
- Round 4: 1 sc, inc, (2 sc, inc) x 5, 1 sc (24)
- Round 5: (3 sc, inc) x 6 (30)
- Round 6: 2 sc, inc, (4 sc, inc) x 5, 2 sc (36)
- Round 7: (5 sc, inc) x 6 (42)
- Round 8: 3 sc, inc, (6 sc, inc) x 5, 3 sc (48)
- Round 9: (7 sc, inc) x 6 (54)
- Round 10: 4 sc, inc, (8 sc, inc) x 5, 4 sc (60)
- Round 11: (9 sc, inc) x 6 (66)
- Round 12: 5 sc, inc, (10 sc, inc) x 5, 5 sc (72)
- Rounds 13-22: sc in each st around (72)
- Round 23: 5 sc, dec, (10 sc, dec) x 5, 5 sc (66)
- Round 24: (9 sc, dec) x 6 (60)
- Round 25: 4 sc, dec, (8 sc, dec) x 5, 4 sc (54)
- Round 26: (7 sc, dec) x 6 (48)
- Round 27: 3 sc, dec, (6 sc, dec) x 5, 3 sc (42)
- Round 28: (5 sc, dec) x 6 (36)
- Round 29: 2 sc, dec, (4 sc, dec) x 5, 2 sc (30)
- Round 30: (3 sc, dec) x 6 (24)
Fasten off, leaving a long tail for sewing the head to the body.
The Body
- Round 1: 6 sc in MR (6)
- Round 2: inc in each st around (12)
- Round 3: (1 sc, inc) x 6 (18)
- Round 4: 1 sc, inc, (2 sc, inc) x 5, 1 sc (24)
- Round 5: (3 sc, inc) x 6 (30)
- Round 6: 2 sc, inc, (4 sc, inc) x 5, 2 sc (36)
- Round 7: (5 sc, inc) x 6 (42)
- Round 8: 3 sc, inc, (6 sc, inc) x 5, 3 sc (48)
- Round 9: (7 sc, inc) x 6 (54)
- Round 10: 4 sc, inc, (8 sc, inc) x 5, 4 sc (60)
- Round 11: (9 sc, inc) x 6 (66)
- Round 12: 5 sc, inc, (10 sc, inc) x 5, 5 sc (72)
- Rounds 13-20: sc in each st around (72)
- Round 21: 5 sc, dec, (10 sc, dec) x 5, 5 sc (66)
- Round 22: sc in each st around (66)
- Round 23: (9 sc, dec) x 6 (60)
- Round 24: sc in each st around (60)
- Round 25: (18 sc, dec) x 3 (57)
- Round 26: (17 sc, dec) x 3 (54)
- Rounds 27-28: sc in each st around (54)
- Round 29: (7 sc, dec) x 6 (48)
- Round 30: sc in each st around (48)
- Round 31: (6 sc, dec) x 6 (42)
- Round 32: (12 sc, dec) x 3 (39)
- Round 33: sc in each st around (39)
- Round 34: (11 sc, dec) x 3 (36)
- Round 35: sc in each st around (36)
- Round 36: (4 sc, dec) x 6 (30)
- Round 37: (3 sc, dec) x 6 (24)
- Round 38: sc in each st around (24)
Fasten off and weave in ends.
The Muzzle and Nose
Muzzle
- Row 1: Ch 5. Starting in the 2nd ch from hook: 3 sc in the first st, 2 sc along the chain, 3 sc in the last ch. Work back along the other side of the chain: 2 sc, inc (10)
- Row 2: inc, 2 sc, (inc) x 3, 2 sc, (inc) x 2 (16)
- Row 3: sc, inc, 2 sc, (1 sc, inc) x 3, 2 sc, (1 sc, inc) x 2 (22)
- Row 4: 2 sc, inc, 2 sc, (2 sc, inc) x 3, 2 sc, (2 sc, inc) x 2 (28)
- Row 5: 3 sc, inc, 2 sc, (3 sc, inc) x 3, 2 sc, (3 sc, inc) x 2 (34)
- Rounds 6-8: sc in each st around (34)
Fasten off, leaving a tail for sewing.
Nose (Using 1.25mm hook)
- Row 1: Ch 4. Starting in 2nd ch from hook: inc, 1 sc, 3 sc in the last ch. Work back along the other side: 2 sc (8)
- Row 2: (inc) x 2, 1 sc, (inc) x 3, 1 sc, inc (14)
- Rounds 3-4: sc in each st around (14)
Fasten off and sew to the muzzle.
The Ears, Arms, and Legs
Ears (Make 2)
- Round 1: 6 sc in MR (6)
- Round 2: inc in each st around (12)
- Round 3: (1 sc, inc) x 6 (18)
- Round 4: (8 sc, inc) x 2 (20)
- Rounds 5-6: sc in each st around (20)
Fold the ear in half and sc 10 stitches across the bottom to close. Fasten off.
Arms (Make 2)
- Round 1: 6 sc in MR (6)
- Round 2: inc in each st around (12)
- Round 3: (1 sc, inc) x 6 (18)
- Round 4: (5 sc, inc) x 3 (21)
- Rounds 5-7: sc in each st around (21)
- Round 8: dec x 3, 15 sc (18)
- Rounds 9-27: sc in each st around (18)
- Round 28: (1 sc, dec) x 6 (12)
Fasten off and weave in ends.
Legs (Make 2)
- Row 1: Ch 8. Starting in 2nd ch from hook: inc, 5 sc, 3 sc in the last ch. Work back along the other side: 6 sc (18)
- Row 2: (inc) x 2, 5 sc, (inc) x 3, 5 sc, inc (22)
- Row 3: (1 sc, inc) x 2, 5 sc, (1 sc, inc) x 3, 5 sc, (1 sc, inc) (28)
- Row 4: (2 sc, inc) x 2, 5 sc, (2 sc, inc) x 3, 5 sc, (2 sc, inc) (34)
- Rounds 5-7: sc in each st around (34)
- Round 8: 13 sc, (2 sc, dec) x 3, 9 sc (31)
- Round 9: 13 sc, (1 sc, dec) x 3, 9 sc (28)
- Round 10: 13 sc, dec x 3, 9 sc (25)
- Round 11: sc in each st around (25)
- Round 12: 1 sc, dec x 2, 8 sc, dec x 2, 8 sc (21)
- Rounds 13-28: sc in each st around (21)
- Round 29: (5 sc, dec) x 3 (18)
- Round 30: (1 sc, dec) x 6 (12)
Fasten off and weave in ends.
The Knitted Dress
This piece is created using knitting needles. Cast on 52 stitches.
- Row 1: Purl all stitches.
- Row 2: K8, yo, K1, yo, K8, yo, K1, yo, K16, yo, K1, yo, K8, yo, K1, yo, K8.
- Row 3: Purl all stitches.
- Row 4: K9, yo, K1, yo, K10, yo, K1, yo, K18, yo, K1, yo, K10, yo, K1, yo, K9.
- Row 5: Purl all stitches.
- Row 6: K10, yo, K1, yo, K12, yo, K1, yo, K20, yo, K1, yo, K12, yo, K1, yo, K10.
- Row 7: Purl all stitches.
- Row 8: K11, yo, K1, yo, K14, yo, K1, yo, K22, yo, K1, yo, K14, yo, K1, yo, K11.
- Row 9: Purl all stitches.
- Row 10: K12, k2 together (repeat 17 times to close armhole), K24, k2 together (repeat 17 times), K12.
- Rows 11-15: Alternating knit and purl rows.
- Row 16: (K2, yo) x 24, K2.
- Row 17: Purl all.
- Row 18: (K3, yo) x 24, K2.
- Row 19: Purl all.
- Row 20: Knit all.
- Row 21: Purl all.
- Row 22: (K4, yo) x 24, K2.
- Rows 23-27: Alternating knit and purl rows.
- Row 28: (K5, yo) x 24, K2.
- Rows 29-41: Alternating knit and purl rows.
- Rows 42-45: Knit all rows.
Bind off all stitches. Sew the back seam and add buttons or sequins for decoration.
Headband with Rose
- Band: Ch 50 with purple yarn.
- Rose: Switch to pink yarn (do not cut purple). Ch 12. Starting in 3rd ch from hook, work (3 sc in one st) 10 times. Fasten off pink and roll into a rose shape, sewing it to the band.
- Finish Band: Continue with purple yarn, ch 30 and sl st to the first ch to form a circle.
- Leaves: Ch 8. Starting in 2nd ch: sl st, sc, hdc, 2 dc in one st, dc, hdc, 3 sc in last st. Work back along the other side: hdc, dc, 2 dc in one st, hdc, sc, sl st.
Finishing & Assembly
Now it’s time to put your bear together! Follow these placement guides for a balanced look:
- Eyes: Place safety eyes between rounds 18 and 19, with 8 stitches between them.
- Muzzle: Sew the muzzle directly under the eyes, between rounds 19 and 30.
- Ears: Position the ears between rounds 3 and 11 on the top of the head.
- Body: Sew the head securely to the body.
- Limbs: Attach the arms and legs using a strong sewing stitch, ensuring the bear can sit upright.
- Final Touch: Slide the dress on and tie the headband around the bear’s head, securing the leaves to the rose.
Tips for Success
- Tension: Keep your tension tight, especially when using plush yarn, to prevent the stuffing from showing through.
- Stuffing: Use a chopstick or a crochet hook to push stuffing into the nose and small areas of the arms.
- Customization: Feel free to change the dress color or add a different flower to the headband to make your bear unique!
- Knitting Beginner? If you aren’t familiar with the “yo” (yarn over) stitch, it creates a small hole that adds a ruffled effect to the dress. It’s a great way to add volume without adding too many stitches.