Watermelon Bunny Crochet Pattern: Zaika Arbuzik
The Sweetest Little Watermelon Bunny You’ll Ever Meet
Hello, my wonderful crochet friend! Have you ever bitten into a juicy slice of watermelon on a hot summer day and thought, “I wish I could crochet this feeling”? Well, today is your lucky day.
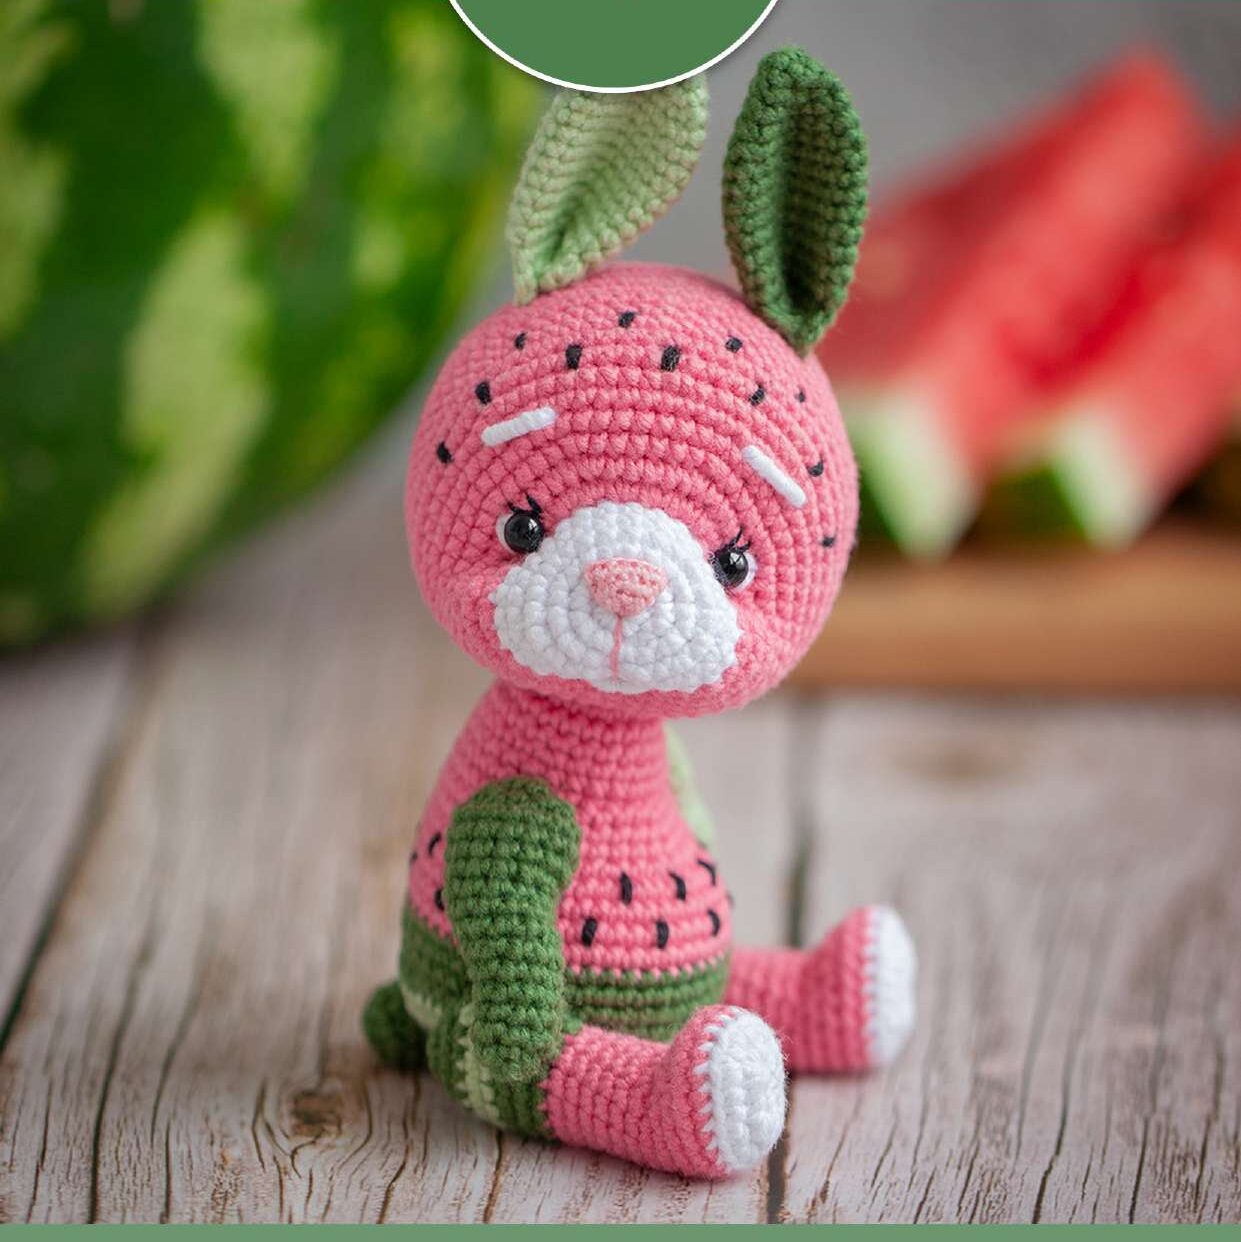
Meet Zaika Arbuzik – the Watermelon Bunny! This adorable little bunny is dressed in the colors of everyone’s favorite summer fruit: bright pink cheeks, dark and light green ears, and the cutest little seed details scattered around. She is sweet, squishy, and absolutely bursting with personality.
Designed by a talented crochet artist (whose work I respect deeply – please do not copy or redistribute this pattern), this bunny measures about 16 cm (6.3 inches) tall when made with the recommended yarn. She has jointed limbs using pins and discs (or you can simply sew them on for a simpler version), making her poseable and perfect for play or display.
Whether you are making her for a watermelon-loving child, a summer birthday gift, or just because you want to add some fruity fun to your amigurumi collection, this bunny is sure to bring a smile to everyone who sees her.
So grab your hook, pick your favorite green and pink yarns, and let’s make some watermelon magic together
Materials You’ll Need
Yarn – YarnArt JEANS (160m/50g, 55% cotton, 45% polyacrylic)
| Color | Number | Used For |
|---|---|---|
| Pink | #42 | Body, head, cheeks |
| Dark Green | #82 | Left ear, lower body stripes |
| Light Green | #79 | Right ear, body stripes |
| White | #62 | Face details, eye whites |
| Black | #53 | Eyes, seed details |
Additional Yarn
- Iris yarn (Gamma) color #0070 – for the nose (or any thin cotton thread)
Other Supplies
- Crochet hook: 1.5 mm (main) and 0.6 mm (for tiny details/embroidery)
- Stuffing: Hollow fiber or polyfil
- Safety eyes: 6 mm – 2 pieces
- Cotter pins (joints): 5 pieces
- Clear plastic discs: 20 mm – 5 pieces (1 for head, 4 for lower legs)
- Clear plastic discs: 15 mm – 5 pieces (1 for neck, 4 for upper arms/hands)
- Yarn needle (blunt tip for sewing parts)
- Strong thread for face shaping (tugging)
- Round-nose pliers or cotter pin tool
- Scissors
- Tweezers or wooden stick (for stuffing)
Abbreviations (US Terms)
| Abbreviation | Meaning |
|---|---|
| MR | Magic ring |
| ch | Chain |
| sc | Single crochet |
| inc | Increase (2 sc in one stitch) |
| dec | Decrease (sc two together through front loops) |
| sl st | Slip stitch |
| BLO | Back loop only |
| FLO | Front loop only |
| psm | Stitch alignment (extra sc to center the round) |
Part 1: Head
Work with white yarn first, then switch to pink. The marker runs along the center of the chin.
White Section (Face Base)
- Round 1: 8 sc in MR (8)
- Round 2: 8 inc (16)
- Round 3: 2 sc, 3 inc, 6 sc, 3 inc, 2 sc (22)
- Round 4: 3 sc, 5 inc, 6 sc, 5 inc, 3 sc (32)
- Round 5: 3 sc, dec, 1 sc, dec, 1 sc, dec, 1 sc, dec, 3 sc (28)
- Round 6: 28 sc + psm if needed (28)
Switch to Pink Yarn
- Round 7: 4 sc, (inc, sc) × 3, inc, 6 sl st, inc, (sc, inc) × 3, 4 sc (36)
- Round 8: 13 sc, skip 1 stitch, ch 1, 1 sc, 6 inc, 1 sc, skip 1 stitch, ch 1, 13 sc (42)
*If using sew-on eyes instead of safety eyes: 15 sc, 6 inc, 15 sc (42)* - Round 9: 13 sc, (inc, 4 sc) × 3, inc, 13 sc (46)
- Round 10: 14 sc, inc, 4 sc, inc, 6 sc, inc, 4 sc, inc, 14 sc (50)
- Round 11: 19 sc, inc, 10 sc, inc, 19 sc (52)
Insert Eyes and Embroider Face
At this point, insert the safety eyes (do not secure them fully yet). Embroider the eye whites, eyelashes, and sew on the nose (using Iris yarn). Create the bridge of the nose between the eyes using strong thread.
- Round 12: 18 sc, inc, 14 sc, inc, 18 sc (54)
- Round 13: (8 sc, inc) × 5, 9 sc (59)
- Rounds 14-16 (3 rounds): 59 sc (59)
Place a marker in the first stitch of Round 16 to mark the position for the cotter pin (pay attention to the center!).
- Round 17: 59 sc (59)
Face Shaping (Tugging)
Thread a strong needle to create the eye tugging (points 3, 4, 5, 6). Bring the thread out between Rounds 7 and 8, centered on the muzzle (2 stitches between the threads – points 1 and 2).
Secure the safety eyes. Sew the bridge of the nose with colored thread.
Embroider the Mouth
- Insert thread from inside at point 1
- Make 2–3 stitches from point 1 to point 2
- Bring the thread out, wrap the stitches to form the lip
- Insert the thread back inside and tie a knot
Embroider the eyebrows: 3 rows up from the eye and 3 stitches long.
Continue the Head
- Rounds 18-22 (5 rounds): 59 sc + psm if needed (59)
- Round 23: 3 sc, dec, 4 sc, dec, 38 sc, dec, 4 sc, dec, 2 sc (55)
- Round 24: 4 sc, dec, 3 sc, dec, 34 sc, dec, 3 sc, dec, 3 sc (51)
- Round 25: (11 sc, dec) × 3, 12 sc (48)
- Round 26: (6 sc, dec) × 6 (42)
- Round 27: (5 sc, dec) × 6 (36)
- Round 28: (4 sc, dec) × 6 (30)
Insert cotter pin (20 mm disc). Stuff the head firmly with hollow fiber.
- Round 29: (3 sc, dec) × 6 (24)
- Round 30: (2 sc, dec) × 6 (18)
- Round 31: (1 sc, dec) × 6 (12)
Add more stuffing to the back of the head.
- Round 32: 6 dec (6)
Close the opening by pulling the yarn tight. Tie a knot and pull the ends inside the head.
Part 2: Ears (Make 2 – One Light Green, One Dark Green)
- Round 1: 6 sc in MR (6)
- Round 2: (sc, inc) × 3 (9)
- Round 3: (2 sc, inc) × 3 (12)
- Round 4: (3 sc, inc) × 3 (15)
- Round 5: (4 sc, inc) × 3 (18)
- Rounds 6-14 (9 rounds): 18 sc (18)
Fold the ear in half and work 9 sc through both sides to close.
Fold the bottom of the ear in half again and secure with several stitches.
Attach the ears between Rounds 18 and 23. There should be 12 stitches between the ears along the front of the head.
Embroider the “seeds” (stripes) on the ears: The seed length is 1 row, with 4 stitches between each seed.
Part 3: Nose
Work with Iris yarn (thin cotton).
- Round 1: 6 sc in MR (6)
- Round 2: (sc, inc) × 3 (9)
- Round 3: (2 sc, inc) × 3 (12)
- Round 4: 12 sc (12)
Fold the piece in half and work 6 sc through both sides to close.
Sew the nose to the face.
Part 4: Upper Arms (Make 2 – Left Light Green, Right Dark Green)
The marker runs along the center of the front.
- Round 1: 6 sc in MR (6)
- Round 2: (1 sc, inc) × 3 (9)
- Rounds 3-5 (3 rounds): 9 sc (9)
- Round 6: 4 sc, inc, 4 sc (10)
- Round 7: 5 sc, inc, 4 sc (11) – mirror for the right arm
- Round 8: 4 sl st, inc, 4 sc, dec (11) – mirror for the right arm
- Round 9: dec, 3 sc, inc, 5 sc (11) – mirror for the right arm
- Round 10: 11 sc + psm if needed (11)
- Round 11: inc, 9 sc, inc (13)
- Rounds 12-14 (3 rounds): 13 sc (13)
Stuff the arm. Insert a cotter pin (15 mm disc) 2 rows below the top, 3–4 stitches to the right or left of the marker (depending on arm position).
- Round 15: 6 dec (6)
Close the opening by working through the front loops of the stitches. Secure the thread and hide the end inside the arm.
Part 5: Lower Legs (Make 2 – Right Light Green, Left Dark Green)
The marker runs along the center of the back.
White Section (Paw/Foot)
- Foundation: Ch 4. Starting from 2nd chain from hook:
- Round 1: inc, 1 sc, 6 sc in last chain, 1 sc, inc (12)
- Round 2: 2 inc, 2 sc, inc, 4 inc, 2 sc, 2 inc (20)
Switch to Pink Yarn
- Round 3: BLO – 20 sc (20)
- Round 4: 20 sc + psm if needed (20)
- Round 5: 6 sc, 4 dec, 6 sc (16)
- Round 6: 6 sc, 2 dec, 6 sc (14)
- Round 7: 4 sc, 6 sl st, 4 sc (14)
- Rounds 8-13 (6 rounds): 14 sc + psm if needed (14)
Switch to Dark Green Yarn
- Round 14 (left leg): 5 sc, 2 inc, 7 sc (16) – mirror for the right leg
- Rounds 15-16 (2 rounds): 16 sc (16)
Switch to Light Green Yarn
- Rounds 17-18 (2 rounds): 16 sc + 2 psm on the right leg (16)
Insert a cotter pin (20 mm disc) one row below.
Switch to Dark Green Yarn
- Round 19: dec, 6 sc, dec, 6 sc (14)
- Round 20: 5 sc, dec, 5 sc, dec (12)
- Round 21: 5 dec (5)
Close the opening by working through the front loops. Secure the thread and hide the end inside the leg.
Part 6: Body
The marker runs along the center of the back.
Pink Yarn
- Round 1: 8 sc in MR (8)
- Round 2: 8 inc (16)
- Round 3: (sc, inc) × 8 (24)
- Rounds 4-5 (2 rounds): 24 sc (24)
- Round 6: (7 sc, inc) × 3 (27)
- Round 7: 27 sc (27)
- Round 8: 9 sc, 9 sl st, 9 sc (27)
- Round 9: (8 sc, inc) × 3 (30)
Attach the head (15 mm disc).
- Round 10: (9 sc, inc) × 3 (33)
- Round 11: 5 sc, inc, 3 sc, place marker for arm, 7 sc, inc, 7 sc, place marker for other arm, 3 sc, inc, 5 sc (36)
- Round 12: 8 sc, inc, 5 sc, inc, 1 sc, 4 inc, 1 sc, inc, 5 sc, inc, 8 sc (44)
- Round 13: 12 sc, inc, 4 sc, inc, 4 sc, place marker for belly center, 4 sc, inc, 4 sc, inc, 12 sc (48)
- Rounds 14-16 (3 rounds): 48 sc (48)
Switch to Dark Green Yarn
- Round 17: 41 sc, ch 14, skip 7 stitches, connect (48)
- Round 18: Skip 7 stitches, from the 8th stitch: 34 sc, 7 sc along the chain (48)
- Round 19: 7 sc along the chain, 41 sc (48)
- Round 20: 48 sc (48)
Switch to Light Green Yarn
- Round 21: 48 sc (48)
- Round 22: (6 sc, dec) × 6 (42)
Attach the upper arms.
Switch to Dark Green Yarn
- Round 23: (5 sc, dec) × 6 (36)
Place markers for the lower legs between Rounds 21 and 22. There should be 22 stitches between the markers along the front.
- Round 24: (4 sc, dec) × 6 (30)
- Round 25: (3 sc, dec) × 6 (24)
- Round 26: (2 sc, dec) × 6 (18)
- Round 27: (1 sc, dec) × 6 (12)
- Round 28: 6 dec (6)
Close the opening by working through the front loops. Secure the thread and hide the end inside the body.
Attach the Lower Legs
Attach the legs using the cotter pins (20 mm discs).
Embroider the Body “Seeds”
Embroider small black “watermelon seeds” scattered across the pink parts of the body and face.
Part 7: Tail
Work with dark green yarn.
- Round 1: 6 sc in MR (6)
- Round 2: 6 inc (12)
- Round 3: 12 sc (12)
- Round 4: (2 sc, dec) × 3 (9)
To attach the tail:
- Stuff the tail lightly with hollow fiber.
- Sew the tail to the back of the body.
- The tail should be positioned so that when the bunny sits, the tail helps support it and prevents tipping over.
Closing the Body Opening
After attaching the head and limbs, you may have a small opening on the back of the body.
- Thread your needle with body-colored yarn.
- Sew most of the opening closed from the outside.
- Through the remaining small gap, add a little more stuffing to make the back nice and smooth.
- Finish sewing the seam completely.
- Sew back in the opposite direction to reinforce.
- Bring the needle out through the same hole you started with.
- Tie a knot and pull it inside the toy.
- Hide the yarn ends.
Congratulations! Your Watermelon Bunny Is Complete.
You did it! Your Watermelon Bunny (Zaika Arbuzik) is finished, and she is absolutely adorable. From her green-striped ears to her pink watermelon cheeks and tiny seed details, she is the perfect little summer friend.
This sweet bunny is wonderful for:
- Spring and summer gifts (Easter, birthdays, or just because)
- Fruit-themed collections (she would love a strawberry or lemon friend!)
- Poseable play – the cotter pin joints let her sit, stand, and wave!
- Watermelon lovers of all ages
If you used cotter pins and discs, your bunny is fully poseable. If you chose to sew the limbs directly to the body, she will be softer and more huggable – either way, she is guaranteed to make you smile every time you see her.
Thank you for crocheting with me today, and thank you for respecting the designer’s hard work. This pattern is for personal use only – please do not copy, redistribute, or sell the instructions.
I would love to see your Watermelon Bunnies! Share your photos online and be sure to credit the original designer.
Now go enjoy a slice of watermelon and admire your beautiful new crochet bunny. Happy crocheting