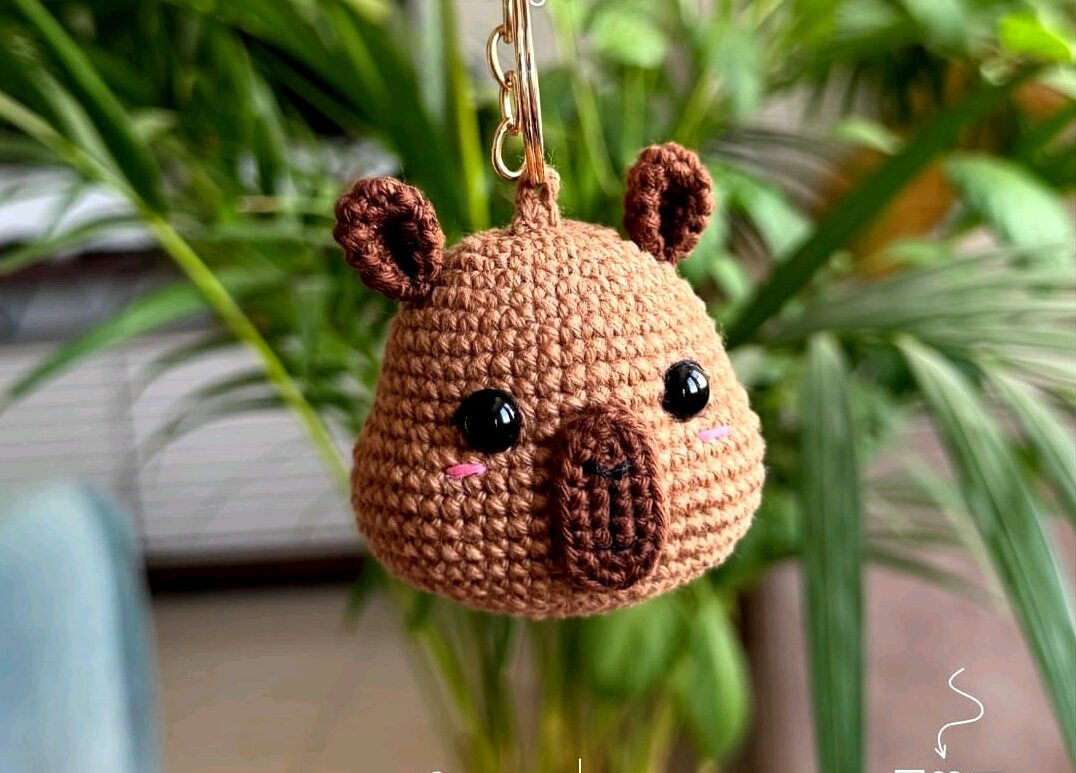
DIY Capybara Keychain: Free Easy Crochet Pattern for Beginners
Hello, crochet friends! Get ready to fall in love with the internet’s favorite animal in the cutest, tiniest form possible. Today, we are making a Capybara Keychain!
Capybaras have taken the world by storm with their chill vibes and friendly nature, and now you can carry one with you wherever you go. This little friend is designed to be a quick, rewarding project that uses just a small amount of yarn. It is perfect for gifting to friends, adding to your own keys, or even making a whole herd of them for a craft fair.
What I adore about this pattern is the clever shaping. From the distinct rectangular head to those sweet little ears, every detail is designed to capture the essence of a capybara’s calm personality. Plus, using a smaller hook gives it that perfect, dense stitch look that makes amigurumi extra professional.
Grab your favorite brown yarn, and let’s get cozy and start stitching
🧶 Materials & Tools
To create your mini capybara friend, you will need the following supplies:
- Yarn: Light Brown and Dark Brown cotton yarn.
- Embroidery Thread: Black thread for the sweet facial details.
- Hook: Size #2 (2.0mm) crochet hook.
- Eyes: A pair of #8 safety eyes.
- Filling: Polyester stuffing.
- Notions: Keychain ring, tapestry needle, and adhesive for the snout.
📝 Abbreviations
Before we dive in, here is our crochet “cheat sheet”:
- mr: Magic ring
- sc: Single crochet
- ch: Chain
- inc: Increase (2 stitches in one)
- dec: Decrease (crochet 2 stitches together)
- x: Number of times to repeat a sequence
🦦 The Capybara Pattern
The Head
Using Light Brown yarn
- Start: Chain 7. Turn and work from the 2nd chain from the hook.
- Round 1: 5 sc, (3 sc in the same st), then working along the other side of the chain: 4 sc, 1 inc (14 stitches).
- Round 2: 1 inc, 4 sc, (inc) x3, 4 sc, (inc) x2 (20 stitches).
- Round 3: 1 inc, (4 sc, inc) x3, 4 sc (24 stitches).
- Round 4: (3 sc, inc) x6 (30 stitches).
- Round 5: 2 sc, inc, (4 sc, inc) x5, 2 sc (36 stitches).
- Round 6: (5 sc, inc) x6 (42 stitches).
- Rounds 7–11: 1 sc in each stitch around (42 stitches).
- Round 12: 1 inc, 1 sc, (inc) x2, 12 sc, (inc) x2, 1 sc, (inc) x3, 1 sc, (inc) x2, 12 sc, (inc) x2, 1 sc, (inc) x2 (56 stitches).
- Rounds 13–18: 1 sc in each stitch around for 6 rounds (56 stitches).
- Round 19: 1 dec, 1 sc, (dec) x2, 12 sc, (dec) x2, 1 sc, (dec) x3, 1 sc, (dec) x2, 12 sc, (dec) x2, 1 sc, (dec) x2 (42 stitches).
- Round 20: (5 sc, dec) x6 (36 stitches).
- Round 21: 2 sc, dec, (4 sc, dec) x5, 2 sc (30 stitches).
- Round 22: (3 sc, dec) x6 (24 stitches).
- Start stuffing the head here.
- Round 23: 1 sc, dec, (2 sc, dec) x5, 1 sc (18 stitches).
- Round 24: (1 sc, dec) x6 (12 stitches).
- Round 25: (dec) x6 (6 stitches).
- Finish: Fasten off and close. Push the stuffing toward the cheeks for a cute shape.
The Ears (Make 2)
Using Light Brown yarn
- Round 1: Magic ring of 6 sc.
- Round 2: (inc) x6 (12 stitches).
- Rounds 3–5: 1 sc in each stitch around for 3 rounds.
- Round 6: Flatten the ear and close with 5 sc.
- Finish: Leave a long tail for sewing.
The Snout
Using Dark Brown yarn
- Start: Chain 7. Turn and work from the 2nd chain from the hook.
- Round 1: 5 sc, (3 sc in the same st), along the other side: 4 sc, 1 inc (14 stitches).
- Round 2: 1 inc, 4 sc, (inc) x3, 4 sc, (inc) x2 (20 stitches).
- Finish: Fasten off with a long tail for an invisible closure.
✨ Assembly & Finishing Steps
- Eyes: Position the safety eyes between rounds 10 and 11, spacing them about 9 stitches apart.
- Sunken Eye Effect: For a deeper look, use a needle and thread to pull the eyes slightly inward and secure with a knot inside the head.
- Snout: Glue or sew the dark brown snout onto the face. Embroider a simple nose and mouth line with black thread.
- Ears: Position the ears on round 4 from the start. Secure them so they stay standing up.
- Final Facial Detail: Use black embroidery thread to stitch a small line above each eye for added character.
- Keychain Attachment: Leave a small yarn tail, chain 9, and return with 2 sc starting from the 8th chain. Sew this loop to the top of the head to attach your keychain ring.
And you’re done! Your tiny capybara is ready to hang out and be the most relaxed member of your keychain collection.
Happy Crocheting