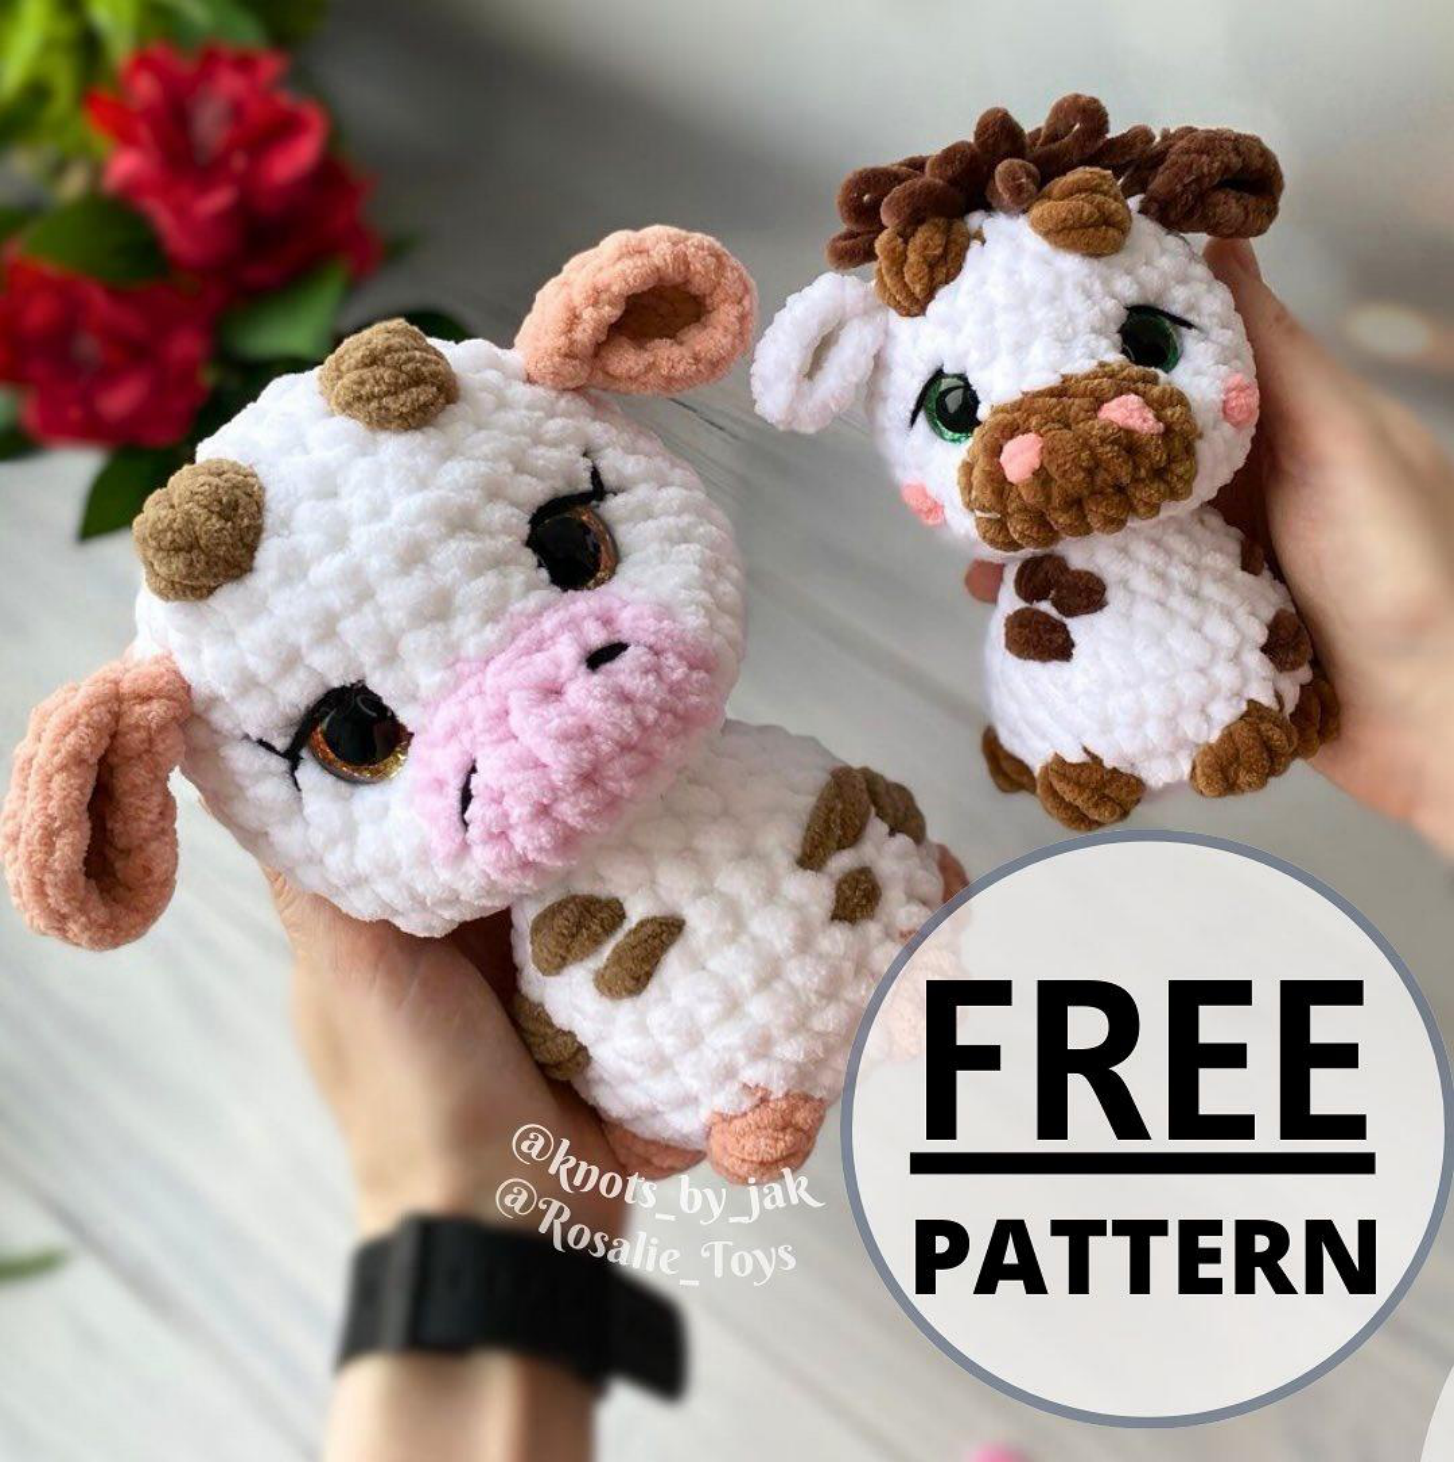
Crochet Cow Amigurumi Pattern
Materials
To crochet your adorable cow amigurumi, gather the following essential materials:
- Yarn in 4 colors: White, Pink, Brown, and Beige.
- Safety Eyes: 14mm (for a smaller cow) or 16mm (for the large cow, which this pattern focuses on).
- Crochet Hook: Size 4mm (for a smaller cow) or size 6mm (recommended for the large cow in these instructions).
- Needle for tightening, shaping, and weaving in ends.
- Stuffing (polyester fiberfill) to give your cow its plush form.
- Yarn for muzzle embroidery (a contrasting color like brown or a darker pink works well).
Abbreviations
Familiarize yourself with these standard crochet abbreviations to easily follow the pattern:
- MR: Magic Ring
- SC: Single Crochet
- HDC: Half Double Crochet
- CH: Chain Stitch
- INC: Increase (working two stitches into one stitch)
- DEC: Decrease (crocheting two stitches together)
- SL ST: Slip Stitch
- (TAIL): A special instruction sequence: Chain 6, then work 5 slip stitches into the 2nd chain from the hook, followed by 1 slip stitch into the base (the last increase worked).
- (BOBBLE): A textured stitch created by working 4 double crochet stitches in one stitch with a common top. To make a bobble: (Yarn over, insert hook into stitch, pull up a loop, yarn over, pull through 2 loops) 4 times in the same stitch. You will have 5 loops on your hook. Yarn over and pull through all 5 loops.
Gauge & Yarn Recommendations
This detailed pattern is specifically designed for crocheting the large cow. While a precise gauge is not provided, the final dimensions of your amigurumi cow will depend significantly on your chosen yarn, hook size, and personal tension. For the large cow as detailed in these instructions, a 6mm crochet hook and 16mm safety eyes are recommended.
To help you choose, here are some yarn recommendations with their corresponding hook and eye sizes, allowing you to create different versions of your lovable bovine friend:
- Himalaya Dolphin Baby: Use a 4mm hook with 14mm safety eyes for a smaller, compact cow.
- Sweet Snuggles Lite: (No specific hook or eye size provided, but typically uses a hook size similar to Chenille Home Slim for plush projects).
- Chenille Home Slim: Opt for a 5mm hook with 18mm safety eyes for a moderately larger amigurumi.
- Alize Velluto: A 6mm hook paired with 18mm safety eyes will produce a beautifully sized large cow.
- Premier Parfait XL: For an impressively large and huggable cow, use a 10mm hook with 30mm safety eyes.
Crochet Cow Instructions (Large Version)
Let’s begin crafting your adorable large cow amigurumi. Work in continuous rounds unless otherwise specified.
Ears (Make 2)
Begin by crocheting the ears using your Beige color yarn.
- Chain 2, then work 6 SC into the 2nd chain from the hook. Chain 1, then turn your work. (6 stitches)
- Work (SC, INC) 3 times around. Chain 1, then turn. (9 stitches)
- Crochet 9 SC across the row.
To finish the ear shape: Crochet 6 SC along the straight side of the piece (refer to the original pattern’s visual guide for clarity on placement). Chain 1, then fold the ear piece in half. Crochet 3 SC through both loops to securely close the bottom edge of the ear.
Body
Start the body with your main color yarn, typically white.
- Create a Magic Ring (MR) and work 8 SC into it. (8 stitches)
- Work 8 INC (an increase in every stitch around). (16 stitches)
- Work (SC, INC) 8 times around the circle. (24 stitches)
Now, it’s time to add those charming brown bobble spots to the body.
- INC, SC, INC, 2 SC, then make a (BOBBLE). Work 3 SC, then another (BOBBLE). Work 2 INC, SC, then a (BOBBLE). Work 3 SC, then a final (BOBBLE). Work 3 SC, INC, SC, INC. Finish this round by creating the (TAIL) as described in the abbreviations. (30 stitches)
- Work 30 SC.
- Work 30 SC.
- Work 30 SC.
- (DEC, SC) 2 times, 5 SC, DEC, 4 SC, DEC, 5 SC, then (SC, DEC) 2 times. (24 stitches)
- (DEC, SC) 2 times, 2 SC, DEC, 5 SC, DEC, 2 SC, DEC, SC, DEC. (18 stitches)
- Work 18 SC.
- Work 2 DEC, 2 SC, DEC, 3 SC, DEC, SC, 2 DEC. (12 stitches)
Firmly stuff the body with your polyester fiberfill. Ensure it’s evenly distributed to create a stable and well-shaped base for your cow.
Head
Continue crocheting with the main body color yarn for the head.
- Work 12 INC (an increase in every stitch around). (24 stitches)
- Work (3 SC, INC) 6 times. (30 stitches)
- Work (4 SC, INC) 6 times. (36 stitches)
Transition to Pink yarn to crochet the muzzle detail.
- Work 17 SC, then 6 HDC, and finish the round with 13 SC. (36 stitches)
- Work 17 SC, then 6 HDC, 1 SC, and finish with 12 SC. (36 stitches)
- Work 17 SC, then (SC, DEC) 2 times, 1 SC, and complete the round with 12 SC. (34 stitches)
- Work 17 SC. Then, switch to the main body color yarn and crochet 5 SC through the back loops only. Finish the round by crocheting 12 SC through both loops. (34 stitches)
- Work (6 SC, DEC) 4 times around. (30 stitches)
- Work 30 SC.
Insert the safety eyes now, between rows 18 and 19. Position them with a clear distance of 5 visible SC stitches between the eyes. Secure the washers firmly on the inside.
- Work 8 SC. Next, attach one ear by crocheting 3 SC together with the ear piece. Work 13 SC. Attach the second ear by crocheting 3 SC with the ear piece. Finish with 3 SC. (30 stitches)
- Work (3 SC, DEC) 6 times around. (24 stitches)
Now, switch to Brown yarn to create the horns.
- Work (DEC, 2 SC) 2 times. Then, DEC, SC, and make a (BOBBLE). Work DEC, 2 SC, DEC, and another (BOBBLE). Finish with SC, DEC, 2 SC. (18 stitches)
- Work (SC, DEC) 6 times. (12 stitches)
- Work 6 DEC (decreasing all stitches around). (6 stitches)
Assembly & Finishing
Once you’ve completed the head, it’s time for the final touches to bring your cow to life.
- Cut your yarn, leaving a generous long tail. Thread this tail onto your needle.
- Weave the yarn tail through the front loop of each of the remaining 6 stitches. Pull the tail tight to cinch the opening closed. Secure with a knot and weave in the end.
- Perform tightening and shaping of the head and muzzle using your needle, as demonstrated in the original pattern’s video guide. This step is crucial for defining the facial features and giving your cow its characteristic expression.
- Using your embroidery yarn, add details like nostrils and any other desired facial embellishments to the muzzle.
Tips for Beginners
This crochet cow pattern incorporates a few special techniques that might be new if you’re just starting your amigurumi journey:
- Mastering the Bobble Stitch: The (BOBBLE) stitch adds wonderful texture but can be a bit challenging initially. Practice making a few bobbles on a scrap piece of yarn before incorporating them into your main project.
- Visual Guidance is Key: The original pattern mentions video demonstrations for certain steps, such as ear placement and the final head shaping. While direct links aren’t provided here, remember that visual aids are invaluable. Don’t hesitate to search for general “amigurumi ear attachment” or “crochet head sculpting” tutorials online if you need a visual reference.
- Consistent Stitch Counting: Amigurumi patterns rely heavily on accurate stitch counts. Always count your stitches at the end of each round to ensure your project stays on track and maintains the correct shape.
- Stuffing Technique: Stuff your amigurumi firmly and evenly. For a smooth finish, add small amounts of stuffing at a time, particularly in tight curves and corners, using the blunt end of a crochet hook or a chopstick to push it into place.