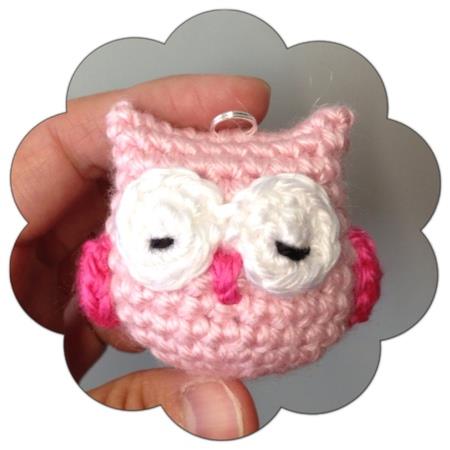
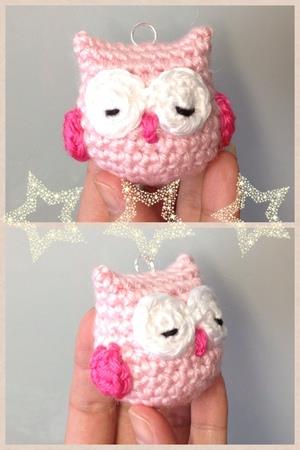
Free Pattern: Adorable Mini Owl Charm – A Quick & Cozy Crochet Project
Hello, crochet friends! Grab your favorite mug of tea and your yarn basket, because today we are making something truly hoot-tacular.
I am so excited to share this sweet little pattern for a Mini Owl Charm. Whether you are looking for a quick weekend project, a way to use up those scrap yarn balls, or a tiny handmade gift to brighten someone’s day, this little owl is the perfect solution.
What I love most about this pattern is its simplicity. It’s designed to be worked from the bottom up, and the clever construction means the ears are formed naturally just by how you seam the top! It’s magical to watch it come together.
This pattern is originally created by DD’s Crochet, and it’s just right for adding a little whimsy to your keys, bags, or even as a cute desk buddy. Let’s dive in and start stitching!
🧶 What You’ll Need
Before we begin, let’s gather our supplies. You don’t need much, which makes this a fantastic stash-buster project!
- Yarn: #4 Worsted weight yarn. You will need Pink, Light Pink, White, and a small amount of Black.
- Hook: 3.5mm crochet hook.
- Notions:
- Tapestry needle for sewing.
- Poly-filling (stuffing).
- Optional: A spring ring or lanyard if you want to turn it into a keychain.
📝 Abbreviations & Notes
If you are new to amigurumi, don’t worry! Here are the stitches you need to know for this pattern:
- MR: Magic Ring
- ch: Chain
- sc: Single Crochet
- hdc: Half Double Crochet
- inc: Increase (make 2 single crochet stitches into the same stitch)
- dec: Decrease (crochet 1 single crochet over two stitches)
- sl st: Slip Stitch
- Stuff: Put poly-filling inside the body
🦉 The Mini Owl Pattern
Part 1: The Body
We will start working from the bottom up.
- Round 1: Start with a Magic Ring (MR) and make 6 sc into it. Alternatively, chain 2 and make 6 sc into the 1st chain. (6 stitches)
- Round 2: Work an inc (2 sc) in every stitch around. (12 stitches)
- Round 3: 1 sc, inc. Repeat this pattern 6 times. (18 stitches)
- Round 4: 1 sc, 1 sc, inc. Repeat this pattern 6 times. (24 stitches)
- Rounds 5 – 8: Work 1 sc in each stitch around. (24 stitches)
- Round 9: 1 sc in next 4 stitches, dec. Repeat this pattern 4 times. (20 stitches)
- Rounds 10 – 13: Work 1 sc in each stitch around. (20 stitches)
Finishing the Body:
- Fasten off, but leave a long yarn tail for sewing.
- Put the stuffing inside the body.
- The Ear Trick: Press the top opening flat. Use the remaining yarn tail to sew the top opening closed while keeping it pressed flat.
- Once sewn, tie a knot and hide the yarn tail inside the body.
- Note: The corners created by sewing it flat will naturally become the Owl’s hair tufts/ears!
Part 2: The Eyes (Make 2)
Use your white yarn for this part to make those big, sleepy owl eyes.
- Round 1: Start with a Magic Ring (MR) and make 4 sc into it. Or, chain 2 and make 4 sc into the 1st chain. (4 stitches)
- Round 2: Work an inc in every stitch around. (8 stitches)
- Finish: Sl st to close. Fasten off and leave a long tail to sew them onto the owl.
Embroidery: Using black yarn, embroider a small line on each white circle to create the “sleepy” or “winking” eye look.
Part 3: The Wings (Make 2)
These little wings add a pop of color to the sides!
- Instruction: Start with a Magic Ring (MR) and make 6 sc into it (or chain 2 and make 6 sc into the 1st chain). (6 stitches)
- Finish: Sl st, finish off, and leave a tail to sew them to the side of the body.
✨ Assembly & Final Touches
Now comes the fun part—putting your little friend together!
- Attach the Eyes: Sew the two white eye circles onto the front of the body.
- Attach the Wings: Sew the small wings onto the sides of the body.
- The Beak: Finally, take a bit of pink yarn and embroider a small mouth/beak right between the two eyes.
- Turn it into a Charm: If you like, you can sew a spring ring or lanyard to the top.
And you are done! You now have a sweet Mini Owl Charm ready to accompany you on your adventures.
Happy Crocheting