Crochet Simpsons Donuts — The Cutest Free Amigurumi Pattern
How to Crochet Simpsons Donuts — The Cutest Free Amigurumi Pattern You’ll Ever Make
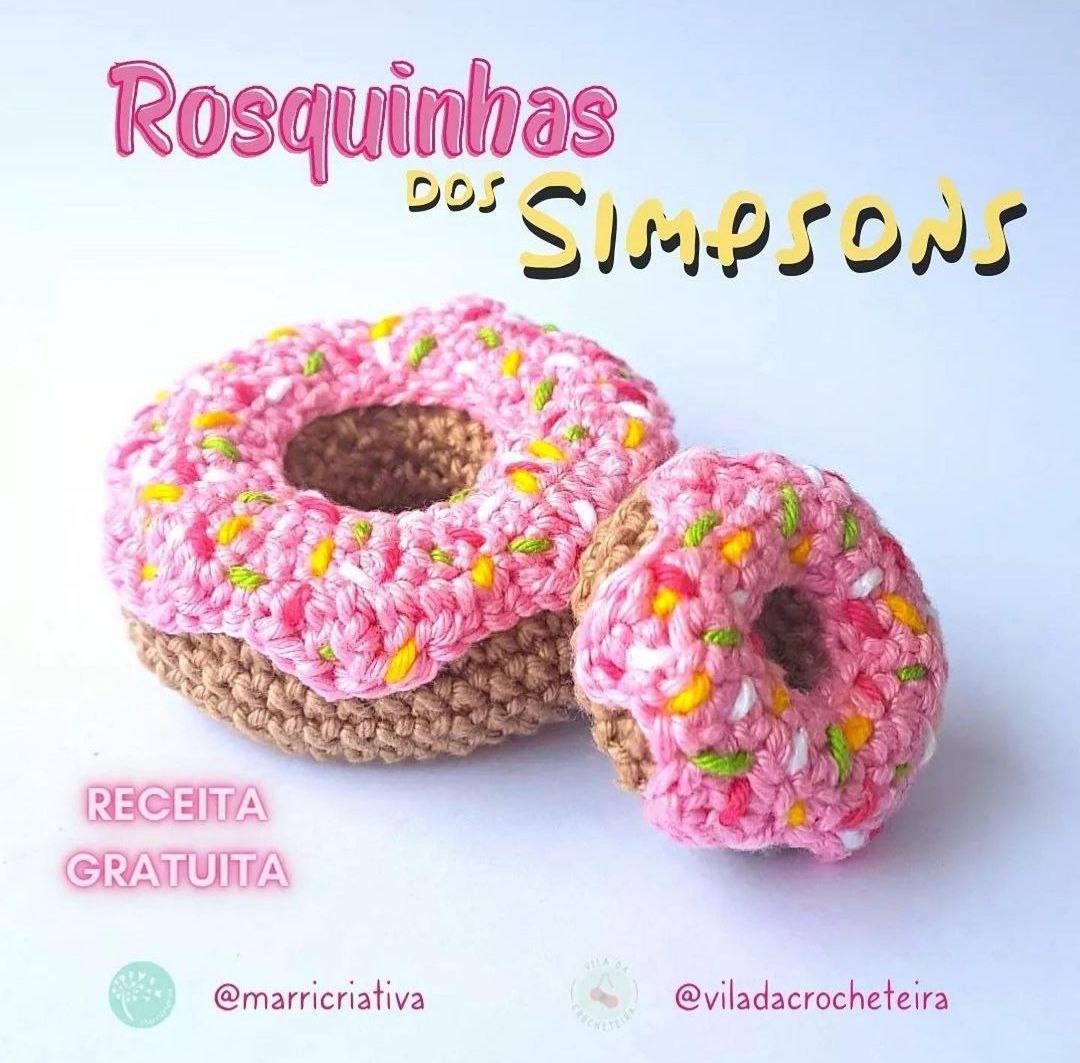
Two sizes · Pink frosting · Rainbow sprinkles · Beginner-friendly · Perfect as a keychain or amigurumi accessory
The Sweetest Little Crochet Project Is Here!
Is there anything more iconic than Homer Simpson reaching for a pink frosted donut? That image alone is enough to make any fan smile — and now you can bring that delicious, sugary magic to life in crochet! Say hello to the Rosquinhas dos Simpsons, a free amigurumi pattern that lets you craft two adorable mini crocheted donuts, complete with fluffy pink icing and colourful candy sprinkles.
These little beauties were designed as a collaboration between @marricriativa and @viladacrocheteira, and they are every bit as charming as they sound. Whether you want to attach them as an accessory to your Homer Simpson amigurumi, hang them on a keychain, or simply display them on your craft shelf — these rosquinhas are the perfect tiny project for any occasion.
The pattern includes two sizes: a larger donut (Rosquinha G) measuring 6.5 cm, and a petite version (Rosquinha P) measuring just 4 cm. Both share the same construction logic, so once you finish the small one, the large one will feel like a breeze! This is a wonderful beginner-level crochet pattern — the stitches themselves are very straightforward, with the only fiddly part being the embroidered sprinkles on top. And honestly? That’s the most fun part.
The pattern is worked in X stitch (single crochet) throughout, but it adapts perfectly to V stitch as well — so use whatever you’re most comfortable with. The whole recipe is quick, satisfying, and makes an incredibly cute handmade gift. Think birthday presents, party favours, stocking stuffers, or a little self-care crafting session with a good TV show on in the background (The Simpsons, naturally 🍩).
Ready to get hooked? Let’s dive into the full free crochet pattern for these Simpsons-inspired crocheted donuts — your hook, some colourful yarn, and a sprinkle of imagination are all you need!
Finished Size
Rosquinha G (Large)
Great as a keychain or Homer accessory
Rosquinha P (Small)
Perfect mini charm or decoration
Materials & Abbreviations
🧶 What You’ll Need
- Scissors and pins
- Small and medium tapestry needles
- Crochet hook — 2.25 mm
- Amigurumi yarn in Castanha 7625 (brown/tan)
- Amigurumi yarn in Chiclete 3131 (bubblegum pink)
- Amigurumi yarn in Canário 1289 (yellow — sprinkles)
- Amigurumi yarn in Tulipa 3334 (tulip pink — sprinkles)
- Amigurumi yarn in Branco 8001 (white — sprinkles)
- Amigurumi yarn in Greenery 5203 (green — sprinkles)
- Silicone fibre stuffing (polyfill)
- Keychain ring with chain (for the large version)
🎨 Yarn Colours
📖 Abbreviations
Rosquinha P — Small Donut Body
Work this piece using Castanha 7625 (the brown/tan yarn). This forms the doughy base of your small donut. You’ll work in continuous rounds.
Round-by-Round Instructions
- Chain 12 and join to the beginning with a slip stitch to form a ring. Starting ring
- *(1 sc, 1 increase)* repeat 6 times. 18 sts
- *(2 sc, 1 increase)* repeat 6 times. 24 sts
- Work 24 sc around. Repeat this same round for rows 4, 5, and 6. 24 sts × 3 rounds
- *(2 sc, 1 decrease)* repeat 6 times. 18 sts
- *(1 sc, 1 decrease)* repeat 6 times. 12 sts
- Work 12 sc. Fasten off, leaving a long tail for sewing. 12 sts
🪡 Assembly: Fold the piece in half so both sides meet. Sew the halves together partway, add your polyfill stuffing, then finish sewing and weave in the end. You’ve got your little donut base!
Cobertura P — Small Pink Frosting
Time to add that gorgeous pink icing! Work this piece in Chiclete 3131 (bubblegum pink). This is the fun part — the frilly texture is what gives it that drippy, glazed donut look!
Round-by-Round Instructions
- Chain 12 and join to the beginning with a slip stitch to form a ring. Starting ring
- *(1 sc, 1 increase)* repeat 6 times. 18 sts
- *(2 sc, 1 increase)* repeat 6 times. 24 sts
- *(2 chain, turn and skip 1 st, 1 sc, 1 hdc in the base stitch post, skip 2 sts, 2 sc)* repeat 6 times. Fasten off. Ruffle edge round
🪡 Assembly: Flip the frosting piece so the wrong side (the textured, bumpy side) faces up — this is the decorative top! You can sew or glue the frosting onto your donut base. Then, using your tapestry needle, embroider the sprinkles in Canário (yellow), Tulipa (pink), Greenery (green), and Branco (white) yarn across the top. These are made with simple straight stitches and give the Simpsons donut its signature look!
Rosquinha G — Large Donut Body
Now for the big one! Work in Castanha 7625. The large donut follows the same logic as the small one, just with more stitches and rows for a generous 6.5 cm finished size.
Round-by-Round Instructions
- Chain 20 and join to the beginning with a slip stitch to form a ring. Starting ring
- *(1 sc, 1 increase)* repeat 10 times. 30 sts
- *(2 sc, 1 increase)* repeat 10 times. 40 sts
- *(3 sc, 1 increase)* repeat 10 times. 50 sts
- Work 50 sc around. Repeat for rounds 5, 6, 7, and 8. 50 sts × 4 rounds
- *(3 sc, 1 decrease)* repeat 10 times. 40 sts
- *(2 sc, 1 decrease)* repeat 10 times. 30 sts
- *(1 sc, 1 decrease)* repeat 10 times. 20 sts
- Work 20 sc. Repeat for rounds 13 and 14 — leave a long tail for sewing. 20 sts × 3 rounds
🪡 Assembly: Fold the piece so both sides meet, sew halfway, stuff with polyfill, finish sewing, and weave in the end. Your large donut base is complete!
Cobertura G — Large Pink Frosting
Work this piece in Chiclete 3131. The large frosting has a few more rounds than the small version and creates a beautiful scalloped edge — just like real icing dripping over the side of a donut!
Round-by-Round Instructions
- Chain 20 and join to the beginning with a slip stitch to form a ring. Starting ring
- *(1 sc, 1 increase)* repeat 10 times. 30 sts
- *(2 sc, 1 increase)* repeat 10 times. 40 sts
- *(3 sc, 1 increase)* repeat 10 times. 50 sts
- *(1 sc, 1 hdc, 1 hdc, 1 dc, 1 hdc, 1 hdc, 1 chain, 2 sc)* repeat 7 times. 63 sts — decorative ruffle edge
🪡 Assembly: Flip the frosting wrong side up so the textured scallops are on top. Sew or glue it onto your large donut base. Embroider sprinkles using Canário (yellow), Tulipa (pink), Greenery (green), and Branco (white). Finally, sew on a keychain ring with chain so you (or your lucky giftee) can carry this little donut everywhere!
Beginner Tips for the Perfect Crochet Donut
New to crochet or amigurumi? Here are a few friendly tips to help your Simpsons donuts turn out looking bakery-fresh every time.
Your Rosquinhas Are Ready — Enjoy!
And just like that — you’ve crocheted your very own Simpsons donuts! 🎉 Whether they’re riding in your bag as a keychain, sitting proudly on your desk, or dressed up on a Homer Simpson amigurumi, these little rosquinhas are guaranteed to make everyone smile.
This is such a joyful pattern to make — quick to finish, deeply satisfying, and wildly cute. If you make yours, be sure to tag @marricriativa and @viladacrocheteira on social media — they’d love to see your finished pieces!
Remember: you may sell the finished pieces you make from this pattern, but please do not sell or modify the pattern itself. Let’s keep the crochet community kind and supportive 🧶💕
Happy hooking, and may your yarn never tangle! 🧶