Tiny Hooves, Big Charm: Crochet Your Own Adorable Mini Amigurumi Horse
“`html
How to Crochet a Tiny Amigurumi Horse: Step-by-Step Tutorial
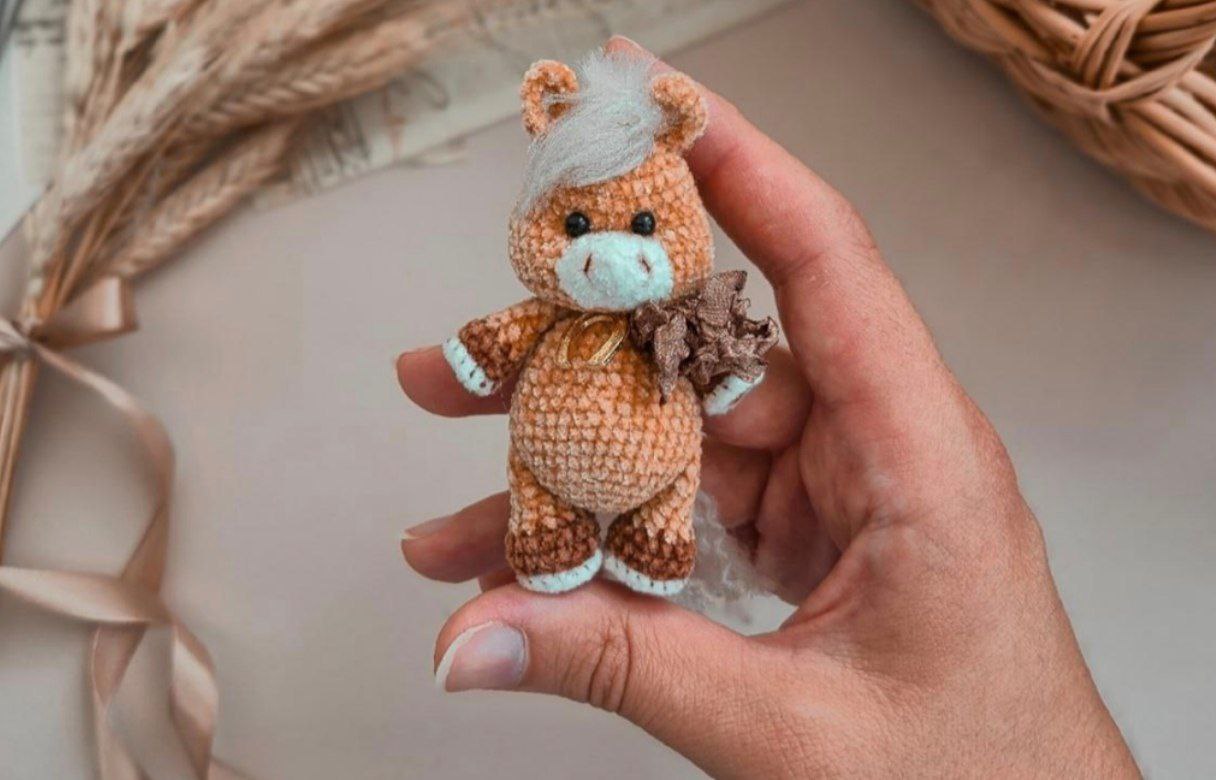
Create your own adorable mini horse with this detailed crochet guide. This project is perfect for those who love miniatures and amigurumi. The finished horse stands approximately 2.75 inches (7 cm) tall.
Materials and Tools
- Yarn:
- Main Color (MC): Micro-velour yarn (approx. 2mm)
- Secondary Color (SC): Micro-velour yarn for leg and arm details
- Accent Color (AC): Micro-velour yarn for ears, muzzle, and details
- Mane: Fancy fur-imitation yarn (e.g., YarnArt Mink)
- Tail: Acrylic yarn (e.g., Alize My Baby)
- Crochet Hook: 1.4 mm
- Eyes: 4mm black half-beads or plastic rhinestones
- Stuffing: Hollofibre or polyester fiberfill
- Additional Supplies:
- B-7000 glue for eyes
- Embroidery floss (wool/acrylic) for nostrils
- Reinforced sewing thread in main color
- Yarn needle, scissors, and sewing pins
- Colored pencils or soft pastels for shading
- Tweezers or a diamond painting stylus (for glue placement)
Crochet Abbreviations (US Terms)
- MR: Magic Ring
- ch: Chain
- sc: Single Crochet
- inc: Increase (2 sc in one stitch)
- dec: Decrease (sc 2 together)
- hdc: Half Double Crochet
- dc: Double Crochet
- sl st: Slip Stitch
- BLO: Back Loop Only
- ( ): Sequence of stitches to be repeated
- *X: Repeat the sequence X times
- [X]: Repeat the row X times
Step-by-Step Crochet Pattern
1. Legs (Make 2)
Start with Secondary Color.
- Row 1: 6 sc in MR (6)
- Row 2: 6 inc (12)
- Row 3: (sc, inc) * 6 (18)
- Row 4: 18 sc in BLO (18)
- Row 4′: (Join Accent Color) Attach yarn to the front loops of Row 4, 18 sc around (18). Fasten off.
- Row 5-6: (Switch back to Secondary Color) 18 sc per row. On the last stitch of Row 6, change color to Main Color (18)
- Row 7: (sc, dec) * 6 (12)
- Row 8-11: 12 sc (12)
Stuff the legs only up to Row 7.
Finishing: Crochet 4 extra sc. Fold the piece in half and crochet 6 sc across both layers to close. Fasten off, leaving a tail for sewing.
2. Arms (Make 2)
Start with Secondary Color.
- Row 1: 6 sc in MR (6)
- Row 2: 6 inc (12)
- Row 3: 12 sc in BLO (12)
- Row 3′: (Join Accent Color) Attach yarn to the front loops of Row 3, 12 sc around (12). Fasten off.
- Row 4: (Switch back to Secondary Color) 12 sc. On the last stitch, change color to Main Color (12)
- Row 5: (sc, dec) * 4 (8)
- Row 6-9: 8 sc (8)
Stuff the arms only up to Row 5.
Finishing: Fold in half and crochet 4 sc across both layers to close. Fasten off.
3. Muzzle (Make 1)
Use Accent Color. Do not stuff this piece.
- Row 1: ch 5. Starting in 2nd ch from hook: hdc, dc, hdc, then 3 sc in the last chain. Turn and work on the other side of the chain: 3 hdc, 3 sc in the last chain (12)
- Row 2: hdc, dc, hdc, 3 inc (from 2 sc), 3 hdc, 3 inc (from 2 sc) (18)
Do not cut the yarn; leave a long tail for sewing. Thread the tail into a needle and weave it through the first stitch of the last row to secure.
4. Ears (Make 2)
Start with Accent Color. Do not stuff.
- Row 1: ch 4. Starting in 2nd ch from hook: 2 sc, (sc, dc, sc) all in the same stitch. Turn and work on the other side of the chain: 3 sc. Change color to Main Color at the end of the row (8)
- Row 2: (Main Color) 2 sc, inc, inc (from 2 dc), inc, 3 sc (11)
Fasten off, leaving a long tail for sewing.
5. Body and Head (One Piece)
Use Main Color. Stuff the body and head evenly.
- Row 1: 6 sc in MR (6)
- Row 2: 6 inc (12)
- Row 3: (sc, inc) * 6 (18)
- Row 4: (2 sc, inc) * 6 (24)
- Row 5: (3 sc, inc) * 6 (30)
- Row 6: (4 sc, inc) * 6 (36)
- Row 7: (5 sc, inc) * 6 (42)
- Row 8: 42 sc (42)
- Row 9 (Join Legs): 6 sc joined with first leg, 16 sc, 6 sc joined with second leg, 7 sc (35)
- Row 10-11: 42 sc. End with sl st (42)
- Row 12: (5 sc, dec) * 6 (36)
- Row 13-14: 36 sc. End with sl st (36)
- Row 15: (4 sc, dec) * 6 (30)
- Row 16: 30 sc (30)
- Row 17: (3 sc, dec) * 6. End with sl st (24)
- Row 18: 24 sc (24)
- Row 19: (2 sc, dec) * 6 (18)
- Row 20 (Join Arms): 3 sc, 4 sc joined with first arm, 5 sc, 4 sc joined with second arm, 2 sc. End with sl st (18)
- Row 21: 2 sc, dec, (4 sc, dec) * 2, 2 sc (15)
The Head: (Continue from the body, numbering restarts)
- Row 1: 15 inc (30)
- Row 2: 2 sc, inc, (4 sc, inc) * 5, 2 sc. End with sl st (36)
- Row 3: (5 sc, inc) * 6 (42)
- Row 4: 3 sc, inc, (6 sc, inc) * 5, 3 sc (48)
- Row 5: 48 sc. End with sl st (48)
- Row 6: (6 sc, dec) * 6 (42)
- Row 7-9: 42 sc. End with sl st on Row 8 (42)
- Row 10: (5 sc, dec) * 6 (36)
- Row 11: 2 sc, dec, (4 sc, dec) * 5, 2 sc. End with sl st (30)
- Row 12-14: 30 sc. End with sl st on Row 14 (30)
- Row 15: (3 sc, dec) * 6 (24)
- Row 16: sc, dec, (2 sc, dec) * 5, sc (18)
- Row 17: (sc, dec) * 6 (12)
- Row 18: 6 dec (6)
Close the hole, fasten off, and hide the yarn ends.
Assembly and Detailing
1. Eye Indentations and Eyes
To create eye sockets, use reinforced thread to sew between Rows 10 and 11 of the head. Start at the base of the head, go up to the eye position, across to the other eye, and back down to the base. Pull tight and knot securely.
Glue the 4mm black beads into these indentations using B-7000 glue. Ensure they are level.
2. Attaching Ears and Muzzle
- Ears: Sew ears to the top of the head (Rows 15-16). They should be equidistant from the center and roughly level with the arms.
- Muzzle: Position the muzzle between Rows 4 and 9 of the head. Sew in a counter-clockwise direction starting from the top right.
3. Final Face Details
- Nostrils: Embroider two small nostrils with a single strand of embroidery floss.
- Shading: Use a colored pencil or soft pastel to lightly shade around the nostrils and eye sockets for a more realistic look.
4. Mane and Tail
- Mane: With fur yarn and a 1.4mm hook, crochet 4 sc in MR, then ch 23. Sew the ring to the center of the forehead (between ears) and the chain along the neck to the nape. Brush the fur and trim as needed.
- Tail: Cut 3 pieces of acrylic yarn (15cm each). Split the plies of the yarn to make them fluffier. Attach the bundle to the center back of the horse at the level of the legs. Tie a secure knot in the middle of the tail fibers and trim the ends.
Optional Step: Stability
For extra stability, you can sew the bottom of the legs to the body using reinforced thread in the main color.
“`