Stitch Your Own Cuddly Companion: A Step-by-Step Vintage Fox Amigurumi Guide
“`html
How to Crochet a Cute Little Fox Doll: Step-by-Step Amigurumi Pattern
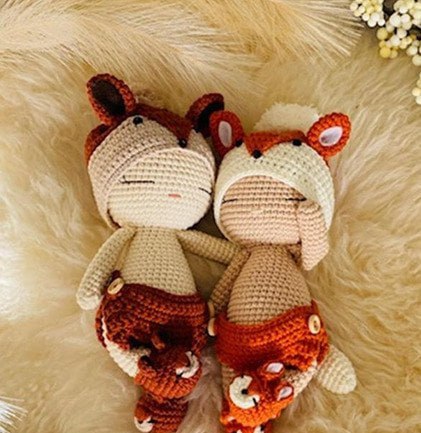
Create your own adorable handcrafted fox companion with this detailed crochet guide. This pattern is perfect for amigurumi lovers looking to make a soft, cuddly toy with a charming vintage aesthetic. Follow our step-by-step instructions to bring this little fox to life!
Materials You Will Need
- Yarn: Organic cotton yarn in the following colors:
- Natural or Ecru (approx. 1.5 skeins) for the body.
- Cinnamon or Terracotta (1 skein) for the hat, slippers, and diaper.
- Snow or Beige (0.5 skein) for the hat, slipper noses, and tail.
- Other Notions:
- 2.5 mm crochet hook
- Fiberfill stuffing
- Dark brown sewing thread (for eyes)
- Pink embroidery thread (for the nose)
- 2 wood buttons (1 cm diameter)
- 3 small buttons (0.5 mm diameter) for hat eyes and nose
- Small pieces of dark brown or white felt
- Sewing needle, scissors, glue, and marking pins
Crochet Abbreviations
This pattern uses US crochet terminology:
- sc: single crochet
- ch: chain stitch
- slst: slip stitch
- inc: increase
- dec: decrease (invisible decrease recommended)
- hdc: half double crochet
- FLO: front loop only
- BLO: back loop only
- Rd: round
Important Tips for Success
- Crochet stitches as tightly as possible to prevent stuffing from showing.
- Work in a continuous spiral unless otherwise stated.
- Use a stitch marker to keep track of the beginning of each round.
- The finished doll should be approximately 25 cm (about 10 inches) tall.
Step 1: The Arms (Make 2)
Use Natural/Ecru yarn.
- R1: 5 sc in magic ring
- R2: inc into each stitch (10 sc)
- R3 – R9: 10 sc (7 rounds)
- Fill the hand with fiberfill. Leave the rest of the arm empty.
- R10 – R18: 10 sc (9 rounds)
- R19: (dec, 3 sc) x 2 (8 sc)
Finish with 1 slst and weave in the ends.
Step 2: The Body
Use Natural/Ecru yarn.
- R1: 6 sc in magic ring
- R2: inc into each stitch (12 sc) – Place stitch marker here!
- R3: (sc, inc) x 6 (18 sc)
- R4: (2 sc, inc) x 6 (24 sc)
- R5: (3 sc, inc) x 6 (30 sc)
- R6: (4 sc, inc) x 6 (36 sc)
- R7: (5 sc, inc) x 6 (42 sc)
- R8 – R13: 42 sc (6 rounds)
- R14: (5 sc, dec) x 6 (36 sc)
- R15 – R16: 36 sc (2 rounds)
- R17: (4 sc, dec) x 6 (30 sc)
- R18 – R19: 30 sc (2 rounds)
- R20: (3 sc, dec) x 6 (24 sc)
- R21 – R22: 24 sc (2 rounds)
- R23: (2 sc, dec) x 6 (18 sc)
- R24: 18 sc
Fill the body firmly with fiberfill.
Attaching the Arms
R25: 4 sc, 4 sc through the first arm and the body together, 6 sc (front of body), 4 sc through the second arm and the body together.
Important: Do not cut the yarn. Stuff the neck area with fiberfill and continue to the head.
Step 3: The Head
- R1: 18 x (inc) FLO (36 sc) – Work in front loops only.
- R2: (5 sc, inc) x 6 (42 sc)
- R3: 3 sc, inc, (6 sc, inc) x 5, 3 sc (48 sc)
- R4: (7 sc, inc) x 6 (54 sc)
Reinforcing the Neck
To prevent the head from bending, we will create an inner neck support using new yarn:
- R1: Start with a ch 1, then work 18 sc in the back loop round on the inside of the neck.
- R2: 9 x (dec) (9 sc)
Sew the opening closed and weave in ends.
Completing the Head
Return to the head pattern:
- R5 – R16: 54 sc (12 rounds)
- R17: (7 sc, dec) x 6 (48 sc)
- R18: (6 sc, dec) x 6 (42 sc)
- R19: (5 sc, dec) x 6 (36 sc)
- R20: (4 sc, dec) x 6 (30 sc)
- R21: (3 sc, dec) x 6 (24 sc)
Fill the head firmly, especially the lower cheek areas.
- R22: (2 sc, dec) x 6 (18 sc)
- R23: (sc, dec) x 6 (12 sc)
- R24: 6 x (dec) (6 sc)
Fill completely, finish with 1 slst, and leave a long tail for sewing.
Step 4: Face Details
Use pins to mark the face before embroidering:
- Nose: Place pins between rounds 6 and 7, spaced 2 stitches apart.
- Eyes: Place pins between rounds 8 and 9, 3 stitches away from the nose pin. Place another pin 5 stitches from the first black pin.
Embroider the eyes using dark brown yarn, starting from the top of the head. Add small lashes. Embroider the nose with pink yarn (stitch twice).
Step 5: Legs and Slippers (Make 2)
Start with Cinnamon/Terracotta yarn.
- R1: 6 sc in magic ring
- R2: inc into each stitch (12 sc)
- R3: (1 sc, inc) x 6 (18 sc)
- R4: (2 sc, inc) x 6 (24 sc)
- R5 – R7: 24 sc (3 rounds)
- R8: 7 sc, dec, 6 sc, dec, 7 sc (22 sc)
- R9: 7 sc, 4 x (dec), 7 sc (18 sc)
- R10: 7 sc, 2 x (dec), 7 sc (16 sc)
Change to Natural/Ecru yarn:
- R11: 16 sc BLO (16 sc)
Return to Cinnamon yarn: Finish the round with 15 slst. Tie this yarn to the body color yarn inside the foot.
Fill the foot firmly with fiberfill.
- R12: 5 sc, dec, 2 sc, dec, 5 sc (14 sc)
- R13: 6 sc, dec, 6 sc (13 sc)
- R14: 13 sc
Fill to this point. Leave the rest of the leg un-stuffed.
- R15 – R20: 13 sc (6 rounds)
- R21: dec, 11 sc (12 sc)
- R22: 12 sc
- R23: 6 x (dec) (6 sc)
Finish with 1 slst and leave a tail for sewing.
Step 6: Slipper Accents
Slipper Ears (Make 4)
Cinnamon/Terracotta yarn.
In magic ring: 2 sc, 3 hdc, ch 1, 3 hdc, 2 sc. Finish with 1 slst. Glue a small piece of felt inside and sew the opening in the middle with one stitch.
Slipper Nose (Make 2)
Beige/Snow yarn.
R1: 10 sc in magic ring. Close with 1 slst.
Slipper Face Assembly
Sew the beige nose onto the slipper at round 3. Embroider a nose bridge using cinnamon yarn from the bottom up. Embroider eyes with dark brown yarn and add a small dark brown stitch to the nose tip.
Step 7: The Hat
Start with Beige/Snow yarn.
Measure the circumference of the head. For this pattern, we use 54 chains.
- Row 1: Ch 1, start in 2nd ch from hook, 54 sc, ch 1, turn.
- Row 2: 54 sc, ch 1, turn.
- Row 3 – Row 7: 54 sc, ch 1, turn (5 rows).
- Row 8: 54 slst BLO, ch 1, turn.
- Row 9: Change to Cinnamon yarn, 54 sc BLO, ch 1, turn.
- Row 10: 23 sc, 8 sc FLO, 23 sc, ch 1, turn.
- Row 11: 54 sc, ch 1, turn.
- Row 12 – Row 15: 54 sc, ch 1, turn (4 rows).
- Row 16: 54 sc, ch 2, turn.
- Row 17: 54 hdc, ch 2, turn.
Repeat Row 17 as many times as needed to fit the head. Sew the ends together and cinch the top of the hat tightly with a sewing needle.
Hat Finishing Touches
- Hat Nose: Using cinnamon yarn, attach to the 8 FLO stitches from Row 10. Work 7 rows of decreasing sc until you reach 1 stitch. Sew to the hat.
- Hat Ears: Crochet 2 ears (R1: 6 sc in magic ring; R2: (sc, inc) x 3; R3: (2 sc, inc) x 3; R4: (3 sc, inc) x 3; R5: (4 sc, inc) x 3; R6-R9: 18 sc). Add felt insides and sew to the hat.
- Details: Sew buttons for eyes and a button on the nose tip. Add a 5 cm beige pompom to the top.
Step 8: The Diaper
Cinnamon/Terracotta yarn.
- Row 1: ch 25, start in 2nd ch, 24 sc, ch 1, turn. (Work first and last 3 sc in BLO).
- Row 2: 3 sc BLO, dec sc, 14 sc, dec sc, 3 sc BLO, ch 1, turn (22 sc).
- Row 3: 3 sc BLO, 16 sc, 3 sc BLO, ch 1, turn (22 sc).
- Row 4: 3 sc BLO, dec sc, 12 sc, dec sc, 3 sc BLO, ch 1, turn (20 sc).
- Row 5: 3 sc BLO, 14 sc, 3 sc BLO, ch 1, turn (20 sc).
- Row 6: 3 sc BLO, dec sc, 10 sc, dec sc, 3 sc BLO, ch 1, turn (18 sc).
- Row 7: 3 sc BLO, 12 sc, 3 sc BLO, ch 1, turn (18 sc).
- Row 8: 3 sc BLO, dec sc, 8 sc, dec sc, 3 sc BLO, ch 1, turn (16 sc).
- Row 9: 3 sc BLO, 10 sc, 3 sc BLO, ch 1, turn (16 sc).
- Row 10: 3 sc BLO, dec sc, 6 sc, dec sc, 3 sc BLO, ch 1, turn (14 sc).
- Row 11: 3 sc BLO, 8 sc, 3 sc BLO, ch 1, turn (14 sc).
- Row 12: 3 sc BLO, dec sc, 4 sc, dec sc, 3 sc BLO, ch 1, turn (12 sc).
- Row 13: 3 sc BLO, 6 sc, 3 sc BLO, ch 1, turn (12 sc).
- Row 14: 3 sc BLO, inc sc, 4 sc, inc sc, 3 sc BLO, ch 1, turn (14 sc).
- Row 15: 3 sc BLO, 8 sc, 3 sc BLO, ch 1, turn (14 sc).
- Row 16: 3 sc BLO, inc sc, 6 sc, inc sc, 3 sc BLO, ch 1, turn (16 sc).
- Row 17: 3 sc BLO, 10 sc, 3 sc BLO, ch 1, turn (16 sc).
- Row 18: 3 sc BLO, inc sc, 8 sc, inc sc, 3 sc BLO, ch 1, turn (18 sc).
- Row 19: 3 sc BLO, 12 sc, 3 sc BLO, ch 1, turn (18 sc).
- Row 20: 3 sc BLO, inc sc, 10 sc, inc sc, 3 sc BLO, ch 1, turn (20 sc).
- Row 21: 3 sc BLO, 14 sc, 3 sc BLO, ch 1, turn (20 sc).
- Row 22: 3 sc BLO, inc sc, 12 sc, inc sc, 3 sc BLO, ch 1, turn (22 sc).
- Row 23: 3 sc BLO, 16 sc, 3 sc BLO, ch 1, turn (22 sc).
- Row 24: 3 sc BLO, inc sc, 14 sc, inc sc, 3 sc BLO, 6 ch, turn (24 sc).
- Row 25: 24 sc, 6 ch, finish with 1 slst.
Step 9: The Tail
Start with Beige/Snow yarn.
- R1: 6 sc in magic ring
- R2: (sc, inc) x 3 (9 sc)
- R3: (2 sc, inc) x 3 (12 sc)
- R4: (3 sc, inc) x 3 (15 sc)
- R5: (4 sc, inc) x 3 (18 sc)
- R6 – R8: 18 sc (3 rounds)
Change to Cinnamon/Terracotta yarn:
- R9: 18 sc
- R10 – R13: 18 sc (4 rounds)
- R14: (4 sc, dec) x 3 (15 sc)
- R15: (3 sc, dec) x 3 (12 sc)
- R16: (dec) x 6 (6 sc)
- R17: 6 sc
Do not fill the tail. Finish with 1 slst.
Final Assembly
- Slipper Ears: Sew the ears to the slippers between rounds 8 and 9, aligned with the eyes and spaced 3 stitches apart.
- Legs: Find the center back of the body. Count 10 stitches to each side and pin. Sew the legs, ensuring toes point inwards. Sew a second line of attachment 2 rounds below the top of the legs for stability.
- Tail: Sew the tail to the middle of the back between rounds 22 and 23.
- Diaper: Wrap the diaper around the body and sew buttons on the front side, approximately 6 stitches from the ends.
- Hat: Place the hat on the head and secure it.
Your adorable crochet fox is now complete!
“`