Hop Into Spring: Create Your Own Adorable Amigurumi Easter Bunny!
“`html
Adorable Crochet Easter Bunny Pattern: Step-by-Step Guide
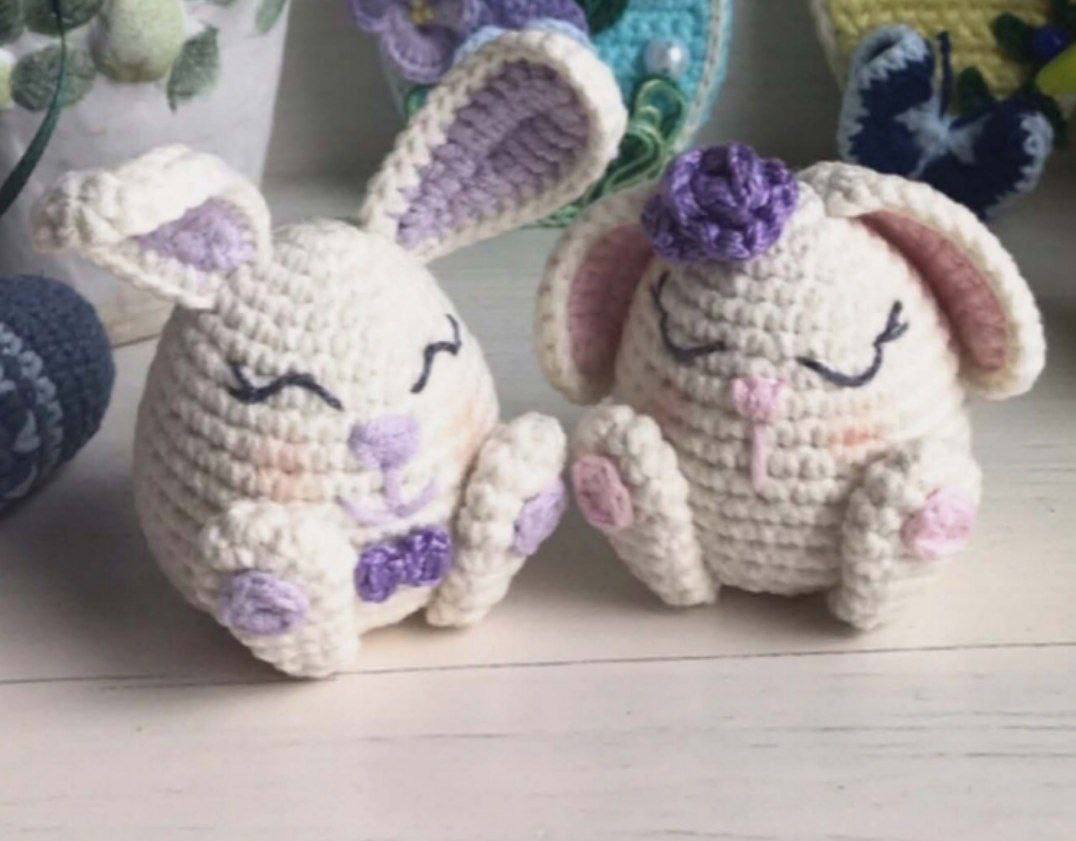
Bring some spring cheer to your home with these cute, round crochet Easter bunnies! This amigurumi pattern is perfect for beginners and experienced crocheters alike, resulting in a sweet little companion that makes a wonderful holiday gift or decoration.
Materials You Will Need
- Main Yarn: Sport weight yarn (such as YarnArt Jeans) in white or your preferred bunny color.
- Embroidery Yarn: Mercerized cotton thread (such as Iris yarn) for the facial features and decorative bows/flowers.
- Crochet Hook: 2.0mm hook.
- Stuffing: High-quality fiberfill.
- Tools: Yarn needle and scissors.
Crochet Abbreviations (US Terms)
- MR: Magic Ring
- ch: Chain
- sl st: Slip stitch
- sc: Single crochet
- inc: Increase (two single crochets in one stitch)
- dec: Decrease (two single crochets joined together)
- hdc: Half double crochet
- dc: Double crochet
Pattern Instructions
The Body
Work in continuous rounds.
- Round 1: 6 sc in MR (6)
- Round 2: 6 inc (12)
- Round 3: (1 sc, inc) * 6 (18)
- Round 4: 18 sc (18)
- Round 5: (2 sc, inc) * 6 (24)
- Round 6: 24 sc (24)
- Round 7: (3 sc, inc) * 6 (30)
- Round 8: 30 sc (30)
- Round 9: (9 sc, inc) * 3 (33)
- Round 10: 33 sc (33)
- Round 11: (10 sc, inc) * 3 (36)
- Rounds 12-16: 36 sc (36)
- Round 17: (4 sc, dec) * 6 (30)
- Round 18: (3 sc, dec) * 6 (24)
- Round 19: (2 sc, dec) * 6 (18)
- Stuff the body firmly with fiberfill.
- Round 20: (1 sc, dec) * 6 (12)
- Round 21: 6 dec (6)
Fasten off, weave the tail through the remaining stitches to close the hole, and secure the yarn.
The Ears (Make 4 pieces)
Chain 11. Starting in the 2nd chain from the hook, work the following in one row:
- 3 sc, 3 hdc, 3 dc, 5 dc in the next stitch, 3 dc, 3 hdc, 3 sc.
Assembly of Ears: Place two pieces together with the wrong sides facing each other. Join them by crocheting around the edges: 10 sc, 3 inc, 10 sc. Fasten off, leaving a long tail for sewing to the body.
The Paws (Make 2)
- Round 1: 6 sc in MR (6)
- Round 2: 6 inc (12)
- Rounds 3-4: 12 sc (12)
- Round 5: (2 sc, dec) * 3 (9)
- Rounds 6-7: 9 sc (9)
- Round 8: (1 sc, dec) * 3 (6)
- Round 9: 6 sc (6)
Do not stuff the paws. Fasten off and leave a tail for sewing.
Paw Pads (Make 4)
- Round 1: 6 sc in MR, finish with a sl st.
Sew these small circles onto the bottom of the paws.
The Tail
- Round 1: 6 sc in MR (6)
- Round 2: 6 inc (12)
- Round 3: (2 sc, dec) * 3 (9), finish with a sl st.
Stuff very lightly, fasten off, and leave a tail for sewing.
Assembly and Finishing Touches
- Sewing: Attach the ears and paws to the body. You can position the ears however you like—either standing up or drooping slightly for a cuter look.
- Eyes: You can use safety eyes or embroider them using the cotton thread. If embroidering, use a single strand of thread for a delicate look.
- Face: Embroider a small nose and a little mouth using the cotton thread.
- Tail: Sew the small tail to the back of the bunny.
- Decorations: Add a small crochet flower or a bow using the cotton thread (doubled up for thickness) and sew it near the ear or on the chest.
- Final Detail: For an extra touch of cuteness, you can lightly apply a bit of pink blush or fabric marker to the cheeks.
“`