Crochet Your Own Cuddly Mini Snowman: A Step-by-Step Soft & Squishy Guide
“`html
How to Crochet a Mini Snowman Amigurumi: Step-by-Step Pattern
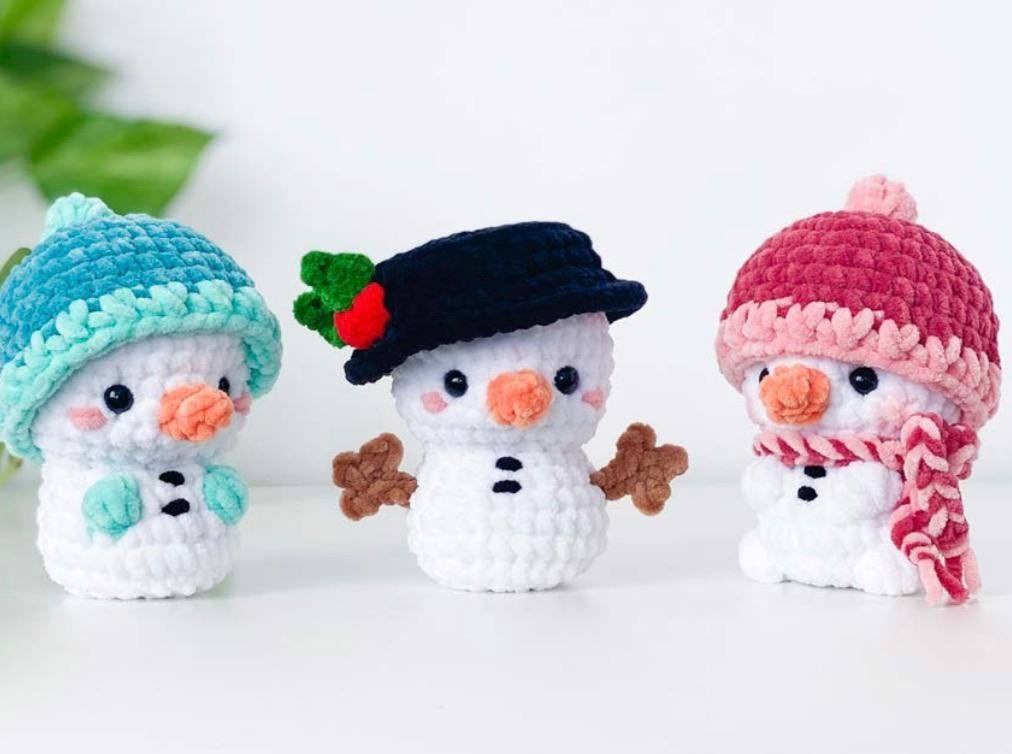
Create your own adorable winter companion with this detailed guide to crocheting a Mini Snowman. These plushies are made using super bulky chenille yarn, giving them a soft, huggable texture. Depending on your style, you can create a snowman with a cozy beanie, a classic top hat, or a colorful winter scarf.
Materials Needed
Yarn (Super Bulky Chenille)
- White: 25-30g (for the body)
- Orange: 2-4g (for the nose)
- Black: 2-12g (for buttons/hat)
- Light Pink: 2-12g (for cheeks/scarf/beanie)
- Optional Colors: Teal, Light Teal, Brown, Red, or Green depending on the version you choose.
Tools
- Main Crochet Hook: 4.0mm
- Additional Hooks: 5.0mm and 6.0mm (for accessories)
- Fiberfill stuffing
- 12mm Black Safety Eyes (x2)
- Yarn needle and scissors
- Stitch marker
Crochet Abbreviations (US Terms)
- ch: chain stitch
- sc: single crochet stitch
- inc: increase (2 sc in the same stitch)
- dec: invisible decrease (2 sc together in 1 stitch)
- hdc: half double crochet
- dc: double crochet
- slst: slip stitch
- BLO: Back Loop Only
- FLO: Front Loop Only
- FPhdc: Front Post half double crochet
- BPhdc: Back Post half double crochet
- Bobble dc: Bobble stitch made of double crochets
- Rnd: Round
- st/sts: stitch/stitches
Step 1: Head and Body
All versions start with the same head and upper body base. Use white yarn and work in continuous rounds (spirals).
- Rnd 1: Ch 2, work 8 sc in the second chain from hook. [inc] 8x (16 sts)
- Rnd 2: [sc 1, inc] 8x (24 sts)
- Rnd 3: [sc 1, inc, sc 2] 6x (30 sts)
- Rnd 4-9: sc 30 (30 sts)
Eyes: Place safety eyes between rounds 7 and 8. Position the first eye between stitches 9 and 10, and the second eye between stitches 15 and 16.
Step 2: The Carrot Nose
The nose is worked directly onto the head. Attach orange yarn to the 13th stitch between rounds 8 and 9.
- Round 1: {ch 1 + sc 1} in the 13th st, sc 1 in the 12th st (3 sts).
Turn the head 90 degrees to the right. Insert hook between sts 11 and 12 of rnd 8: sc 1 (+1 st).
Turn 90 degrees right. Insert hook in 12th st between rnd 7 and 8: sc 1 in 12th st, sc 1 in 13th st (+2 sts).
Turn 90 degrees right. Insert hook between sts 13 and 14 of rnd 8: sc 1 (+1 st). - Round 2: [dec] 3x (+2 sts).
Fasten off and weave the tails through the center of the nose into the head. Tie a knot inside and hide the ends.
Step 3: Completing the Body
Depending on your version, follow the corresponding instructions below:
Beanie or Scarf Version
- Rnd 10: [sc 1, dec, sc 2] 6x (24 sts)
- Rnd 11: [sc 1, dec] 8x (16 sts)
- Rnd 12: FLO [sc 1, inc] 8x (24 sts)
- Rnd 13: sc 7, light teal/pink bobble dc 5, white sc 4, light teal/pink bobble dc 5, white sc 11 (24 sts)
- Rnd 14: sc 8, [inc] 4x, sc 12 (28 sts)
- Rnd 15: sc 28 (28 sts)
- Rnd 16: sc 8, [dec] 4x, sc 12 (24 sts)
- Rnd 17: FLO [sc 1, dec] 8x (16 sts)
- Rnd 18: [dec] 8x (8 sts)
Hat Version
- Rnd 10: [sc 1, dec, sc 2] 6x (24 sts)
- Rnd 11: [sc 1, dec] 8x (16 sts)
- Rnd 12: FLO [sc 1, inc] 8x (24 sts)
- Rnd 13: sc 24 (24 sts)
- Rnd 14: [sc 7, inc] 3x (27 sts)
- Rnd 15-16: sc 27 (27 sts)
- Rnd 17: FLO [sc 7, dec] 3x (24 sts)
- Rnd 18: [sc 1, dec] 8x (16 sts)
- Rnd 19: [dec] 8x (8 sts)
Stuff the head and body generously. Close using the front loops of the final stitches and fasten off.
Step 4: Accessories
Option A: The Beanie and Pompom
- Beanie: Using teal or pink yarn: ch 2, 8 sc in 2nd ch.
Rnd 1: [inc] 8x (16 sts)
Rnd 2: [sc 1, inc] 8x (24 sts)
Rnd 3: [sc 1, inc, sc 2] 6x (30 sts)
Rnd 4: [sc 4, inc] 6x (36 sts)
Rnd 5-8: sc 36.
Rnd 9: Using light teal/pink, [FPhdc 1, BPhdc 1] 18x. Invisible fasten off. - Pompom: Use a 5mm hook. Attach light teal/pink yarn to the center of the beanie. Work: ch 3 + bobble dc 6 + ch 1. Fasten off and sew the tails to the top of the hat.
Option B: The Top Hat, Arms, and Leaves
- Hat: Using black yarn: ch 2, 8 sc in 2nd ch.
Rnd 1: [inc] 8x (16 sts)
Rnd 2: [sc 1, inc] 8x (24 sts)
Rnd 3: [sc 1, inc, sc 2] 6x (30 sts)
Rnd 4: BLO sc 30 (30 sts)
Rnd 5: sc 8, Red [bobble dc 3 in next st] 2x, Black sc 20 (30 sts)
Rnd 6: FLO [sc 1, inc] 15x (45 sts)
Rnd 7: sc 45. Invisible fasten off. - Leaves: Attach green yarn to the hat. Work: (ch 1 + sc 1 + hdc 1 + ch 2 + slst 1 + hdc 1 + sc 1 + ch 1) all in the same stitch. Repeat for the second leaf.
- Arms: Attach brown yarn to rnd 14 of the body.
Work: ch 5, slst in 2nd ch from hook. Create three small branches using ch 2 and slst. Fasten off and weave in ends.
Option C: The Scarf
- Use a 6.0mm hook and two shades of pink.
Make a starting loop.
Pass hook under dark pink, yarn over dark pink, draw through loop.
Pass hook under light pink, yarn over light pink, draw through loop.
Repeat this alternating sequence approximately 60 times to reach desired length. Tie knots at both ends.
Step 5: Final Touches
- Cheeks: Use light pink yarn and a needle to make two small stitches (2 sts long) under each eye. Alternatively, use a small amount of pink blush and a soft brush.
- Buttons: Use black yarn and a needle. Make a small stitch (1 st long) centered on the front of the body. Place the first between rounds 12-13 and the second between rounds 13-14.
- Assembly: Place your chosen accessory (beanie or hat) on the head and glue or sew it in place. Wrap the scarf around the neck if using the scarf version.
“`