Chubby, Chunky, and Cute: The Ultimate Plush Hamster Crochet Guide
“`html
DIY Chunky Crochet Hamster Pattern: Step-by-Step Guide
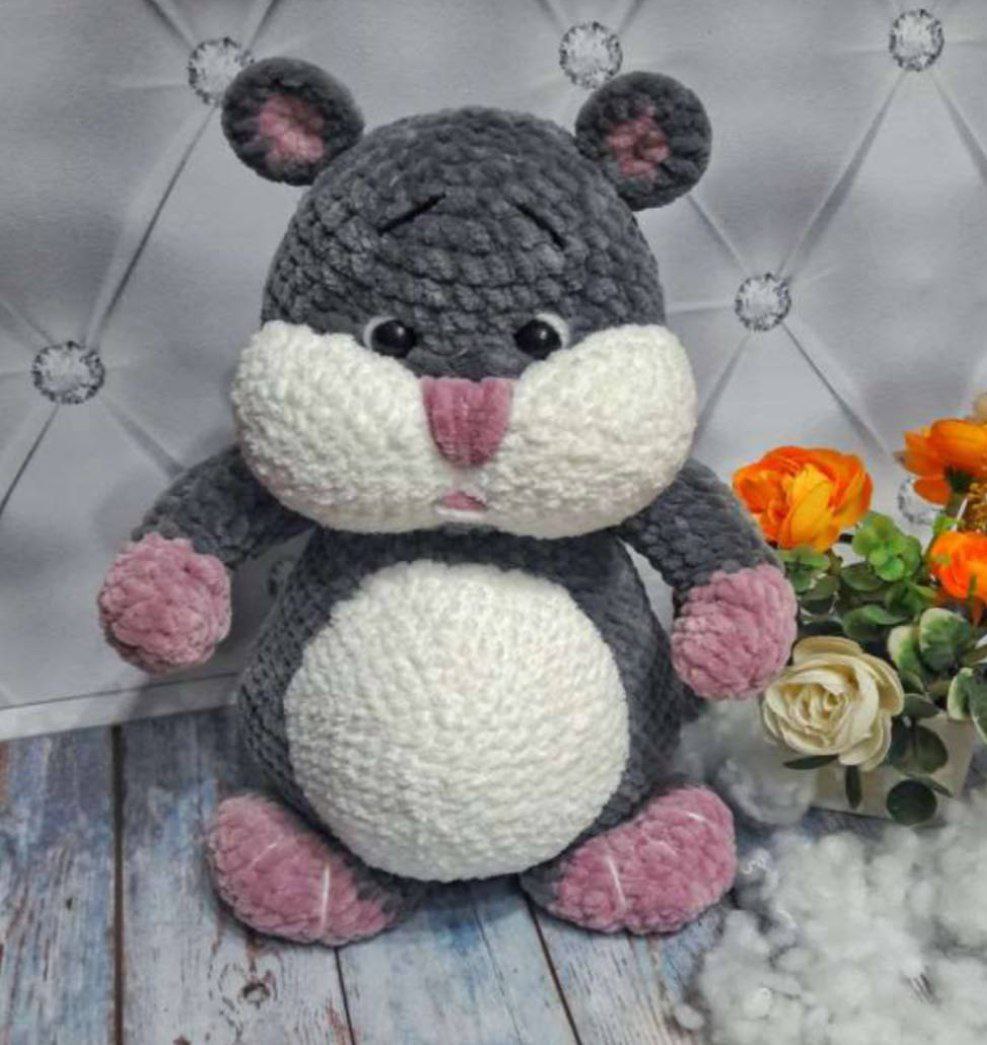
Create your own adorable, squishy companion with this detailed crochet pattern. This project is designed for those with an intermediate skill level and results in a cute, chubby hamster using plush chenille yarn.
Materials Needed
- Plush Yarn:
- Main color: Approximately 1.3 skeins (Suggested: Himalaya Dolphin Baby or YarnArt Dolce)
- Accent color: Approximately 0.3 skeins
- White plush yarn: 1 skein (Suggested: Alize Softy)
- Other Supplies:
- Embroidery thread (matching the yarn colors) for sewing and detailing
- Plastic safety eyes or beads: 13mm diameter
- Crochet hook: 3.5mm (or a size appropriate for your chosen yarn)
- Large tapestry needle with a wide eye
- Scissors
- Stitch markers
- Buttons: 2 pieces (20mm) for jointing the arms (optional)
- Stuffing: Fiberfill or synthetic stuffing
- Decorative ribbons or bows (optional)
Crochet Abbreviations (US Terms)
- MR: Magic Ring
- ch: Chain
- sc: Single Crochet
- inc: Increase (2 sc in one stitch)
- dec: Decrease (sc 2 stitches together)
- dc: Double Crochet
- Puff: Puff Stitch (3 dc in one stitch, worked together)
- sl st: Slip Stitch
Note: All parts are worked in continuous rounds. Stuff the toy firmly as you go.
Step-by-Step Pattern
1. The Body and Head
Start with the main color. We will crochet the body first and continue directly into the head without cutting the yarn.
Body:
- Round 1: Ch 5. Starting from the 2nd chain from hook: 3 sc, 3 sc in the last ch, 2 sc, inc (10)
- Round 2: inc, 2 sc, 3 inc, 2 sc, 2 inc (16)
- Round 3: 1 sc, inc, 2 sc, (1 sc, inc)*3, 2 sc, (1 sc, inc)*2 (22)
- Round 4: 2 sc, inc, 2 sc, (2 sc, inc)*3, 2 sc, (2 sc, inc)*2 (28)
- Round 5: 3 sc, inc, 2 sc, (3 sc, inc)*3, 2 sc, (3 sc, inc)*2 (34)
- Round 6: 4 sc, inc, 2 sc, (4 sc, inc)*3, 2 sc, (4 sc, inc)*2 (40)
- Round 7: 5 sc, inc, 2 sc, (5 sc, inc)*3, 2 sc, (5 sc, inc)*2 (46)
- Round 8: 6 sc, inc, 2 sc, (6 sc, inc)*3, 2 sc, (6 sc, inc)*2 (52)
- Round 9: 2 inc, 20 sc, 6 inc, 20 sc, 4 inc (64)
- Rounds 10-15: sc in each stitch (64 sc for 6 rounds)
Pro Tip: At this stage, you may optionally insert a sturdy plastic or cardboard oval into the base for better stability.
- Round 16: 2 dec, 20 sc, 6 dec, 20 sc, 4 dec (52)
- Rounds 17-21: sc in each stitch (52 sc for 5 rounds)
- Round 22: 30 sc, (1 sc, dec)*6, 4 sc (46)
- Round 23: 30 sc, 6 dec, 4 sc (40)
- Round 24: sc in each stitch (40 sc)
- Round 25: (3 sc, dec)*8 (32)
- Round 26: sc in each stitch (32 sc)
- Round 27: (2 sc, dec)*8 (24)
- Round 28: sc in each stitch (24 sc)
Head:
Do not cut the yarn; continue crocheting the head.
- Round 29: inc in every stitch (48)
- Rounds 30-37: sc in each stitch (48 sc for 8 rounds)
- Round 38: (5 sc, dec)*6, 6 sc (42)
- Round 39: (4 sc, dec)*7 (35)
- Rounds 40-41: sc in each stitch (35 sc for 2 rounds)
- Round 42: (3 sc, dec)*7 (28)
- Round 43: sc in each stitch (28 sc)
- Round 44: (2 sc, dec)*7 (21)
- Round 45: (1 sc, dec)*7 (14)
- Round 46: dec*7 (7)
- Round 47: Continue decreasing until the hole is closed. Fasten off and hide the yarn tail.
2. Cheeks (Make 2)
Use white plush yarn, worked with a double strand.
- Round 1: 6 sc in MR (6)
- Round 2: inc*6 (12)
- Round 3: (1 sc, inc)*6 (18)
- Round 4: (2 sc, inc)*6 (24)
- Round 5: (3 sc, inc)*6 (30)
- Round 6: (4 sc, inc)*6 (36)
- Round 7: (5 sc, inc)*6 (42)
- Round 8: sc in each stitch (42 sc)
3. Ears (Make 4 – 2 in main color, 2 in accent color)
- Round 1: 6 sc in MR (6)
- Round 2: inc*6 (12)
Fold the two colored circles together and crochet 10 sc around the edge. Fold the resulting piece in half and crochet 1 sc to create an elongated ear shape.
4. Tummy (Make 1)
Use white plush yarn, worked with a double strand.
- Start: Ch 6. Starting from the 2nd ch from hook:
- Round 1: 4 sc, 3 sc in 1 ch, 3 sc, inc (12)
- Round 2: inc, 3 sc, 3 inc, 3 sc, 2 inc (18)
- Round 3: 1 sc, inc, 3 sc, (1 sc, inc)*3, 3 sc, (1 sc, inc)*2 (24)
- Round 4: 2 sc, inc, 3 sc, (2 sc, inc)*3, 3 sc, (2 sc, inc)*2 (30)
- Round 5: 3 sc, inc, 3 sc, (3 sc, inc)*3, 3 sc, (3 sc, inc)*2 (36)
- Round 6: 4 sc, inc, 3 sc, (4 sc, inc)*3, 3 sc, (4 sc, inc)*2 (42)
- Round 7: 5 sc, inc, 3 sc, (5 sc, inc)*3, 3 sc, (5 sc, inc)*2 (48)
- Round 8: 6 sc, inc, 3 sc, (6 sc, inc)*3, 3 sc, (6 sc, inc)*2 (54)
- Round 9: 7 sc, inc, 3 sc, (7 sc, inc)*3, 3 sc, (7 sc, inc)*2 (60)
- Round 10: 8 sc, inc, 3 sc, (8 sc, inc)*3, 3 sc, (8 sc, inc)*2 (66)
End the round with 4 slip stitches.
5. Arms (Make 2)
Stuff the bottom firmly and the top with medium density.
- Round 1: 6 sc in MR (6)
- Round 2: inc*6 (12)
- Rounds 3-4: sc in each stitch (12 sc)
- Round 5: Puff stitch, 5 sc, dec, 4 sc
- Round 6: 5 sc, dec, 4 sc (10)
- Color Change: Switch to the main color.
- Round 7: dec, 3 sc, dec, 3 sc (8)
- Round 8: inc, 7 sc (9)
- Round 9: 1 sc, inc, 7 sc (10)
- Round 10: 1 sc, inc, 8 sc (11)
- Round 11: sc in each stitch (11 sc)
- Round 12: 2 sc, inc, 8 sc (12)
- Rounds 13-20: sc in each stitch (12 sc)
- Round 21: dec*6 (6). Continue decreasing until closed.
6. Legs (Make 2)
- Start: Ch 4. Starting from the 2nd ch from hook:
- Round 1: 2 sc, 3 sc in 1 ch, 1 sc, inc (8)
- Round 2: inc, 1 sc, 3 inc, 1 sc, 2 inc (14)
- Round 3: 1 sc, inc, 1 sc, (1 sc, inc)*3, 1 sc, (1 sc, inc)*2 (20)
- Round 4: 2 sc, inc, 1 sc, (2 sc, inc)*3, 1 sc, (2 sc, inc)*2 (26)
- Round 5: sc in each stitch (26 sc)
- Color Change: Switch to the main color.
- Rounds 6-7: sc in each stitch (26 sc)
Fold the piece in half and crochet 12 sc across the bottom. Stuff with medium density. Use white or matching thread to create sculpting stitches on the toes.
7. Tail (Make 1)
- Round 1: 6 sc in MR (6)
- Round 2: 6 sc (6)
- Round 3: 6 sc (6)
- Round 4: inc, 5 sc (7)
- Round 5: 7 sc (7)
Do not stuff the tail.
Assembly and Finishing
Face Sculpting and Eyes
To create eye sockets, use a long needle and thread. Insert the needle between rounds 38 and 39 of the head at point A and bring it out at point B. The stitch should be about 3 sc wide, and the distance between the two eyes should be 3-4 sc. Repeat for the other eye.
Attach the safety eyes or beads into these sculpted sockets.
Adding Details
- Cheeks: Pin the cheeks in place, add a small amount of stuffing, and sew them on.
- Ears: Pin the ears and sew them to the top of the head.
- Face: Embroider the eyebrows, a small nose, and a single stitch for the mouth.
- Tummy: Lightly stuff the white tummy piece and sew it to the front of the body.
- Tail: Sew the tail to the back of the body.
- Legs: Sew the legs to the body between rounds 6 and 7, spaced 6 sc apart.
Attaching the Arms (Button Joint Technique)
To ensure the arms are secure and movable:
- Use a tapestry needle and strong thread (4 strands).
- Insert the needle through the body, then through the arm, and add a 20mm button.
- Pass the needle back through the arm and the body.
- Repeat for the second arm.
- Tie the thread securely with 2-3 knots and hide the ends inside the body.
Important: Do not overtighten, but make sure the arms are snug and do not wobble.
“`