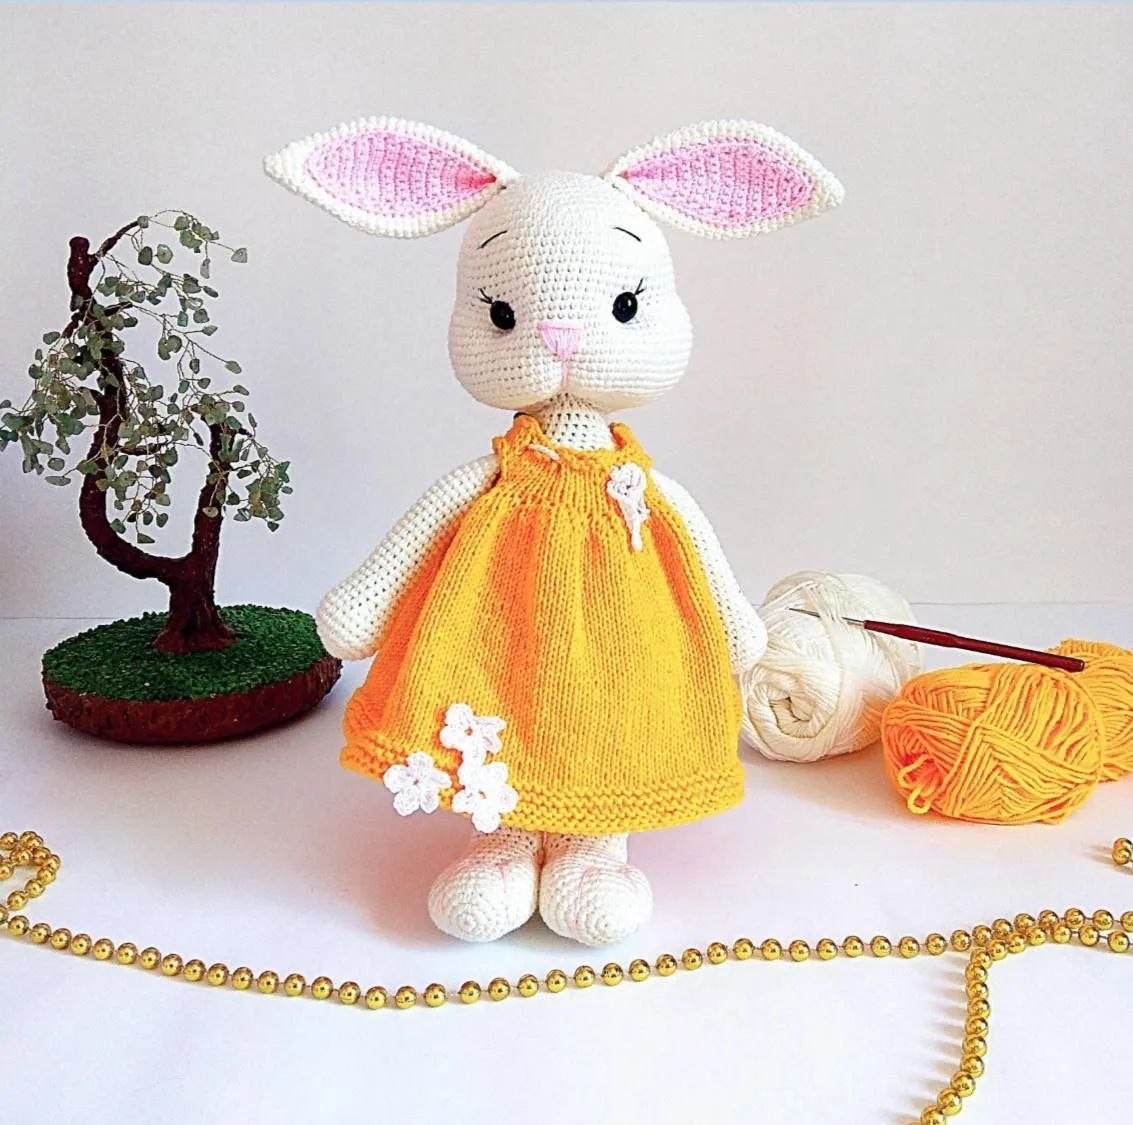
Create This Adorable Crochet Bunny in a Tiny Knitted Dress
How to Crochet a Cute Bunny with a Knitted Dress: Step-by-Step Pattern
Create your own adorable handmade bunny companion! This project combines both crochet and knitting to create a beautiful toy with a detailed wardrobe. This pattern is designed for intermediate crafters.
Materials and Tools
- Yarn:
- Main Color (Milk/Cream): Alize Cotton Gold #62
- Dress Color (Dark Yellow): Alize Cotton Gold #216
- White: Alize Bella #55
- Light Pink: Alize Diva #185
- Crochet Hooks: 1.75mm and 1.25mm
- Knitting Needles: 2.5mm (circular needles recommended)
- Other Supplies: 10mm safety eyes, black embroidery floss, dental floss or matching thread (for eye sculpting), fiberfill stuffing, tapestry needle.
Abbreviations (US Terms)
- MR: Magic Ring
- ch: Chain
- sc: Single crochet
- inc: Increase (2 sc in one stitch)
- dec: Decrease (sc 2 together)
- sl st: Slip stitch
- dc: Double crochet
- K: Knit
- P: Purl
- YO: Yarn over
- K2tog: Knit 2 together
Step 1: The Arms (Make 2)
Worked in milk-colored yarn.
- Round 1: 6 sc in MR (6)
- Round 2: 6 inc (12)
- Round 3: (1 sc, inc) * 6 (18)
- Round 4: (2 sc, inc) * 6 (24)
- Rounds 5-7: 24 sc (24)
- Round 8: (2 sc, dec) * 6 (18)
- Rounds 9-10: 18 sc (18)
- Round 11: (4 sc, dec) * 3 (15)
Begin stuffing the arm. Continue stuffing up to round 28.
- Rounds 12-32: 15 sc (15)
Flatten the end and sc across the opening to close. Fasten off, leaving a long tail for sewing.
Step 2: Legs and Torso
The Legs (Make 2)
Worked in milk-colored yarn.
- Round 1: 6 sc in MR (6)
- Round 2: 6 inc (12)
- Round 3: (1 sc, inc) * 6 (18)
- Round 4: (2 sc, inc) * 6 (24)
- Round 5: (3 sc, inc) * 6 (30)
- Rounds 6-10: 30 sc (30)
- Round 11: (13 sc, dec) * 2 (28)
- Round 12: (12 sc, dec) * 2 (26)
- Round 13: (11 sc, dec) * 2 (24)
- Round 14: (10 sc, dec) * 2 (22)
- Round 15: (9 sc, dec) * 2 + 2 sl st (20)
The Heel: Work in rows (flat).
- Row 1: 4 sc, sl st, ch 1, turn
- Row 2: 5 sc, sl st, ch 1, turn
- Row 3: 6 sc, sl st, ch 1, turn
- Row 4: 7 sc, sl st, ch 1, turn
- Row 5: 8 sc, sl st, ch 1, turn
- Row 6: 9 sc, sl st, ch 1, turn
- Row 7: 10 sc, sl st, ch 1, turn
- Row 8: 11 sc, sl st, ch 1, turn
- Row 9: 12 sc, sl st, ch 1, turn
- Row 10: 13 sc, sl st, turn (no chain)
Returning to rounds:
- Round 11: 14 sc along the heel, 6 sc along the top of the foot. Place a marker. Stuff the foot.
- Rounds 12-20: 20 sc (20)
Fasten off the first leg. For the second leg, do not cut the yarn.
The Torso
Using the yarn from the second leg, work 4 sc along the leg, ch 4, then join to the 7th stitch to the right of the marker on the first leg. Work 20 sc around the first leg, 4 sc in the chain, 20 sc around the second leg, and 4 sc in the chain. Place a marker.
- Round 1: 20 sc, inc, 2 sc, inc, 20 sc, inc, 2 sc, inc (52)
- Round 2: 10 sc, inc, 25 sc, inc, 15 sc (54)
- Round 3: (8 sc, inc) * 6 (60)
- Round 4: (9 sc, inc) * 6 (66)
- Round 5: (10 sc, inc) * 6 (72)
- Rounds 6-16: 72 sc (72)
Begin stuffing the torso.
- Round 17: (10 sc, dec) * 6 (66)
- Rounds 18-22: 66 sc (66)
- Round 23: (9 sc, dec) * 6 (60)
- Rounds 24-28: 60 sc (60)
- Round 29: (8 sc, dec) * 6 (54)
- Rounds 30-32: 54 sc (54)
- Round 33: (7 sc, dec) * 6 (48)
- Rounds 34-35: 48 sc (48)
- Round 36: (6 sc, dec) * 6 (42)
- Round 37: 42 sc (42)
- Round 38: (5 sc, dec) * 6 (36)
- Round 39: (4 sc, dec) * 6 (30)
- Round 40: (3 sc, dec) * 6 (24)
- Rounds 41-44: 24 sc (24)
Stuff very firmly, especially in the neck area. Fasten off, leaving a long tail for sewing.
Step 3: The Head
Worked in milk-colored yarn.
- Round 1: 6 sc in MR (6)
- Round 2: 6 inc (12)
- Round 3: (1 sc, inc) * 6 (18)
- Round 4: (2 sc, inc) * 6 (24)
- Round 5: (3 sc, inc) * 6 (30)
- Round 6: (4 sc, inc) * 6 (36)
- Round 7: (5 sc, inc) * 6 (42)
- Round 8: (6 sc, inc) * 6 (48)
- Round 9: (7 sc, inc) * 6 (54)
- Round 10: (8 sc, inc) * 6 (60)
- Round 11: (9 sc, inc) * 6 (66)
- Rounds 12-20: 66 sc (66)
- Round 21: 15 sc, 10 inc, 16 sc, 10 inc, 15 sc (86)
- Rounds 22-28: 86 sc (86)
Safety Eyes: Insert eyes between rounds 20 and 21, with 16 stitches between them.
- Round 29: 15 sc, dec, 52 sc, dec, 15 sc (84)
- Round 30: 6 sc, dec, (12 sc, dec) * 5, 6 sc (78)
- Round 31: (11 sc, dec) * 6 (72)
- Round 32: 5 sc, dec, (10 sc, dec) * 5, 5 sc (66)
- Round 33: (9 sc, dec) * 6 (60)
- Round 34: 4 sc, dec, (8 sc, dec) * 5, 4 sc (54)
- Round 35: (7 sc, dec) * 6 (48)
- Round 36: 3 sc, dec, (6 sc, dec) * 5, 3 sc (42)
- Round 37: (5 sc, dec) * 6 (36)
- Round 38: 2 sc, dec, (4 sc, dec) * 5, 2 sc (30)
- Round 39: (3 sc, dec) * 6 (24)
Fasten off and weave in ends.
Step 4: Face Detailing
Eye Sculpting: Use a long needle and dental floss. Thread through the head from the center toward the eye to create a socket. Pull tight and repeat several times for each eye to get the desired expression.
The Nose: Using light pink yarn, embroider a small triangular nose between the eyes. Secure and hide the thread inside the head.
Step 5: The Ears (Make 2)
Outer Ear
Worked in milk-colored yarn.
- Round 1: 6 sc in MR (6)
- Round 2: 6 sc (6)
- Round 3: 6 inc (12)
- Rounds 4-5: 12 sc (12)
- Round 6: (1 sc, inc) * 6 (18)
- Rounds 7-8: 18 sc (18)
- Round 9: (2 sc, inc) * 6 (24)
- Rounds 10-11: 24 sc (24)
- Round 12: (3 sc, inc) * 6 (30)
- Rounds 13-15: 30 sc (30)
- Round 16: (13 sc, dec) * 2 (28)
- Round 17: 28 sc (28)
- Round 18: (12 sc, dec) * 2 (26)
- Round 19: 26 sc (26)
- Round 20: (11 sc, dec) * 2 (24)
- Round 21: 24 sc (24)
- Round 22: (10 sc, dec) * 2 (22)
- Round 23: 22 sc (22)
- Round 24: (9 sc, dec) * 2 (20)
- Rounds 25-28: 20 sc (20)
Fold the ear in half and sc across 10 stitches to close.
Inner Ear
Worked in light pink yarn in flat rows.
- Row 1: 3 sc in MR (3)
- Row 2: 3 sc, ch 1, turn (3)
- Row 3: inc, 1 sc, inc, ch 1, turn (5)
- Row 4: 5 sc, ch 1, turn (5)
- Row 5: inc, 3 sc, inc, ch 1, turn (7)
- Row 6: 7 sc, ch 1, turn (7)
- Row 7: inc, 5 sc, inc, ch 1, turn (9)
- Rows 8-9: 9 sc, ch 1, turn (9)
- Row 11: 3 sc, dec, 4 sc, ch 1, turn (8)
- Row 12: 8 sc, ch 1, turn (8)
- Row 13: 3 sc, dec, 3 sc, ch 1, turn (7)
- Row 14: 7 sc, ch 1, turn (7)
- Row 15: 2 sc, dec, 3 sc, ch 1, turn (6)
- Row 16: 6 sc, ch 1, turn (6)
- Row 17: 2 sc, dec, 2 sc, ch 1, turn (5)
- Rows 17-22: 5 sc, ch 1, turn (5)
- Row 23: 5 sc
Work a round of sc around the entire perimeter of the inner ear. Sew the inner ear to the outer ear, fold again, and sc to secure. Sew ears to the head.
Step 6: The Tail
Worked in milk-colored yarn.
- Round 1: 6 sc in MR (6)
- Round 2: 6 inc (12)
- Round 3: (1 sc, inc) * 6 (18)
- Rounds 4-5: 18 sc (18)
- Round 6: (1 sc, dec) * 6 (12)
- Round 7: (1 sc, dec) * 4 (8)
Fasten off and sew to the torso.
Step 7: The Dress (Knitted)
Use dark yellow yarn and 2.5mm circular needles.
Cast on 54 stitches and join to work in the round.
- Row 1: 54 P
- Row 2: 54 K
- Row 3: *4 K, K2tog, YO* repeat until end of round.
- Row 4: 54 K (knit the YO stitches as regular knit stitches)
- Rows 5-6: 54 K
- Row 7: 18 K, bind off 9, 18 K, bind off 9 (creates armholes)
- Row 8: 18 K, cast on 5, 18 K, cast on 5
- Rows 9-10: 46 K
- Row 11: *1 K, M1 (increase from YO)* repeat until end of round.
- Row 12: *1 K, 1 K from twisted YO* repeat until end of round.
- Row 13: *2 K, M1* repeat until end of round.
- Row 14: *2 K, 1 K from twisted YO* repeat until end of round.
- Rows 15-55: 138 K
- Rows 56-62: Alternate 1 row 138 P and 1 row 138 K (ribbing effect)
- Row 63: Bind off all stitches.
Flower Accessories (Make 3)
Using white yarn and 1.25mm hook:
- Row 1: 5 ch, join into a ring.
- Row 2: (3 ch, 2 dc together, 3 ch) * 5
Sew flowers onto the dress. Finally, create a chain of white stitches (approximately 45 cm long) and weave it through the holes created in Row 7 of the dress to create straps.
Final Assembly
- Sew the head to the torso.
- Sew the arms to the sides of the torso.
- Use black embroidery floss to add eyelashes and eyebrows to the face.
- Dress your bunny in her new yellow dress