Knit Your Own Pocket-Sized Fluffy Goose
“`html
How to Knit a Tiny Fluffy Goose with a Hat
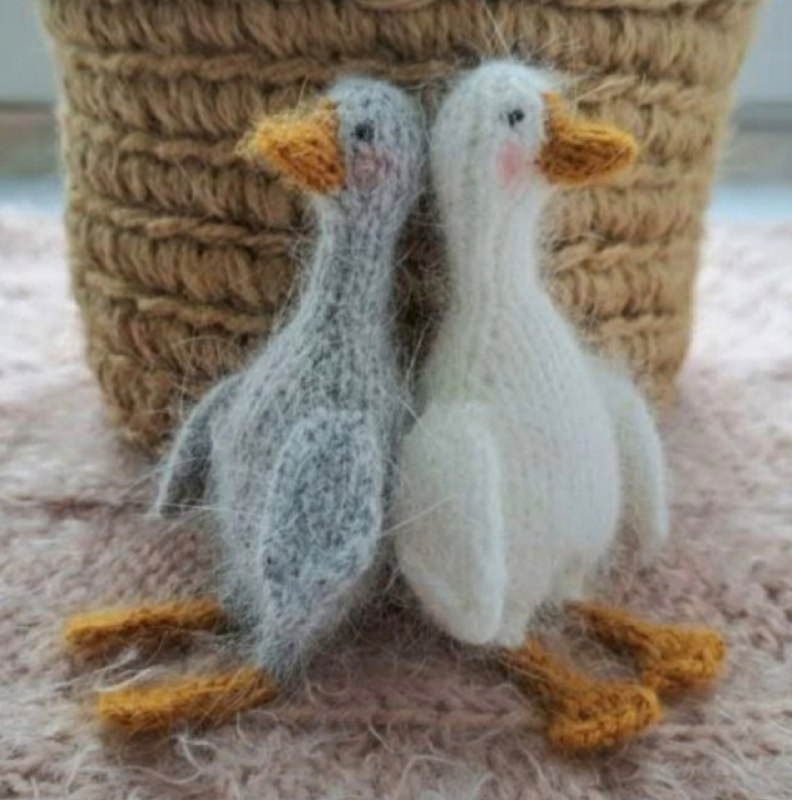
Create your own miniature companion with this detailed guide to knitting a tiny, fluffy goose. This project is perfect for those looking to make a small, whimsical plushie. The finished goose stands approximately 4.3 inches tall, depending on your choice of yarn.
Materials and Tools
Yarn
- Body, Legs, and Wings: Fluffy mohair-style or “mink fluff” yarn (approximately 380 yards per 50g). Suggested colors: White or Light Gray. Note: This part of the project is worked using a double strand of yarn.
- Beak: Orange or Yellow fluffy yarn. Note: This is worked with a single strand.
- Hat: Pink or any bright colored fluffy yarn. Note: This is worked with a single strand.
Needles and Notions
- Double-pointed needles (DPNs): 2.5mm (for body, legs, wings, and hat) and 2.0mm (for the beak).
- Crochet hook: 2.0mm.
- Fiberfill or other stuffing.
- Small black beads (2mm) for eyes.
- Tapestry needle and black embroidery thread.
- 5 stitch markers.
- A wooden stick or similar tool for stuffing.
Abbreviations (US Terms)
- st: stitch
- k: knit
- p: purl
- yo: yarn over (worked as a twisted knit in this pattern)
- inc: increase (knit into the front and back loop of one stitch)
- k2tog: knit 2 together (right-leaning decrease)
- ssk: slip, slip, knit (left-leaning decrease)
Step-by-Step Pattern
1. Head and Body
The head and body are worked as one piece from the top down. Stuff the piece as you go, ensuring the head is firmly stuffed while the neck and body remain soft and rounded.
Using a double strand of white or gray yarn on 2.5mm DPNs, cast on 8 stitches using the Judy’s cast-on method or a crochet chain. Distribute stitches across two needles; the third is the working needle.
- Row 1: K8.
- Row 2: (K1, yo, K2, yo, K1) * 2 = 12 sts.
- Row 3: K12 (Work yarn overs as twisted knits).
- Row 4: (K1, yo, K4, yo, K1) * 2 = 16 sts.
- Row 5: K16 (Work yarn overs as twisted knits).
- Row 6: K16.
- Row 7: (ssk, K4, k2tog) * 2 = 12 sts.
- Row 8: K12.
- Row 9: (ssk, K2, k2tog) * 2 = 8 sts.
- Rows 10-16: Place a marker at the start of the row and work 7 rows of K8.
- Row 17: (K1, yo, K2, yo, K1) * 2 = 12 sts.
- Row 18: K12 (Work yarn overs as twisted knits).
- Row 19: (K1, yo, K4, yo, K1) * 2 = 16 sts.
- Row 20: K16 (Work yarn overs as twisted knits).
- Row 21: K16.
- Row 22: (K1, yo, K6, yo, K1) * 2 = 20 sts.
- Row 23: K20 (Work yarn overs as twisted knits).
- Row 24: K20. Place wing markers here: Right wing (sts 10, 11, 12), Left wing (sts 19, 20, and st 1 of the next row).
- Row 25: (K1, yo, K8, yo, K1) * 2 = 24 sts.
- Row 26: K24 (Work yarn overs as twisted knits).
- Rows 27-35: Shift the start-of-row marker to the left side of the goose and work 9 rows of K24.
- Row 36: (ssk, K8, k2tog) * 2 = 20 sts.
2. The Legs
Legs are worked directly from the body stitches. Knit the left leg first.
Hold the stitches for the right leg (sts 6-10 and 11-15) on markers. Work the remaining 10 stitches for the left leg in the round.
- Rows 1-2: K10.
- Row 3: (ssk, K1, k2tog) * 2 = 6 sts.
- Row 4: K6.
- Row 5: k2tog 3 times = 3 sts.
Cut the yarn, leaving a long tail (about 27 inches). Join the orange yarn (double strand) and work the leg as an I-cord:
- Rows 6-10: Work 5 rows of 3 sts.
- Row 11: K1, inc, K1 = 4 sts.
- Row 12: P4.
- Row 13 (Left Leg): K1, inc, K2 = 5 sts.
- Row 13 (Right Leg): K2, inc, K1 = 5 sts.
Bind off as purl stitches. Weave the ends securely into the body. Repeat the process for the right leg, ensuring they are slightly spaced apart.
3. The Beak and Eyes
Option 1: Separate Beak
Using a single strand of orange yarn and 2.0mm needles:
- Cast on 6 sts.
- Rows 1-2: K6.
- Row 3: K1, inc, K1, inc, K4 = 8 sts.
- Row 4: K8 (Work yarn overs as twisted knits).
Bind off, leave a tail for sewing, and stuff lightly. Sew to the head and add horizontal embroidery stitches for detail. For eyes, sew on 2mm black beads or embroider them with black thread.
Option 2: Integrated Beak
Using a crochet hook, pick up 7 stitches from the head and work 4 rows of K7. Bind off, stuff lightly, and sew into shape.
4. The Wings
Work the wings from the body markers. Using a crochet hook, pick up 3 stitches from the body for the top and 3 stitches from 1-2 rows below for the bottom.
- Row 1: K6.
- Row 2: (K1, yo, K1, yo, K1) * 2 = 10 sts.
- Row 3: K10 (Work yarn overs as twisted knits).
- Rows 4-9: Work 6 rows of K10.
- Row 10: Right wing (ssk, K6, k2tog = 8 sts); Left wing (K3, k2tog, ssk, K3 = 8 sts).
- Row 11: Right wing (ssk, K4, k2tog = 6 sts); Left wing (K2, k2tog, ssk, K2 = 6 sts).
- Row 12: Right wing (ssk, K2, k2tog = 4 sts); Left wing (K1, k2tog, ssk, K1 = 4 sts).
Bind off and sew the wings to the body.
5. The Tail
Take a small bundle of 5-6 yarn scraps. Fold them in half and use a crochet hook to pull them through a stitch at the bottom of the back. Tighten and trim to about 0.5 inches.
6. The Hat
Work in the round from the bottom up using a single strand of pink yarn and 2.5mm needles.
- Cast on 24 sts, leaving a 15-20 inch tail for the tie.
- Rows 1-2: K24. Work one extra K1 to mark the start of the row.
- Row 3: (ssk, K8, k2tog) * 2 = 20 sts.
- Row 4: K20.
- Row 5: (ssk, K6, k2tog) * 2 = 16 sts.
- Row 6: K16.
- Row 7: (ssk, K4, k2tog) * 2 = 12 sts.
- Row 8: K12.
- Row 9: (ssk, K2, k2tog) * 2 = 8 sts.
- Row 10: K8.
- Row 11: (ssk, k2tog) * 2 = 4 sts.
- Row 12: K4.
- Rows 13-22: Work 10 rows of I-cord (4 sts).
Bind off and tie a knot at the top. Use the long cast-on tail to create ties for the hat.
Finishing Touches
To give your goose a professional finish, hand wash the goose and the hat using mild soap or hair shampoo. Gently squeeze out excess water with a towel. While damp, shape the body, fluff the wings, and straighten the legs. Air dry in a warm spot away from direct sunlight.
“`