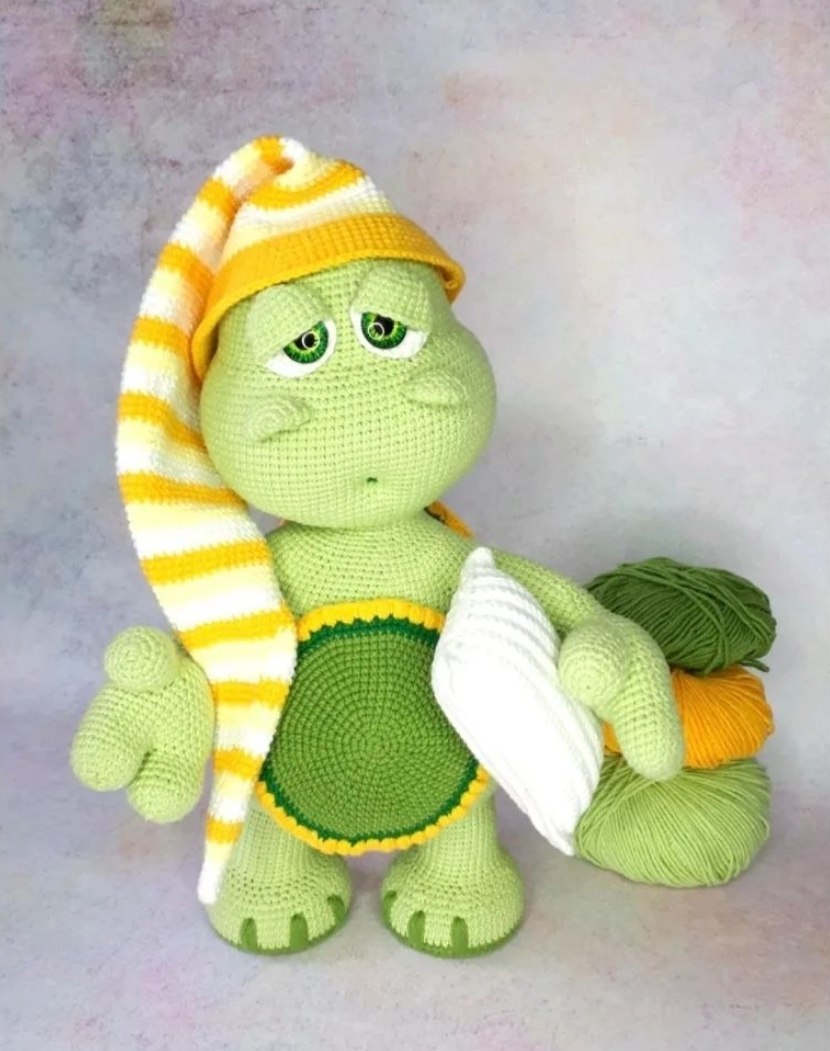
Stitch Your New Best Friend: The Ultimate Guide to Crocheting a Sleepy Turtle
“`html
How to Crochet a Sleepy Turtle: A Detailed Step-by-Step Guide
Create your own adorable, cozy companion with this detailed crochet pattern for a Sleepy Turtle. This project combines amigurumi techniques with structural elements like a wire frame and plastic supports to ensure your turtle stands proud and holds its shape.
Materials Needed
- Yarn:
- Light Green (Cotton/Polyacrylic blend): Approx. 2.5 balls
- Green (Cotton/Polyacrylic blend): Approx. 0.5 ball
- Dark Green (Cotton/Polyacrylic blend): Small amount
- Yellow (Cotton/Polyacrylic blend): Approx. 0.5 ball
- Light Yellow (Cotton/Silk/Acrylic blend): Approx. 0.5 ball
- White (Cotton/Polyacrylic blend): Approx. 1 ball
- Hardware & Tools:
- Crochet Hook: 1.75 mm
- Safety Eyes: 16 mm diameter
- Stuffing: Fiberfill
- Wire for internal frame: 2.6 meters (2 mm thickness)
- Plastic sheets: For foot soles (recycled plastic lids work well)
- Other: Scissors, pliers, hot glue or strong adhesive, long sewing needle, stitch markers, masking tape or bandages
Pattern Abbreviations (US Terms)
- MR: Magic Ring
- sc: Single crochet
- inc: Increase (2 sc in one stitch)
- dec: Decrease (sc 2 together)
- sl st: Slip stitch
- ch: Chain
- hdc: Half double crochet
- bobble: 3 double crochets worked together into one stitch
- BLO: Back loop only
- st: Stitch
Step 1: The Arms (Make 2)
The arms are worked from the fingers up to the shoulder.
The Fingers
Using light green yarn, make 3 fingers per hand. Fasten off the first two; leave the yarn attached to the third.
- R1: 6 sc in MR (6)
- R2: 6 inc (12)
- R3: (sc, inc) x 6 (18)
- R4-8: 18 sc (18) – 5 rounds
Joining the Hand
- R1: 9 sc around the first finger, 18 sc around the second, 9 sc around the first (36)
- R2-6: 36 sc (36) – 5 rounds
The Thumb
- R7: 13 sc, 6 sc (join palm and thumb together), 17 sc (36)
- R8: 13 sc, 12 sc around the thumb, 17 sc (42)
Arm Shaping & Frame
- R9: 42 sc (42)
- R10: 13 sc, dec, (2 sc, dec) x 3, 15 sc (38)
- R11: dec, 11 sc, dec, (2 sc, dec) x 2, 15 sc (34)
- R12: (dec, 6 sc, dec, 7 sc) x 2 (30)
Frame: Cut two pieces of wire (approx. 70 cm). Bend them to fit the fingers and palm. Twist the ends together. Insert the wire into the hand, stuff the fingers and palm, and continue crocheting.
- R13: (3 sc, dec) x 6 (24)
- R14: (2 sc, dec) x 6 (18)
- R15: (dec, 7 sc) x 2 (16)
- R16: 16 sc (16)
- R17: (inc, 7 sc) x 2 (18)
- R18: (inc, 8 sc) x 2 (20)
- R19: (inc, 9 sc) x 2 (22)
- R20-31: 22 sc (22) – 12 rounds
- R32: 9 sc (leave row unfinished)
Stuff the arm almost to the top and fasten off.
Step 2: The Legs (Make 2)
The Soles
Use green yarn.
- R1: 6 sc in MR (6)
- R2: 6 inc (12)
- R3: (sc, inc) x 6 (18)
- R4: sc, inc, (2 sc, inc) x 5, sc (24)
- R5: (3 sc, inc) x 6 (30)
- R6: 2 sc, inc, (4 sc, inc) x 5, 2 sc (36)
- R7: (5 sc, inc) x 6 (42)
- R8: 3 sc, inc, (6 sc, inc) x 5, 3 sc (48)
- R9: (7 sc, inc) x 6 (54)
- R10: 4 sc, inc, (8 sc, inc) x 5, 4 sc (60)
Sole Support: Cut a circle of plastic equal to the diameter of the sole. Glue or place it inside the foot.
Leg Body
Switch to light green yarn.
- R11: 60 sc in BLO (60)
- R12-16: 60 sc (60) – 5 rounds
- R17: 15 sc, dec, (2 sc, dec) x 7, 15 sc (52)
- R18: 13 sc, dec, (2 sc, dec) x 6, 13 sc (45)
- R19: sc, dec, 2 sc, dec, (5 sc, dec, 4 sc, dec) x 2, 5 sc, dec, 2 sc, dec, sc (37)
- R20: 7 sc, dec, (5 sc, dec) x 3, 7 sc (33)
- R21: (9 sc, dec) x 3 (30)
- R22-33: 30 sc (30) – 12 rounds
Leg Frame: Use 60 cm wire pieces. Bend a loop at the end for the foot, twist the long ends. Glue the loop to the plastic sole, insert the wire, and stuff the leg.
Step 3: The Body and Head
Work in a spiral. Start with light green yarn between the legs.
- R1: 6 sc in MR (6)
- R2: 6 inc (12)
- R3: (sc, inc) x 6 (18)
- R4: sc, inc, (2 sc, inc) x 5, sc (24)
- R5: (3 sc, inc) x 6 (30)
- R6: 2 sc, inc, (4 sc, inc) x 5, 2 sc (36)
- R7: (5 sc, inc) x 6 (42)
- R8: 3 sc, inc, (6 sc, inc) x 5, 3 sc (48)
Joining Legs and Tail
Crochet the tail separately (increasing from 6 to 12 sc). Then join everything to the body:
- R1: 22 sc (Right leg), (3 sc, inc) x 2, 4 sc, inc, 3 sc, 22 sc (Left leg), (3 sc, inc) x 2, 4 sc, inc, 3 sc (82)
- R2: (5 sc, inc) x 13, 3 sc, inc (96)
- R3: (5 sc, inc) x 16 (112)
Torso and Arms
- R4-23: 112 sc (112) – 17 rounds
- R24-39: Work decreases gradually until you reach 72 sc.
- R40 (Joining Arms): 18 sc body, 7 sc (Left arm + body together), 22 sc body, 7 sc (Right arm + body together) (72)
- Continue joining the remaining arm stitches and work rounds to shape the upper chest until you reach 88 sc.
- R44-52: Gradually decrease from 88 sc down to 36 sc to create the neck.
The Head
- R53-56: 36 sc (36) – 4 rounds
- R57: (2 sc, inc) x 12 (48)
- R58: sc, inc, (3 sc, inc) x 11, 2 sc (60)
- R59: 60 sc (60)
- R60: sc, inc, (3 sc, inc) x 14, 2 sc (75)
- R61-63: 75 sc (75) – 3 rounds
- R64-65: Increase to 99 sc using guided increases.
- R66-75: 99 sc (99) – 10 rounds
Nostrils and Face
Crochet two small circles: 6 sc in MR, 6 inc, (sc, inc)x6, 18 sc. Fold and sew them. Join them to the head between R76 and R78 using the pattern’s guided stitch counts.
Head Top: Decrease from 99 sc down to 6 sc, stuffing firmly as you go. Close the hole.
Step 4: The Shell and Belly
The Shell
Use green yarn. Increase from 6 sc in MR up to 114 sc (R1-19). Work 8 rounds of 114 sc. Sew the shell to the back of the turtle.
Shell Trim:
- Round 1 (Dark Green): 114 hdc around the edge.
- Round 2 (Yellow): (sc, bobble) x 65, sl st to first stitch.
The Belly Patch
Use green yarn. Increase from 6 sc in MR up to 96 sc.
- R15-16: Transition to dark green.
- R17: Transition to yellow, work (sc, bobble) x 48.
Sew or glue the patch to the front of the body.
Step 5: Accessories
The Hat
Use white, light yellow, and yellow yarn. Change colors every 3 rounds.
- Start with white: 6 sc in MR, increase gradually.
- Switch to light yellow, then yellow.
- Continue increasing slowly (e.g., (inc, 5 sc)x2, etc.) until the hat reaches 100 sc in diameter and the desired length.
The Pillow
Using white yarn, crochet two rectangles:
- Ch 36, 35 sc across, turn.
- Work 17 rows of 35 sc in BLO.
- Join the two pieces by crocheting around the edges, adding 3 sc in the corners to round them off. Stuff lightly and close.
Final Touches
- Eyes: Crochet small white and light green circles. Glue them to the face and add 16mm safety eyes on top.
- Mouth: Use dark green yarn to embroider a small, sleepy smile.
- Assembly: Ensure all wire frames are secure and the turtle is stuffed firmly for stability.
“`