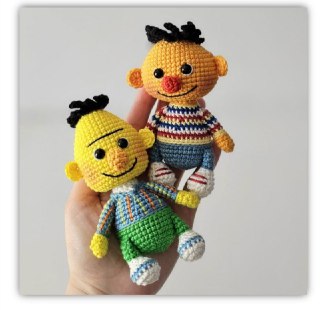
Sihirli Halka Mini Character Crochet Patterns
Ernie’s Legs (Make 2)
Crochet with Nature yarn and stuff as you go.
- Round 1: Start with a magic ring, 6sc (6 stitches)
- Round 2: 6inc (12 stitches)
- Round 3: (2sc, 1inc)*4 (16 stitches)
- Round 4 (Change to Sallow Blue): 16sc (16 stitches)
- Round 5 (Change to Nature): 16sc (16 stitches)
- Round 6 (Nature): 4sc, 4dec, 4sc (12 stitches)
- Round 7 (Nature): 2sc, 4dec, 2sc (8 stitches)
- Round 8 (Change to Neon Green): Work 8sc into the back loops only (Blo)
- Rounds 9-10 (Neon Green): 8sc (8 stitches)
- Round 11 (Neon Green): 8sc (8 stitches), 1slst. Cut the yarn, leaving a long tail for sewing.

Ernie’s leg construction with color changes.
Assembly: Sew the legs onto row 8 of the body, leaving 11 stitches between them.
General Assembly & Finishing Tips (Bert & Ernie)
For both Bert and Ernie, reinforce the neck to prevent wobbling:
Insert a long needle from the top of the head and bring it out from the bottom of the neck. Repeat this process three times, then secure it by tying a few knots on top of the head. This technique helps stabilize the head and neck connection.

Visual guide for strengthening the neck.
Mini Cookie Monster & Elmo Crochet Pattern
Bring more beloved Sesame Street characters to life with these amigurumi patterns for Cookie Monster and Elmo. Each pattern offers distinct details and color schemes to capture their unique charm.
Cookie Monster Amigurumi Pattern
Cookie Monster’s Materials
- Yarn: CATANIA ORIGINALS
- Royal (201)
- Nature (105)
- Sun Kissed (437)
- Chestnut (157)
- Safety Eye: 5mm Safety Eye
- Felt: Black Felt
Cookie Monster’s Head Construction (Stuff as you go)
Start with Royal yarn for Cookie Monster’s head. Remember to stuff as you go to create a firm, rounded shape.
- Round 1: Start with a magic ring, 7sc (7 stitches)
- Round 2: 7inc (14 stitches)
- Round 3: (1sc, 1inc)*7 (21 stitches)
- Round 4: (2sc, 1inc)*7 (28 stitches)
- Round 5: 28sc (28 stitches)
- Round 6: (3sc, 1inc)*7 (35 stitches)
- Rounds 7-8: 35sc (35 stitches)
- Round 9: (4sc, 1inc)*7 (42 stitches)
- Rounds 10-15: 42sc (42 stitches)
- Round 16: (4sc, 1dec)*7 (35 stitches)
- Round 17: (3sc, 1dec)*7 (28 stitches)
- Round 18: (2sc, 1dec)*7 (21 stitches)
- Round 19: (5sc, 1dec)*3 (18 stitches)
- Rounds 20-25: 18sc (18 stitches). Cut the yarn.
Head Shaping Tip: Push the part crocheted from row 20 into the head to help form its distinct shape, as seen in the instructional images.
Cookie Monster’s Eyes (Make 2, Do Not Stuff)
With Nature yarn:
- Round 1: Start with a magic ring, 6sc (6 stitches)
- Round 2: 6inc (12 stitches)
Insert the 5mm safety eyes into the center of these crocheted eye pieces and secure them.
- Rounds 3-4: 12sc (12 stitches)
- Round 5: 6dec (6 stitches), 1slst. Cut the yarn, leaving a long tail for sewing.
Close the remaining stitches by threading the yarn through them with a tapestry needle and pulling tight.
Assembly: Sew the eyes onto row 4 of the head, placing them side by side. Cut the black felt into a mouth shape and glue it between rows 13 and 14.
Cookie Monster’s Arms (Make 2)
Stuff up to row 5 only.
- Round 1 (Royal): Start with a magic ring, 5sc (5 stitches)
- Round 2 (Royal): 5inc (10 stitches)
- Rounds 3-4 (Royal): 10sc (10 stitches)
- Round 5 (Royal): (3sc, 1dec)*2 (8 stitches)
- Rounds 6-10 (Royal): 8sc (8 stitches)
- Round 11 (Royal): 8sc (8 stitches), 1slst. Cut the yarn.
Cookie Monster’s Body Construction (Crochet while Stuffing)
Start with Royal yarn and continue stuffing as you crochet.
- Round 1: Start with a magic ring, 6sc (6 stitches)
- Round 2: 6inc (12 stitches)
- Round 3: (1sc, 1inc)*6 (18 stitches)
- Round 4: (2sc, 1inc)*6 (24 stitches)
- Round 5: 1sc, 1inc, (3sc, 1inc)*5, 2sc (30 stitches)
- Round 6: (4sc, 1inc)*6 (36 stitches)
- Rounds 7-12: 36sc (36 stitches)
- Round 13: (4sc, 1dec)*6 (30 stitches)
- Round 14: 30sc (30 stitches)
- Round 15: (3sc, 1dec)*6 (24 stitches)
Attach Arms Here:
- Round 16: 4sc, crochet 4sc combining arm and body stitches, 8sc, crochet 4sc combining arm and body stitches, 4sc (24 stitches)
- Round 17: 4sc, 4sc (arm only), 8sc, 4sc (arm only), 4sc (24 stitches)
Important Note: The required yarn color is clearly stated at the beginning of each section. Yarn colors in the photos may vary, as they are only for demonstrating the technique. Please follow the written instructions rather than the photo colors for accurate colorwork.
- Round 18: (2sc, 1dec)*6 (18 stitches)
- Round 19: (4sc, 1dec)*3 (15 stitches)
- Rounds 20-25: 15sc (15 stitches)
- Round 26: (3sc, 1dec)*3 (12 stitches)
- Round 27: 6dec (6 stitches), 1slst. Cut the yarn.
Close the remaining stitches by threading the yarn through them with a tapestry needle and pulling tight.
Cookie Monster’s Legs (Make 2)
Crochet with Royal yarn and stuff as you go.
- Round 1: Start with a magic ring, 6sc (6 stitches)
- Round 2: 6inc (12 stitches)
- Round 3: (2sc, 1inc)*4 (16 stitches)
- Rounds 4-5: 16sc (16 stitches)
- Round 6: 4sc, 4dec, 4sc (12 stitches)
- Round 7: 2sc, 4dec, 2sc (8 stitches)
- Rounds 8-10: 8sc (8 stitches)
- Round 11: 8sc (8 stitches), 1slst. Cut the yarn, leaving a long tail for sewing.
Assembly: Sew the legs onto row 8 of the body. Leave 10 stitches between the legs.
Cookie (Do Not Stuff)
Crochet with Sun Kissed and Chestnut yarns.
- Round 1: Start with a magic ring, 6sc (Sun Kissed), 1ch, 1slst (6 stitches)
- Round 2: (2inc Sun Kissed, 1inc Chestnut)*2 (12 stitches), 1ch, 1slst
- Round 3: 1sc Sun Kissed, 1inc Chestnut, (1sc, 1inc)*2 Sun Kissed, 1sc Sun Kissed, 1inc Chestnut, (1sc, 1inc)*2 Sun Kissed (18 stitches), 1ch, 1slst
- Round 4: 18slst, 1slst. Cut the yarn, leaving a long tail for sewing.
Elmo Amigurumi Pattern
Elmo’s Materials
- Yarn: CATANIA ORIGINALS
- Signal Red (115)
- Nature (105)
- Orange (281)
- Safety Eye: 5mm Safety Eye
- Thread: Black thread
- Felt: Black Felt
Elmo’s Head Construction (Stuff as you go)
Start with Signal Red yarn for Elmo’s head, stuffing firmly as you work.
- Round 1: Start with a magic ring, 7sc (7 stitches)
- Round 2: 7inc (14 stitches)
- Round 3: (1sc, 1inc)*7 (21 stitches)
- Round 4: (2sc, 1inc)*7 (28 stitches)
- Round 5: 28sc (28 stitches)
- Round 6: (3sc, 1inc)*7 (35 stitches)
- Rounds 7-8: 35sc (35 stitches)
- Round 9: (4sc, 1inc)*7 (42 stitches)
- Rounds 10-15: 42sc (42 stitches)
- Round 16: (4sc, 1dec)*7 (35 stitches)
- Round 17: (3sc, 1dec)*7 (28 stitches)
- Round 18: (2sc, 1dec)*7 (21 stitches)
- Round 19: (5sc, 1dec)*3 (18 stitches)
- Rounds 20-25: 18sc (18 stitches). Cut the yarn.
Head Shaping Tip: Push the part crocheted from row 20 into the head to help form its distinct shape, as seen in the instructional images.
Elmo’s Eyes (Make 2, Do Not Stuff)
With Nature yarn:
- Round 1: Start with a magic ring, 6sc (6 stitches)
- Round 2: 6inc (12 stitches)
Insert the 5mm safety eyes into the center of these crocheted eye pieces and secure them.
- Rounds 3-4: 12sc (12 stitches)
- Round 5: 6dec (6 stitches), 1slst. Cut the yarn, leaving a long tail for sewing.
Close the remaining stitches by threading the yarn through them with a tapestry needle and pulling tight.
Assembly: Sew the eyes onto row 5 of the head, placing them side by side. Sew the mouth between rows 12 and 14 using black thread, then glue the felt mouth on top.
Elmo’s Nose (Do Not Stuff)
With Orange yarn:
- Round 1: Start with a magic ring, 6sc (6 stitches)
- Round 2: (1sc, 1inc)*3 (9 stitches)
- Round 3: (2sc, 1inc)*3 (12 stitches)
- Round 4: 12sc (12 stitches)
- Round 5: (2sc, 1dec)*3 (9 stitches), 1slst. Cut the yarn, leaving a long tail for sewing.
Close the remaining stitches by threading the yarn through them with a tapestry needle and pulling tight.
Assembly: Sew the nose starting between the eyes and extending down to row 11.
Elmo’s Arms (Make 2)
Stuff up to row 5 only.
- Round 1 (Signal Red): Start with a magic ring, 5sc (5 stitches)
- Round 2 (Signal Red): 5inc (10 stitches)
- Rounds 3-4 (Signal Red): 10sc (10 stitches)
- Round 5 (Signal Red): (3sc, 1dec)*2 (8 stitches)
- Rounds 6-10 (Signal Red): 8sc (8 stitches)
- Round 11 (Signal Red): 8sc (8 stitches), 1slst. Cut the yarn.
Elmo’s Body Construction (Crochet while Stuffing)
Start with Signal Red yarn and continue stuffing as you crochet.
- Round 1: Start with a magic ring, 6sc (6 stitches)
- Round 2: 6inc (12 stitches)
- Round 3: (1sc, 1inc)*6 (18 stitches)
- Round 4: (2sc, 1inc)*6 (24 stitches)
- Round 5: 1sc, 1inc, (3sc, 1inc)*5, 2sc (30 stitches)
- Round 6: (4sc, 1inc)*6 (36 stitches)
- Rounds 7-12: 36sc (36 stitches)
- Round 13: (4sc, 1dec)*6 (30 stitches)
- Round 14: 30sc (30 stitches)
- Round 15: (3sc, 1dec)*6 (24 stitches)
Attach Arms Here:
Important Note: The required yarn color is clearly stated at the beginning of each section. Yarn colors in the photos may vary, as they are only for demonstrating the technique. Please follow the written instructions rather than the photo colors for accurate colorwork.
- Round 16: 4sc, crochet 4sc combining arm and body stitches, 8sc, crochet 4sc combining arm and body stitches, 4sc (24 stitches)
- Round 17: 4sc, 4sc (arm only), 8sc, 4sc (arm only), 4sc (24 stitches)
- Round 18: (2sc, 1dec)*6 (18 stitches)
- Round 19: (4sc, 1dec)*3 (15 stitches)
- Rounds 20-25: 15sc (15 stitches)
- Round 26: (3sc, 1dec)*3 (12 stitches)
- Round 27: 6dec (6 stitches), 1slst. Cut the yarn.
Close the remaining stitches by threading the yarn through them with a tapestry needle and pulling tight.
Elmo’s Legs (Make 2)
Crochet with Signal Red yarn and stuff as you go.
- Round 1: Start with a magic ring, 6sc (6 stitches)
- Round 2: 6inc (12 stitches)
- Round 3: (2sc, 1inc)*4 (16 stitches)
- Rounds 4-5: 16sc (16 stitches)
- Round 6: 4sc, 4dec, 4sc (12 stitches)
- Round 7: 2sc, 4dec, 2sc (8 stitches)
- Rounds 8-10: 8sc (8 stitches)
- Round 11: 8sc (8 stitches), 1slst. Cut the yarn, leaving a long tail for sewing.
Assembly: Sew the legs onto row 8 of the body. Leave 10 stitches between the legs.
General Assembly & Finishing Tips (Cookie Monster & Elmo)
For both Cookie Monster and Elmo, reinforce the neck to ensure the head sits securely:
Insert a long needle from the top of the head and bring it out from the bottom of the neck. Repeat this process three times, then secure it by tying a few knots on top of the head.