Meet the Kiwi Bird: A Fluffy, Adorable Amigurumi Friend
Hello, dear hooksters! Today, I’m absolutely delighted to introduce you to a creature that is as unique as it is adorable—the Kiwi Bird! This little flightless wonder from New Zealand has captured hearts around the world with its round body, long curved beak, and endearing personality, and now you can crochet your very own!
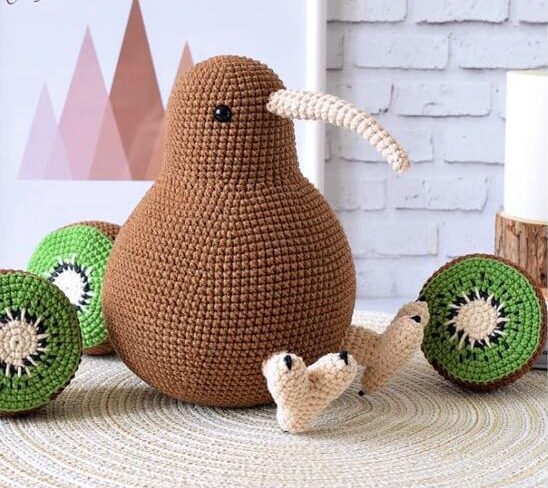
There’s something so special about the kiwi. It’s a bird that can’t fly, covered in fur-like feathers, with whiskers and a nose at the end of its long beak—it honestly looks like someone designed it from a pile of adorable spare parts! And that’s exactly what makes it so charming to crochet. That round, fuzzy body, those tiny wings, and that wonderfully long, curved beak come together to create a friend that’s instantly recognizable and utterly huggable.
This pattern comes to us from the talented Olga Akbayyr (@mauvepony), and it’s a delightful project for crocheters who are comfortable working in the round and ready to try something a bit more advanced. The kiwi has a wonderfully shaped body that starts narrow, widens out for that characteristic round belly, then tapers back down. And that beak! You can even use chenille wire to make it poseable—perfect for capturing that curious, poking-into-everything kiwi personality.
The finished kiwi is just the right size for cuddling, and with those big plastic safety eyes and embroidered details, he’s sure to become a fast favorite. Whether you’re making him for a bird lover, a New Zealand enthusiast, or just because you fell in love with that sweet face, this project is pure joy from start to finish.
So grab your brown and beige yarn in those perfect kiwi shades, and let’s create a little piece of Aotearoa together
Materials & Tools
Yarn: YarnArt Jeans (or similar weight cotton blend):
- Color 40 Brown: For the main body
- Color 87 Beige: For the beak and legs
Hook: 2.0 mm crochet hook
Eyes:
- 6 mm plastic safety eyes with secure backing
Other Supplies:
- Polyester fiberfill (holofiber) for stuffing
- Tapestry needle
- Scissors
- Stitch marker (I use a paper clip!)
- Optional: 30 cm chenille wire for armoring the beak (to make it poseable)
- Black embroidery thread or Iris yarn for embroidering the claws
Abbreviations (US Terms)
- ch: chain / воздушная петля (ВП)
- sl st: slip stitch / соединительный столбик (СС)
- sc: single crochet / столбик без накида (СБН)
- inc: increase / прибавка (ПР)
- dec: decrease / убавка (УБ)
- (…) x n: repeat instructions in parentheses n times
- MR: magic ring / кольцо амигуруми
Let’s Begin! The Kiwi Bird Pattern
Body
We’ll start at the top of the head and work our way down through the body. This pattern uses continuous rounds—keep your stitch marker in place!
With brown yarn:
- R1: 6 sc in a magic ring. (6)
- R2: 6 inc. (12)
- R3: (1 sc, inc) x 6. (18)
- R4: (2 sc, inc) x 6. (24)
- R5: (3 sc, inc) x 6. (30)
- R6: (4 sc, inc) x 6. (36)
- R7: (5 sc, inc) x 6. (42)
- R8: 42 sc.
- R9: (6 sc, inc) x 6. (48)
- R10 – R21: 48 sc. (12 rounds)
- R22: (6 sc, dec) x 6. (42)
Insert safety eyes between Rounds 12 and 13, approximately 15 sc apart. Stuff the head firmly.
- R23: (2 sc, inc) x 14. (56)
- R24: (6 sc, inc) x 8. (64)
- R25: (7 sc, inc) x 8. (72)
- R26: 72 sc.
- R27: (22 sc, 2 inc) x 3. (78)
- R28: 78 sc.
- R29: (24 sc, 2 inc) x 3. (84)
- R30: 84 sc.
- R31: 1 inc, 3 sc, 1 inc, 3 sc, 1 inc, 66 sc, 1 inc, 3 sc, 1 inc, 3 sc, 1 inc. (90)
- R32 – R33: 90 sc. (2 rounds)
- R34: (14 sc, inc) x 6. (96)
- R35 – R36: 96 sc. (2 rounds)
- R37: (15 sc, inc) x 6. (102)
- R38 – R44: 102 sc. (7 rounds)
- R45: (15 sc, dec) x 6. (96)
- R46 – R47: 96 sc. (2 rounds)
- R48: (14 sc, dec) x 6. (90)
- R49 – R50: 90 sc. (2 rounds)
- R51: (13 sc, dec) x 6. (84)
- R52: 84 sc.
- R53: (12 sc, dec) x 6. (78)
- R54: (11 sc, dec) x 6. (72)
- R55: (10 sc, dec) x 6. (66)
- R56: (9 sc, dec) x 6. (60)
Stuff the body firmly.
- R57: (8 sc, dec) x 6. (54)
- R58: (7 sc, dec) x 6. (48)
- R59: (6 sc, dec) x 6. (42)
- R60: (5 sc, dec) x 6. (36)
Continue stuffing evenly as you go.
- R61: (4 sc, dec) x 6. (30)
- R62: (3 sc, dec) x 6. (24)
- R63: (2 sc, dec) x 6. (18)
Stuff to the very end.
- R64: (1 sc, dec) x 6. (12)
- R65: 6 dec. (6)
Tighten the hole closed, secure the yarn, and hide the end inside the body.
Beak
With beige yarn:
- R1: 6 sc in a magic ring. (6)
- R2: 6 sc. (6)
- R3 – R6: 6 sc. (4 rounds) — Total of 5 rounds with 6 sc
- R7: 1 inc, 5 sc. (7)
- R8 – R10: 7 sc. (3 rounds)
- R11: 1 inc, 6 sc. (8)
- R12 – R14: 8 sc. (3 rounds)
- R15: 1 inc, 7 sc. (9)
- R16 – R19: 9 sc. (4 rounds)
Finish with 1 sl st. Leave a long tail for sewing.
Optional Armoring: If using chenille wire for a poseable beak, fold the 30 cm wire in half, twist it into a spiral, and insert it into the beak. The other end of the wire will go into the head, between the eyes.
Position the beak in the center of the face, between the eyes. Secure with pins and sew it on firmly. Shape the beak to give it that characteristic kiwi curve!
Legs (Make 2)
The legs are made in two parts: the foot (with toes) and the lower leg.
Part 1: Foot with Toes
With beige yarn:
- R1: 6 sc in a magic ring. (6)
- R2: 6 inc. (12)
- R3 – R5: 12 sc. (3 rounds)
Make a second identical piece. Do not cut the yarn on the second piece—we’ll join them!
- R6: Join the two pieces by working 24 sc through both pieces. (24)
- R7: 24 sc.
- R8: (2 sc, dec) x 6. (18)
- R9 – R10: 18 sc. (2 rounds)
Stuff the toes firmly.
- R11: (1 sc, dec) x 6. (12)
- R12 – R14: 12 sc. (3 rounds)
Stuff to the end.
- R15: 6 dec. (6)
Tighten the hole closed, secure the yarn, and hide the end.
Optional: Using black Iris or embroidery floss, embroider tiny claws on the toes.
Part 2: Lower Leg
With beige yarn:
- R1: 6 sc in a magic ring. (6)
- R2: 6 inc, 1 sl st. (12)
Leave a long tail for sewing. Sew this piece to the center of the foot, catching only the back loops.
Attach a new strand of yarn to the front loops left on the foot:
- R3: Working in the front loops only, 12 sc. (12)
- R4 – R6: 12 sc. (3 rounds)
Finish with 1 sl st. Stuff lightly. Leave a long tail for sewing.
Assembly
- Attach the Legs: Sew the legs to the body, positioning them so the kiwi can sit upright, resting on its feet. The legs should be placed toward the bottom of the body.
- Final Shaping: Give your kiwi a gentle squeeze and shape the body to be nice and round.
- Add Personality: Admire those big eyes, the curved beak, and the tiny toes!
Your Kiwi Bird Is Complete!
Congratulations, dear crocheter! You’ve just created a little piece of New Zealand magic. This kiwi bird is absolutely adorable—from his round, fuzzy body to that wonderfully long, curious beak. He’s the kind of friend who looks like he’s about to waddle over and ask what you’re up to!
I love how this pattern captures the unique charm of these special birds. Kiwis are such fascinating creatures—they’re nocturnal, they have whiskers like cats, and their eggs are enormous compared to their body size. They’re a true wonder of the natural world, and now you have a little crochet version to remind you of that wonder every day.
This pattern is perfect for:
- Bird lovers and nature enthusiasts
- New Zealand fans (or anyone who’s visited and fallen in love!)
- Unique gift giving—he’s not your average teddy bear!
- Curious little ones who love unusual animals
- Amigurumi collections looking for something a little different
Tips for Success
- Shaping the Body: The body has a lot of increases and decreases to create that characteristic kiwi shape. Take it one round at a time, and don’t be afraid to use stitch markers liberally!
- Eye Placement: Insert the eyes between Rounds 12 and 13, with about 15 sc between them. This gives the kiwi that sweet, forward-facing expression.
- Beak Wire: If you’re using chenille wire for the beak, make sure to twist it tightly so it holds its shape. Insert it carefully to avoid poking through the yarn. This is optional but gives you the ability to pose the beak!
- Leg Positioning: When attaching the legs, take your time to position them so the kiwi can sit stably. Use pins to test the placement before sewing.
- Claw Embroidery: A few simple stitches with black thread make a huge difference in bringing the feet to life!
- Stuffing: Stuff the body firmly to maintain that round, plump shape. Pay special attention to the transition areas between the head and body.
A Final Word from Our Cozy Corner
There you have it—your very own kiwi bird, ready to explore the world with that curious beak and those sweet eyes! I hope this pattern brought you joy and that your new friend brings you even more.
There’s something so special about crocheting animals that aren’t the usual cats and dogs. Each creature has its own unique shape, its own personality to capture in yarn. And this kiwi? He’s got personality in spades. He’s the kind of friend who would poke his long beak into your business (in the sweetest way), waddle around your desk, and make you smile every time you look at him.
Thank you for spending your crochet time with me today. Whether you’re keeping this little guy for yourself or gifting him to someone special, I hope he brings all the cozy, curious joy that kiwis are known for.