Adorable DIY Crochet Baby Elephant Rattle: The Perfect Handmade Gift
“`html
DIY Crochet Baby Elephant Rattle Pattern
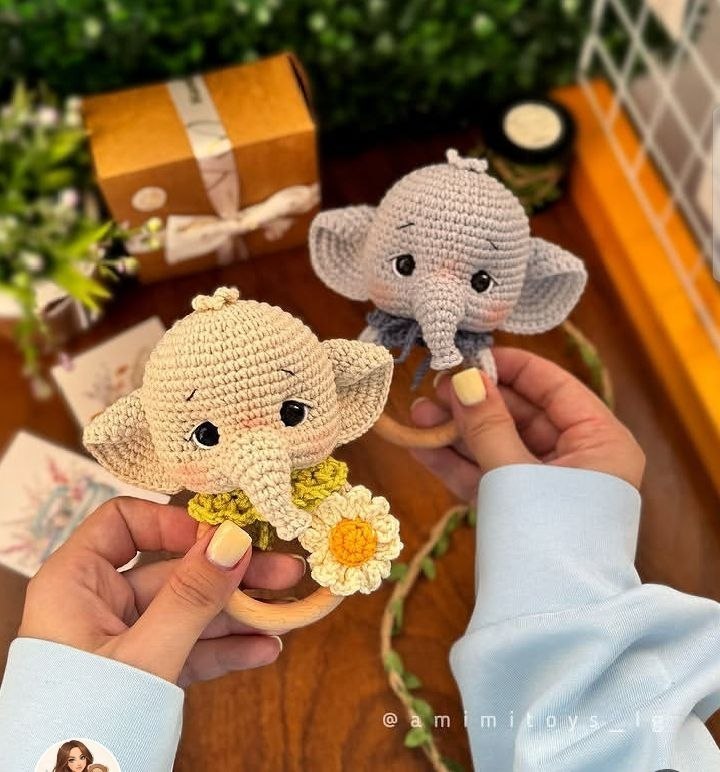
Create a charming and safe handmade toy for infants with this detailed crochet elephant rattle pattern. This project combines a soft amigurumi head with a natural wooden ring, making it a perfect baby shower gift or a nursery addition.
Materials Needed
- Crochet hook (2.0mm)
- Cotton yarn in grey (main color), white, and yellow (for the daisy)
- Safety eyes (10mm)
- Fiberfill stuffing
- Wooden ring (65mm diameter)
- Plastic rattle insert (24mm)
- Tapestry needle and scissors
- Sewing pins
- Dental floss (optional, for stronger sculpting)
Abbreviations (US Terms)
- MR: Magic Ring
- sc: Single crochet
- inc: Increase (2 sc in one stitch)
- dec: Decrease (sc 2 together)
- BLO: Back loop only
- sl st: Slip stitch
- hdc: Half double crochet
- dc: Double crochet
- ch: Chain
Step-by-Step Pattern
The Head
- R1: 6 sc in MR (6)
- R2: 6 inc (12)
- R3: (1 sc, inc) * 6 (18)
- R4: 1 sc, inc, (2 sc, inc) * 5, 1 sc (24)
- R5: (3 sc, inc) * 6 (30)
- R6: 2 sc, inc, (4 sc, inc) * 5, 2 sc (36)
- R7: (5 sc, inc) * 6 (42)
- R8: 3 sc, inc, (6 sc, inc) * 5, 3 sc (48)
- R9-17: 48 sc (9 rows)
- R18: 16 sc, 3 inc, 10 sc, 3 inc, 16 sc (54)
- R19: 54 sc (54)
- R20: (7 sc, dec) * 6 (48)
- Insert safety eyes between rounds 15 and 16, with 7 sc between them. Position the eyes between the increases made in Round 18.
- R21: 3 sc, dec, (6 sc, dec) * 5, 3 sc (42)
- R22: (5 sc, dec) * 6 (36)
- R23: 2 sc, dec, (4 sc, dec) * 5, 2 sc (30)
- Insert the rattle insert now. Tip: Wrap the rattle in a small piece of plastic wrap first so stuffing doesn’t get inside and muffle the sound. Stuff the top of the head firmly.
- R24: (3 sc, dec) * 6 (24)
- R25: (2 sc, dec) * 6 (18)
- R26: (1 sc, dec) * 6 (12)
Stuff firmly, fasten off, and leave a long tail for sewing the head to the ring.
The Ears (Make 2)
- R1: 6 sc in MR
- R2: 6 inc (12)
- R3: (1 sc, inc) * 6 (18)
- R4: (2 sc, inc) * 6 (24)
- R5: (3 sc, inc) * 6 (30)
- R6: (4 sc, inc) * 6 (36)
- R7: (5 sc, inc) * 6 (42)
Fold the piece in half and crochet 21 sc across the edge to close it. Fasten off, leaving a long tail for sewing.
The Ring Wrap
- Chain 25. Starting from the second chain from the hook:
- R1: 24 sc
- R2-6: 24 sc (worked in rows/turned). Adjust the number of rows so the fabric fits your wooden ring snugly.
Sew the edges of the wrap together around the wooden ring.
The Trunk
- R1: 6 sc in MR
- R2: 6 sc in BLO
- R3: (inc, 1 sc) * 3 (9)
- R4: 9 sc
- R5: 3 sc in BLO, 6 sc (9)
- R6: (2 sc, inc) * 3 (12)
- R7: 3 sl st joined together with the loops of Round 5, then (2 sc, inc) * 3 (15)
- R8: 15 sc
- R9: 6 sl st, 9 sc (15)
- R10: dec, 2 sc, dec, 3 sc, 2 inc, 4 sc (15)
Fasten off and leave a tail. Stuff the trunk, shaping it with a slight curve. Finally, attach yarn to the front loops of Round 2 and crochet (1 sc, inc) * 3. Fasten off.
The Collar
- Chain 52. Starting from the 3rd chain from the hook:
- R1: (1 hdc, ch 1, skip 1 st) * 13. (You will have 25 chains remaining for the first tie). Turn work.
- R2: (ch 3, 1 sc in the ch-1 space of the previous row) * 13. In the end, work 1 sc in the corner, ch 2, sl st in the corner of the starting chain.
- Chain 25 for the second tie and fasten off.
The Daisy
- Center (Yellow): 6 sc in MR, 6 inc (12), 12 sl st.
- Petals (White): Change to white yarn. Work in BLO of the previous round.
- Petal Pattern: (ch 3, 1 dc in the next st, ch 3, sl st in the same st). Repeat this process 12 times.
Fasten off, leaving a tail to sew the flower to the ring or head.
Assembly and Finishing
Attaching Parts
- Head: Sew the head firmly to the ring wrap.
- Ears: Pin and sew the ears. Top edge at Round 12, bottom edge at Round 21.
- Trunk: Position the top center between the eyes (between Rounds 15-16) and the sides between Rounds 18-19.
- Hair Tuft: Insert hook under a loop between Rounds 1 and 2 of the head. Ch 4, sl st back into the base, ch 4, sl st again.
Facial Sculpting and Embroidery
- Eye Indentations: Use a needle to pull the fabric from the center of the face toward the eyes to create cute sockets. Secure the thread inside the head.
- Embroidery: Embroider the white of the eyes, eyelashes, and eyelids. Use a single strand of yarn for eyebrows (placed at Round 11).
- Trunk Shaping: To give the trunk more depth, insert the needle from the top of the head, exit under the trunk, go back into the trunk one row higher, and exit back at the top of the head. Pull gently (do not overtighten) and knot.
Your crochet elephant rattle is now complete!
“`