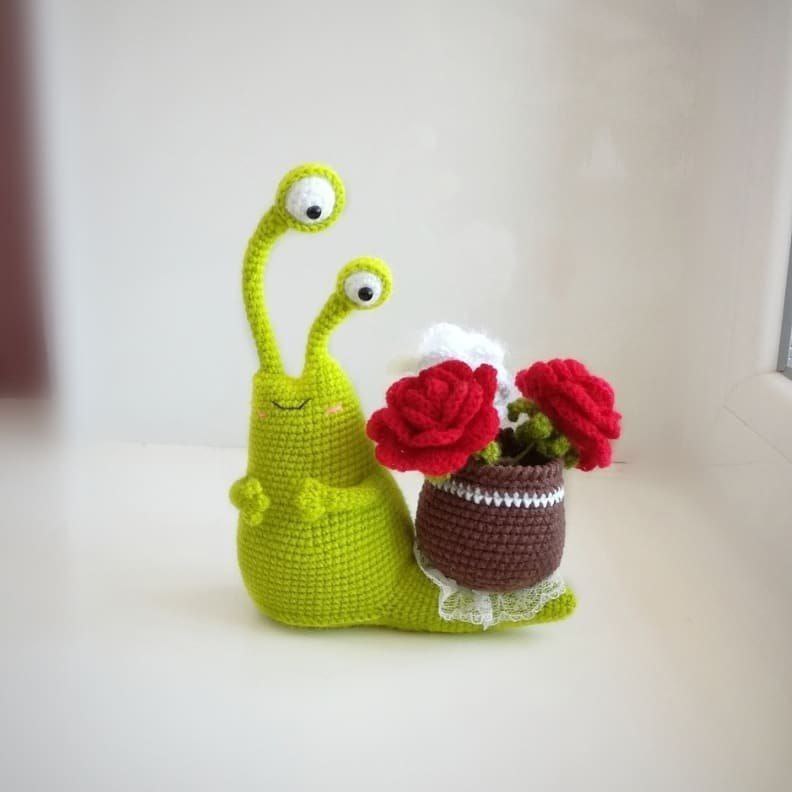
Create Your Own Tiny Garden Companion: The Adorable Flower-Bearing Snail Amigurumi Pattern
“`html
How to Crochet an Adorable Flower-Bearing Snail: Step-by-Step Amigurumi Pattern
Create a whimsical and charming companion with this detailed crochet snail pattern. This project is perfect for intermediate crocheters and results in a cute snail carrying a little flower pot. Follow our guide to bring this garden friend to life!
Materials You Will Need
- Yarn:
- Light green yarn (acrylic or cotton, thin weight) – Main body color
- Light pink yarn (same weight as green) – For the pot and cheeks
- Dark beige or brown yarn (same weight) – For the soil
- Very thin light pink yarn – For blush/cheeks
- Red embroidery thread or thin yarn – For the mouth
- Hardware & Tools:
- 1.0mm crochet hook
- Thin wire (approx. 2mm diameter, about 20cm total)
- Fiberfill stuffing
- White and light green felt (for eyes)
- Doll eyelashes
- Fast-drying fabric glue
- A strip of wide lace (approx. 3cm wide and 30cm long)
- Optional: Small decorative flowers (from a scrapbooking store) and acrylic fabric paint (violet or any preferred color)
Stitch Key (US Terms)
- MR: Magic Ring
- ch: Chain
- sl st: Slip stitch
- sc: Single crochet
- inc: Increase (two sc in one stitch)
- dec: Decrease (sc two together)
- BLO: Back loop only
- FLO: Front loop only
Step 1: Crocheting the Body and Horns
The Short Horn (Light Green)
- Round 1: 6 sc in MR (6)
- Round 2: 6 sc in BLO (6)
- Rounds 3-10: 6 sc per round (6)
- Round 11: 6 inc (12). Fasten off and weave in ends.
The Long Horn (Light Green)
- Rounds 1-2: Repeat as short horn.
- Rounds 3-22: 6 sc per round (6)
- Round 23: 6 inc (12).
Joining the Horns and Shaping the Body
- Round 24: 1 sc, 2 ch, join to any stitch of the short horn with 1 sc, 11 sc around the short horn, 2 sc in the chain loops, 11 sc around the long horn (28)
- Round 25: 28 sc (28)
- Round 26: (6 sc, 1 inc) * 4 (32)
- Rounds 27-28: 32 sc (32)
- Round 29: (7 sc, 1 inc) * 4 (36)
- Rounds 30-32: 36 sc (36)
- Round 33: (8 sc, 1 inc) * 4 (40)
- Rounds 34-36: 40 sc (40)
- Round 37: (9 sc, 1 inc) * 4 (44)
- Rounds 38-39: 44 sc (44)
- Round 40: (10 sc, 1 inc) * 4 (48)
- Round 41: 48 sc (48)
- Round 42: (7 sc, 1 inc) * 6 (54)
- Round 43: 54 sc (54)
- Round 44: (8 sc, 1 inc) * 6 (60)
- Rounds 45-46: 60 sc (60)
- Round 47: 4 sc, 1 inc, (9 sc, 1 inc) * 5, 5 sc (66)
- Rounds 48-57: 66 sc (66)
- Round 58 (Partial): 16 sc. Mark this as Point A. Fasten off. Count 16 more stitches from Point A and mark the 17th stitch as Point B.
Assembly Tip: Cut about 10cm of wire, bend the ends, and insert them into the horns to make them posable. Stuff the body firmly with fiberfill.
Step 2: The Base and the Tail
The Base (Light Green)
- Round 1: 6 sc in MR (6)
- Round 2: 6 inc (12)
- Round 3: (1 sc, 1 inc) * 6 (18)
- Round 4: (2 sc, 1 inc) * 6 (24)
- Round 5: 1 sc, 1 inc, (3 sc, 1 inc) * 5, 2 sc (30)
- Round 6: (4 sc, 1 inc) * 6 (36)
- Round 7: 2 sc, 1 inc, (5 sc, 1 inc) * 5, 3 sc (42)
- Round 8: (6 sc, 1 inc) * 6 (48)
- Round 9: 3 sc, 1 inc, (7 sc, 1 inc) * 5, 4 sc (54)
- Round 10: (8 sc, 1 inc) * 6 (60)
- Round 11: 4 sc, 1 inc, (9 sc, 1 inc) * 5, 5 sc (66)
Optional: For a flatter base, glue a plastic or cardboard disc slightly smaller than the crochet circle inside the base.
Joining the Base to the Body
- Round 12: Join the base to the body starting at Point B and ending at Point A. Work counter-clockwise around the body and in the opposite direction around the base (Total 50 stitches used in the join). Ensure the tail will be positioned to the side, not at the back.
The Tail
- Round 13: 16 sc along the top edge (body), 16 sc along the bottom edge (base) (32)
- Rounds 14-22: 32 sc (32)
- Round 23: (6 sc, 1 dec) * 4 (28)
- Round 24: 28 sc (28)
- Round 25: (5 sc, 1 dec) * 4 (24)
- Rounds 26-28: 24 sc (24)
- Round 29: (4 sc, 1 dec) * 4 (20)
- Round 30: 20 sc (20). Start stuffing the tail.
- Round 31: (3 sc, 1 dec) * 4 (16)
- Rounds 32-34: 16 sc (16)
- Round 35: (2 sc, 1 dec) * 4 (12)
- Round 36: 12 sc (12)
- Round 37: 6 dec (6). Fasten off and sew the hole closed.
Step 3: The Flower Pot and Soil
The Pot (Light Pink)
- Round 1: 6 sc in MR (6)
- Round 2: 6 inc (12)
- Round 3: (1 sc, 1 inc) * 6 (18)
- Round 4: (2 sc, 1 inc) * 6 (24)
- Round 5: 1 sc, 1 inc, (3 sc, 1 inc) * 5, 2 sc (30)
- Round 6: (4 sc, 1 inc) * 6 (36)
- Round 7: 2 sc, 1 inc, (5 sc, 1 inc) * 5, 3 sc (42)
- Round 8: (6 sc, 1 inc) * 6 (48)
- Round 9: 3 sc, 1 inc, (7 sc, 1 inc) * 5, 4 sc (54)
- Rounds 10-14: 54 sc (54)
- Round 15: (16 sc, 1 dec) * 3 (51)
- Rounds 16-18: 51 sc (51)
- Round 19: (15 sc, 1 dec) * 3 (48)
- Rounds 20-22: 48 sc (48)
- Round 23: 48 sc in BLO (48)
- Round 24: 48 sc in FLO (48)
- Rounds 25-29: 48 sc (48)
- Fold the top rows down and slip stitch them to the front loops of Round 23.
The Soil (Brown)
- Round 1: Attach brown yarn to any back loop of Round 24 of the pot and work 48 sc around (48)
- Round 2: (6 sc, 1 dec) * 6 (42)
- Round 3: (5 sc, 1 dec) * 6 (36)
- Round 4: (4 sc, 1 dec) * 6 (30). Start stuffing the pot.
- Round 5: (3 sc, 1 dec) * 6 (24)
- Round 6: (2 sc, 1 dec) * 6 (18)
- Round 7: (1 sc, 1 dec) * 6 (12)
- Round 8: 6 dec (6). Fasten off and hide the end inside the pot.
Step 4: Details and Accessories
The Eyes
- Cut two white felt circles (one 3cm and one 4cm).
- Use a needle and thread to sew a running stitch around the edges, add a tiny bit of stuffing, and pull tight to create small balls.
- Cut two light green felt semi-circles (eyelids) and sew them to the white circles.
- Glue doll eyelashes to the eyelids.
Cheeks and Mouth
- Cheeks: Using light pink yarn, make 2 small circles: 6 sc in MR. Fasten off.
- Mouth: Use red thread to embroider a small smile using a backstitch. Add a few smoothing stitches for a soft look.
The Arms (Light Green)
- Rounds 1: 6 sc in MR (6)
- Rounds 2-8: 6 sc per round (6)
- Insert a 12cm piece of wire and bend the tip.
- Flatten the tube and sew the edges together using 3 sc.
- Fingers: (3 ch, 2 sl st on chain, 1 sl st in base, 1 sl st) * 2, 3 ch, 2 sl st on chain, 1 sl st in base. Fasten off.
- Attach the arms to the body by inserting the wire into the body and exiting at a second point.
Step 5: Final Assembly
- Lace Ruffle: Use a running stitch along the length of the lace to gather it into ruffles. Sew the ends together to form a circle. Attach this ruffle to the snail’s tail.
- Pot Attachment: Sew the flower pot onto the snail’s back.
- Face: Sew on the eyes, cheeks, and arms.
- Finishing Touches:
- Paint the pot with acrylic patterns if desired.
- Insert decorative flowers into the pot and into the snail’s hands.
- Add black pupils using acrylic paint, black beads, or small sequins. Position them so the snail is looking toward its flowers!
“`