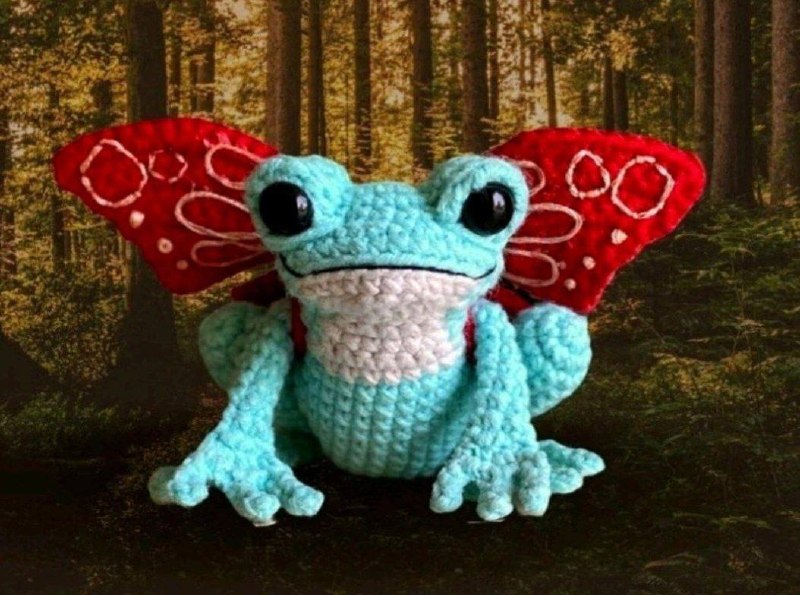
Crochet Your Own Whimsical Butterfly Tree Frog: A Step-by-Step Amigurumi Guide
“`html
DIY Butterfly Tree Frog Crochet Pattern
Create your own whimsical butterfly tree frog with this detailed step-by-step crochet guide. This unique amigurumi project combines the charm of a tiny frog with the elegance of butterfly wings.
Materials Needed
- Yarn: Cotton or acrylic yarn in Red, Blue (Cyan), and White.
- Embroidery Thread: Black thread for final details.
- Crochet Hook: 2.25 mm.
- Safety Eyes: 9 mm.
- Other Tools: Embroidery needle, fiberfill stuffing, and scissors.
Abbreviations (US Terms)
- MR: Magic Ring
- sc: Single Crochet
- hdc: Half Double Crochet
- dc: Double Crochet
- inc: Increase (2 sc in one stitch)
- dec: Decrease (sc 2 together)
- ch: Chain
- sl st: Slip Stitch
- BLO: Back Loop Only
- Triple Inc: 3 sc in one stitch
Body (Light Blue and White)
Start with light blue yarn.
- ch 4.
- Starting from the 2nd chain from the hook: 2 sc, 5 sc in the next stitch, 1 sc, 4 sc in the last stitch (12)
- 3 sc, 3 inc, 3 sc, 3 inc (18)
- 6 sc, 1 inc, 8 sc, 1 inc, 2 sc (20)
- 6 sc, 2 inc, 8 sc, 2 inc, 2 sc (24)
- 24 sc
- 7 sc, 2 inc, 10 sc, 2 inc, 3 sc (28)
- 28 sc
- 28 sc
- 7 sc, 2 dec, 10 sc, 2 dec, 3 sc (24)
- 24 sc
- 10 sc. Do not cut the yarn. Change to white yarn. From the next stitch, work 8 sc and turn the piece (18)
- 8 sc, turn (8)
- 1 dec, 4 sc, 1 dec, turn (6)
- 6 sc, turn (6)
- 6 sc, turn (6)
- 1 inc, 1 hdc, 2 dc increases, 1 hdc, 1 inc, turn (10)
- 1 inc, 8 sc, 1 inc, turn (8)
Cut the white yarn and return to light blue yarn.
- 6 sc along the side, 12 sc, 6 sc along the other side (30)
- 7 sc, 3 dec, 3 sc, BLO (1 triple inc, 10 sc, 1 triple inc), 3 sc, 3 dec, 3 sc (38)
- 5 sc, 3 dec, 3 sc, 1 inc, 1 sc, (1 dec, 1 sc) x 3, 1 sc, 1 inc, 3 sc, 3 dec, 1 sc (30)
- 30 sc
- 7 sc, 3 dec, 8 sc, 3 dec, 3 sc (24)
- 24 sc
- (1 dec, 2 sc) x 6 (18)
Stuff the body firmly with fiberfill.
- (1 sc, 1 dec) x 6 (12)
- 6 dec (6)
Eyes (Light Blue)
- 7 hdc (not in MR), close with a sc, turn [7]
- BLO: 7 sc, turn [7]
- 7 sc, turn [7]
- 7 sc, turn [7]
- 3 dec, 1 sc [4]
Insert the safety eye inside the ring. Leave a long yarn tail to sew the eye onto the head later.
Front Paws (Light Blue)
- 6 sc in MR
- – 8. 6 sc (6) for 7 rounds
- Fold the piece in half and work 3 sc to join the two edges, turn [3]
- 3 inc, turn [6]
Toes: (6 ch, sl st in 4th chain from hook, 2 sl st along the chain, 1 sl st into the next paw stitch). Repeat this process 3 times. Cut yarn and leave a tail. Repeat for the second paw.
Back Legs (Light Blue)
- 6 sc in MR (6)
- 6 inc (12)
- – 6. 12 sc (12) for 4 rounds
- (1 dec, 4 sc) x 2 (10)
- 10 sc
- (1 dec, 3 sc) x 2 (8)
- – 11. 8 sc (8) for 2 rounds
- Fold the piece and join with 4 sc, turn (4)
- 4 sc, turn (4)
- BLO: 4 sc, turn, then 4 sc in the remaining loops (return to spiral crochet) (8)
- 8 sc
- (1 dec, 2 sc) x 2 (6)
- – 19. 6 sc (6) for 3 rounds
- Fold in half, sc 3, turn (3)
- 3 inc, turn (6)
Toes:
1. 6 ch, sl st in 4th ch from hook, 2 sl st along chain, sl st into paw.
2. 8 ch, sl st in 4th ch from hook, 4 sl st along chain, sl st into paw.
3. 6 ch, sl st in 4th ch from hook, 2 sl st along chain, sl st into paw.
Cut yarn and repeat for the second leg.
Wings (Red)
The wings are worked in rows (flat crochet). At the end of each row, turn the work.
- 10 ch
- Starting from the 2nd chain from hook: 3 sc, leave remaining chains unworked (3)
- 3 sc
- 6 sc, leave remaining chains unworked (6)
- 6 sc
- 9 sc
- 4 sc, 9 ch (13)
- 3 sc
- 3 sc
- 1 inc, 4 sc (6)
- 5 sc, 1 inc (7)
- 1 inc, 8 sc (10)
- 9 sc, 1 inc (11)
- 1 inc, 12 sc (14)
- (6 sc, 1 inc) x 2 (16)
- 7 sc, 1 inc, 11 sc (20)
Chain 13 and attach it to the wing with a sl st; this loop will slide over the frog’s arm. Make a second wing identical to the first. Optionally, use black embroidery thread to add decorative details to the wings.
Assembly
- Front Paws: Sew the front paws at the height of Row 12 of the body (where the color change occurs).
- Eyes: Sew the eyes to the sides of the head, aligning them with the front. Position them 2 rows of blue yarn above the mouth area.
- Back Legs: Align the top of the legs with the shoulders, but secure them at the mid-thigh level.
“`