Crochet a Purring Kitty: The Ultimate Calming Sensory Toy Pattern
“`html
DIY Purring Cat Sensory Toy Crochet Pattern
Create a soothing and adorable purring cat sensory toy! This project is perfect for making a calming companion for children or anyone who loves the comforting feel of a purring pet. The secret to this toy is the addition of a vibrating mechanism that mimics a cat’s purr when the yarn ball is pulled.
Materials Needed
- Yarn: Sport or baby weight yarn (fine), 100% cotton.
- Crochet Hook: 2.25 mm or 2.5 mm (use a 3.5 mm hook if you wish to make the toy larger to accommodate a larger vibration unit).
- Eyes: 7 mm safety eyes.
- Sensory Unit: A vibrating mechanism designed for toys (with a pull-string).
- Stuffing: Fiberfill or polyester stuffing.
- Tools: Sewing needle, stitch markers, scissors, and glue.
Color Options
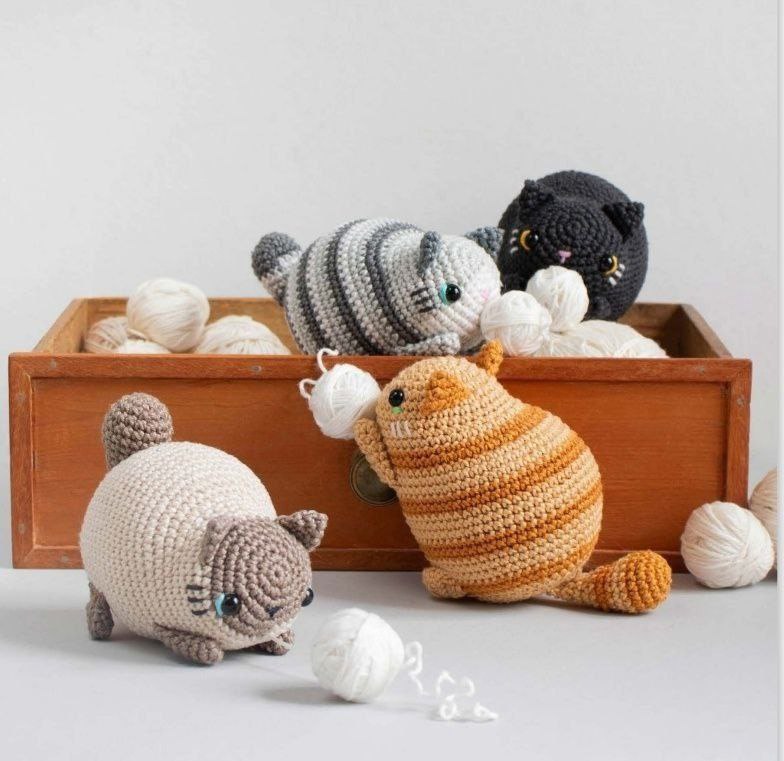
- Black Cat: Solid black yarn.
- Siamese Cat: Linen (main body) and Moon Rock/Beige (accents).
- Tiger Cat: Topaz/Sand (main body) and Ginger Gold/Brown (stripes).
- Grey Tabby: Light Silver, Bridal White, and Metal Grey.
Crochet Terminology (US Terms)
- MR: Magic Ring
- sc: Single Crochet
- inc: Increase (2 sc in one stitch)
- dec: Invisible Decrease
- sl st: Slip Stitch
- ch: Chain
- rnd: Round
Step-by-Step Instructions
1. Head and Body
The head and body are worked as one piece in a continuous spiral. Use a stitch marker to track the start of each round.
Option A: Tiger Cat (Ginger)
- Rnd 1: 6 sc in MR (6)
- Rnd 2: inc x6 (12)
- Rnd 3: (sc, inc) x6 (18)
- Rnd 4: 1 sc, inc, (2 sc, inc) x5, 1 sc (24)
- Rnd 5: (3 sc, inc) x6 (30)
- Rnd 6: 2 sc, inc, (4 sc, inc) x5, 2 sc (36)
- Rnd 7-10: 36 sc
- Rnd 11: 13 sc, 10 inc, 13 sc (46)
- Rnd 12: Change color to brown, 46 sc
- Rnd 13: 1 sc, (1 sc, inc) x10, 13 sc (56)
Pause here to attach the safety eyes. See the “Assembly” section below.
- Rnd 14: Change color to sand, 56 sc
- Rnd 15-16: 56 sc
- Rnd 17: Brown, 56 sc
- Rnd 18: 56 sc
- Rnd 19: Sand, 56 sc
- Rnd 20-21: 56 sc
- Rnd 22: Brown, 56 sc
- Rnd 23: 56 sc
- Rnd 24: Sand, 56 sc
- Rnd 25-26: 56 sc
Pause here to install the vibrating unit. See the “Installing the Vibration Unit” section.
- Rnd 27: Brown, (dec, 26 sc) x2 (54)
- Rnd 28: (dec, 7 sc) x6 (48)
- Rnd 29: Sand, 3 sc, dec, (6 sc, dec) x3, 3 sc (42)
- Rnd 30: (dec, 5 sc) x6 (36)
- Rnd 31: 2 sc, dec, (4 sc, dec) x5, 2 sc (30)
- Rnd 32: (3 sc, dec) x6 (24)
- Rnd 33: 1 sc, dec, (2 sc, dec) x5, 1 sc (18)
- Rnd 34: (1 sc, dec) x6 (12)
Stuff the body firmly. Finish with (dec) x4 and fasten off, weaving in the ends.
Option B: Siamese Cat
- Rnd 1-6: Follow Tiger Cat instructions using brown yarn.
- Rnd 7: Change color to linen, 36 sc
- Rnd 8-10: 36 sc
- Rnd 11: 13 sc, 10 inc, 13 sc (46)
- Rnd 12: 46 sc
- Rnd 13: 1 sc, (1 sc, inc) x10, 13 sc (56)
- Rnd 14-26: 56 sc (Linen)
- Rnd 27-35: Follow Tiger Cat decrease pattern.
Option C: Grey Tabby
- Rnd 1: (Grey 4 sc, White 2 sc) in MR (6)
- Rnd 2: Grey 4 inc, White 2 inc (12)
- Rnd 3: Grey (1 sc, inc) x4, White (1 sc, inc) x2 (18)
- Rnd 4: Grey (2 sc, inc) x4, White (2 sc, inc) x2 (24)
- Rnd 5: Grey (3 sc, inc) x4, White (3 sc, inc) x2 (30)
- Rnd 6: Grey (4 sc, inc) x4, White (4 sc, inc) x2 (36)
- Rnd 7-10: Grey 24 sc, White 12 sc (36)
- Rnd 11: Grey 7 sc, 10 inc, 13 sc (46)
- Rnd 12: Dark Grey, 46 sc
- Rnd 13: 13 sc, (1 sc, inc) x10 (56)
- Rnd 14-15: Grey, 56 sc
- Rnd 16: White, 56 sc
- Rnd 17-18: Dark Grey, 56 sc
- Rnd 19-20: Grey, 56 sc
- Rnd 21: White, 56 sc
- Rnd 22-23: Grey, 56 sc
- Rnd 24-25: Dark Grey, 56 sc
- Rnd 26: White, 56 sc
- Rnd 27-35: Follow Tiger Cat decrease pattern, maintaining current color.
2. The Tail
Start with the accent color (Brown, Dark Grey, etc.)
- Rnd 1: 6 sc in MR (6)
- Rnd 2: 6 inc (12)
- Rnd 3: (1 sc, inc) x6 (18)
- Rnd 4-5: 18 sc
- Rnd 6: Change to main color, 18 sc
- Rnd 7: 2 sc, dec, (4 sc, dec) x2, 2 sc (15)
- Rnd 8: Change to accent color, 15 sc
- Rnd 9: (dec, 3 sc) x3 (12)
- Rnd 10: Accent color, 12 sc
Stuff the tail. Continue decreases: (1 sc, dec) x2, 1 sc (9) $\rightarrow$ 9 sc $\rightarrow$ (1 sc, dec) x3 (6). Fold the tail in half and sc across the opening to close. Sew to the body between rounds 3 and 4 of the bottom of the toy.
3. The Ears (Make 2)
Use the accent color.
- Rnd 1: 4 sc in MR (4)
- Rnd 2: (1 sc, inc) x2 (6)
- Rnd 3: (2 sc, inc) x2 (8)
Flatten the ear and sc across the top to close. Sew between rounds 6 and 8 of the head.
4. Back Legs (Make 2)
Use the main body color.
- Rnd 1: 6 sc in MR (6)
- Rnd 2-7: 6 sc
Flatten and close the end. Sew between rounds 14 and 15 of the body, spaced 6-7 stitches apart.
5. Front Legs (Make 2)
Use the main body color.
- Rnd 1: 6 sc in MR (6)
- Rnd 2-4: 6 sc
Flatten and close the end. Sew horizontally between rounds 8 and 12 of the body so that the paws touch the ground when the cat lies on its belly.
6. The Yarn Ball
Start with white yarn.
- Rnd 1: 6 sc in MR (6)
- Rnd 2: 6 inc (12)
- Rnd 3: (1 sc, inc) x6 (18)
- Rnd 4-6: 18 sc
Insert the end of the vibration unit’s pull-string through the center of the magic ring. Tie a very secure knot or use a bit of glue to ensure it doesn’t slip.
- Rnd 7: (1 sc, dec) x6 (12)
Stuff the ball firmly. Finish with 6 dec. Fasten off. Wrap additional yarn around the ball to make it look like a real ball of yarn, leaving a tail of yarn hanging off. Apply a mixture of 2 parts white glue to 1 part water over the ball to keep the yarn in place.
Final Assembly and Finishing
Installing the Vibration Unit
- Pull the string out of the vibration box as far as possible.
- Place the vibration block inside the body at the chin/neck level.
- Pull the string through a stitch at the chin area so it exits the body.
- Fill the head and body around the block firmly with stuffing so the block doesn’t move.
The Face
- Nose: Embroider a small nose 3 cm below the magic ring using pink, dark grey, or black thread (1 vertical stitch, 2 horizontal).
- Accents: Use a bright color (green, blue, yellow) to add a small stitch near the eyes for a “glint.” Use pink for cheeks.
- Whiskers: Use white or dark grey thread to embroider 3 horizontal whiskers on each side of the face.
Once everything is sewn and the vibration unit is tested, your purring cat is ready for cuddles!
“`