Create Your Own Huggable Friend: The Ultimate Super-Soft Plush Sheep Pattern
How to Crochet a Cute Plush Sheep: Step-by-Step Amigurumi Pattern
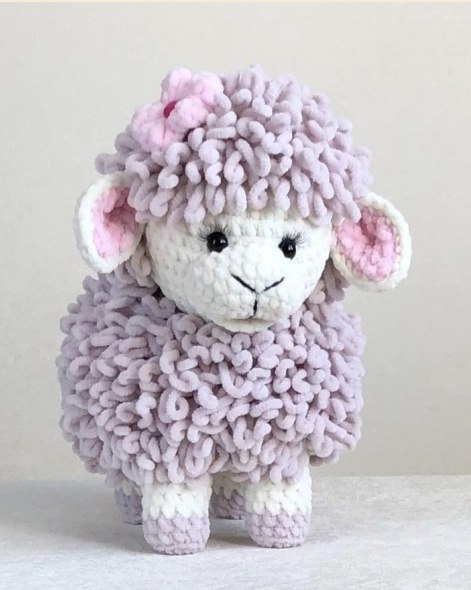
Create your own adorable, cuddly plush sheep with this detailed crochet guide. This project uses plush yarn to ensure a soft, huggable finish, making it perfect for a nursery gift or a cozy companion.
Finished Size
The completed sheep measures approximately 10 inches (25 cm) in height and 9 inches (23 cm) in length.
Materials Needed
- Plush Yarn: (e.g., Himalaya Dolphin Baby, Yarnart Dolce, or similar chenille yarn)
- Main color (for the body and head)
- Fluff color (for the “wool” coat)
- Pink (for the inner ears and flower)
- Light Brown (for the hooves and optional horns)
- Crochet Hook: 3.75mm (Recommended range: 3mm to 5mm depending on yarn thickness)
- Stuffing: 100% polyester fiberfill
- Eyes: 11mm plastic safety eyes
- Tools: Yarn needle, black embroidery thread for the mouth, and stitch markers
Abbreviations (US Terms)
- ch: chain
- sc: single crochet
- hdc: half double crochet
- dc: double crochet
- tr: treble crochet
- inc: increase (two sc in one stitch)
- dec: decrease (sc two stitches together)
- BLO: back loop only
Note: This pattern is worked in continuous spirals. Use a stitch marker to keep track of the beginning of each round.
Step-by-Step Pattern
The Legs (Make 4)
Start with the light brown yarn:
- Round 1: Ch 3, join in a circle. 3 inc (6)
- Round 2: 6 inc (12)
- Round 3: 12 sc worked in BLO (12)
- Round 4: 12 sc (12)
Change to the main body color:
- Rounds 5-9: 12 sc (12)
Fasten off the first three legs. For the fourth leg, do not cut the yarn, as you will use it to begin the body.
The Body
Join the legs together by working sc into the top of each leg. Work in a circle:
- Round 10: ch 1, 10 sc around the first leg, ch 6, 10 sc around the second leg, ch 1, 10 sc around the third leg, ch 6, 10 sc around the fourth leg (54).
Tip: Leave 2 stitches unworked on each leg; these will be used later to attach the belly. - Round 11: 54 sc (54)
- Round 12: (inc, 5 sc) * 9 (63)
- Rounds 13-17: 63 sc (63)
- Round 18: (dec, 3 sc) * 12, dec, 1 sc (50)
- Round 19: 50 sc (50)
Stop here. Leave the work and create the belly piece before continuing the body.
The Belly
Using the main body color:
- Start: Ch 8. Begin crocheting in the 3rd chain from the hook.
- Row 1: 5 sc, 4 sc in the next stitch (turn), 5 sc, inc (17)
- Row 2: inc, 6 sc, inc, inc, 7 sc, inc (21)
- Row 3: inc, 8 sc, inc, inc, 9 sc, inc (25)
Do not cut the yarn. Place the belly face down against the body and sew it in place by catching one stitch of the body and one stitch of the belly together. Once secured, continue with the body.
Finishing the Body
- Round 20: (dec, 3 sc) * 10 (40)
- Round 21: (dec, 2 sc) * 10 (30)
- Round 22: 30 sc (30)
Stuff the body firmly with polyester fiberfill, shaping it as you go to ensure the sheep stands steadily.
- Round 23: (dec, 1 sc) * 10 (20)
- Round 24: 20 sc (20)
- Round 25: 10 dec (10)
Fasten off and weave in the ends.
The Head
Using the main body color:
- Round 1: Ch 4, join in a circle. 4 inc (8)
- Round 2: 8 inc (16)
- Round 3: (1 sc, inc) * 8 (24)
- Round 4: (2 sc, inc) * 8 (32)
- Round 5: (3 sc, inc) * 8 (40)
- Rounds 6-12: 40 sc (40)
- Round 13: (dec, 3 sc) * 8 (32)
- Round 14: (dec, 2 sc) * 8 (24)
- Round 15: (dec, 1 sc) * 8 (16)
- Round 16: 16 sc (16)
Stuff the head firmly into a smooth sphere.
- Round 17: 8 dec (8)
Fasten off and sew the head to the body.
The Muzzle and Face
Using white/cream yarn:
- Start: Ch 8. Begin in the 3rd chain from the hook.
- Row 1: 5 sc, 4 sc in the next stitch (turn), 5 sc, inc (17)
- Row 2: inc, 6 sc, inc, inc, 7 sc, inc (21)
- Row 3: 21 sc (21)
- Row 4: inc, 8 sc, inc, inc, 9 sc, inc (25)
- Row 5: 25 sc (25)
Stuff lightly and sew the muzzle to the head. Insert the safety eyes above the muzzle. To create the mouth, attach black thread to the back of the muzzle and work the following sequence: sc, hdc, 2 dc, hdc, sc. Fasten off.
The Ears (Make 2)
Each ear consists of a pink inner part and a main color outer part. Both are made using the same pattern.
Inner Part (Pink):
- Row 1: Ch 2, 2 sc in the first chain (3)
- Row 2: ch 1, 3 sc (4)
- Row 3: ch 1, 4 sc (5)
- Row 4: ch 1, 5 sc (6)
- Row 5: ch 1, 6 sc (7)
- Row 6: ch 1, 5 sc (6) – Insert hook into the 2nd stitch of the previous row.
- Row 7: ch 1, 4 sc (5)
- Row 8: ch 1, 3 sc (4)
- Row 9: ch 1, 2 sc (3)
- Row 10: ch 1, 1 sc (2)
Assembly: Crochet the outer ear using the main color. Join the pink and main color pieces by working sc through both layers together. Finish by working 2 sc at the tip to close it. Sew ears to the head.
Adding the Fluffy Coat
The wool is created using a loop stitch. The loops should be approximately 1.5 to 2 inches (4-5 cm) long.
Loop Stitch Method: Insert hook into a stitch of the body, pull up a long loop of the fluff yarn, pull the loop through with a single crochet.
- Start at the head and work in a spiral until the desired area is covered.
- Cover the back of the head (from ear to ear).
- Cover the body. Leave exactly 8 rows of space between the brown hooves and the start of the fluff.
- Fasten off and weave in the ends.
Optional Accessories
The Flower
Using pink yarn:
- Round 1: Ch 4, join in a circle. 4 inc (8)
- Round 2: (sc, dc, tr, tr, dc) * 5
Fasten off. Pull the tail to the back. Turn the flower over so the petals are convex. Sew a bead or glue a small pompom to the center. Attach to the sheep’s head.
The Horns (For a Ram)
Using light brown yarn:
- Round 1: Ch 3, join in a circle. 3 inc (6)
- Right Horn (Rounds 2-14): 3 hdc, 3 sc
- Left Horn (Rounds 2-14): 3 sc, 3 hdc
The right horn will curl naturally; manually curve the left horn in the opposite direction. Sew to the head