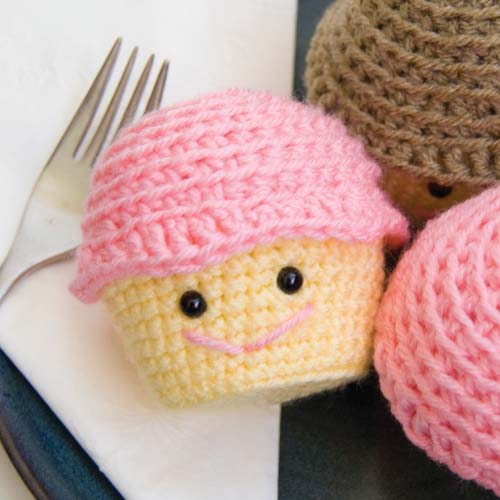
Bake a Yarn Treat: Adorable Amigurumi Cupcake Crochet Pattern
“`html
Adorable Amigurumi Cupcake Crochet Pattern: Step-by-Step Guide
Looking for a sweet and simple project to brighten someone’s day? These amigurumi cupcakes are the perfect choice. Whether you are a beginner looking to practice basic shaping or an experienced crocheter needing a quick gift for a baby shower or office party, this pattern is a delightful way to create a guilt-free treat.
Materials You Will Need
- Sport weight yarn in your choice of colors (one for the cake, one for the icing, and a small amount of pink for the smile)
- Fiber fill stuffing
- 6mm plastic safety eyes
- Size E crochet hook (3.5 mm)
- Yarn needle
- Stitch marker
Stitches and Abbreviations
This pattern uses standard US crochet terminology:
- CH: Chain Stitch
- SC: Single Crochet
- HDC: Half Double Crochet
- DC: Double Crochet
- TR: Treble (Triple) Crochet
- DECR: Single Crochet Decrease
- SL: Slip Stitch
- ST/S: Stitch/Stitches
- MM: Move Marker
- FO: Finish Off
- BLO: Back Loops Only
Part 1: Crocheting the Cake Base
The cake base is worked in a spiral (un-joined rounds). We recommend using a stitch marker to keep track of your current round.
- Round 1: Using cake color, CH 2. Work 6 SC into the second CH from the hook. Place a stitch marker in the last SC.
- Round 2: Work 2 SC in each ST around (12 SC). MM.
- Round 3: *2 SC in first ST, 1 SC in next. Repeat from * around (18 SC). MM.
- Round 4: *2 SC in first ST, 1 SC in each of the next two STs. Repeat from * around (24 SC). MM.
- Round 5: *2 SC in first ST, 1 SC in each of the next three STs. Repeat from * around (30 SC). MM.
- Round 6: *2 SC in first ST, 1 SC in each of the next four STs. Repeat from * around (36 SC). MM.
- Round 7: Working in BLO, SC in each ST around (36 SC). MM.
- Rounds 8-13: SC in each ST around (36 SC). MM.
- Round 14: *2 SC in first ST, 1 SC in next. Repeat from * around (54 SC). MM.
- Round 15: SC in each ST around (54 SC). MM.
- Round 16: *DECR across first two STs, SC in next. Repeat from * around (36 SC). FO.
Part 2: Crocheting the Icing
The icing is worked using half-double crochet (HDC) in a spiral. For added texture, this pattern is worked in the back loops. If you prefer a smoother look, work through both loops.
- Round 1: Using icing color, CH 2. Work 6 HDC into the second CH from the hook. Place a stitch marker in the last HDC.
- Round 2: Working in BLO from here on, work 2 HDC in each ST around (12 HDC). MM.
- Round 3: *2 HDC in first ST, 1 HDC in next. Repeat from * around (18 HDC). MM.
- Round 4: HDC in each ST around (18 HDC). MM.
- Round 5: *2 HDC in first ST, 1 HDC in each of the next two STs. Repeat from * around (24 HDC). MM.
- Round 6: *2 HDC in first ST, 1 HDC in each of the next three STs. Repeat from * around (30 HDC). MM.
- Round 7: HDC in each ST around (30 HDC). MM.
- Round 8: *2 HDC in first ST, 1 HDC in each of the next four STs. Repeat from * around (36 HDC). MM.
- Round 9: *2 HDC in first ST, 1 HDC in each of the next five STs. Repeat from * around (42 HDC). FO, leaving a long tail for sewing.
Part 3: Assembling Your Cupcake
- Eyes: Place the black safety eyes between rounds 11 and 12 of the cake base, approximately 4 stitches apart.
- Smile: Using a small amount of pink yarn and your yarn needle, stitch a small smile between the eyes.
- Positioning: Pinch the icing piece and the lip of the cake (rounds 14 and 16) together.
- Stitching: Using the yarn needle and the tail from the icing, begin stitching the icing to the cake base.
- Stuffing: Continue stitching around the base until about 1 inch (2.5 cm) remains unstitched. Push fiber fill through this opening until the cupcake is firmly stuffed.
- Closing: Stitch the remaining portion closed and FO.
Part 4: Adding the Finishing Touches
To complete the look, we will add a decorative scalloped edge of icing around the top rim of the cake.
- Join your icing-colored yarn to the cupcake.
- Round 1: Working one stitch into each of the back loops of the icing piece, repeat the following sequence: *SC, HDC, DC, DC, TR, DC, DC.
- Repeat this sequence around the entire edge and join with a SL to the first SC.
- FO and weave in all remaining ends.
Safety Warning: Plastic safety eyes and small embellishments can pose a choking hazard for children under three. For toys intended for very young children, we recommend sewing eyes and decorations using embroidery thread or yarn.
“`