Easy Crochet Pencil Amigurumi Pattern: A Cute Back-to-School Project
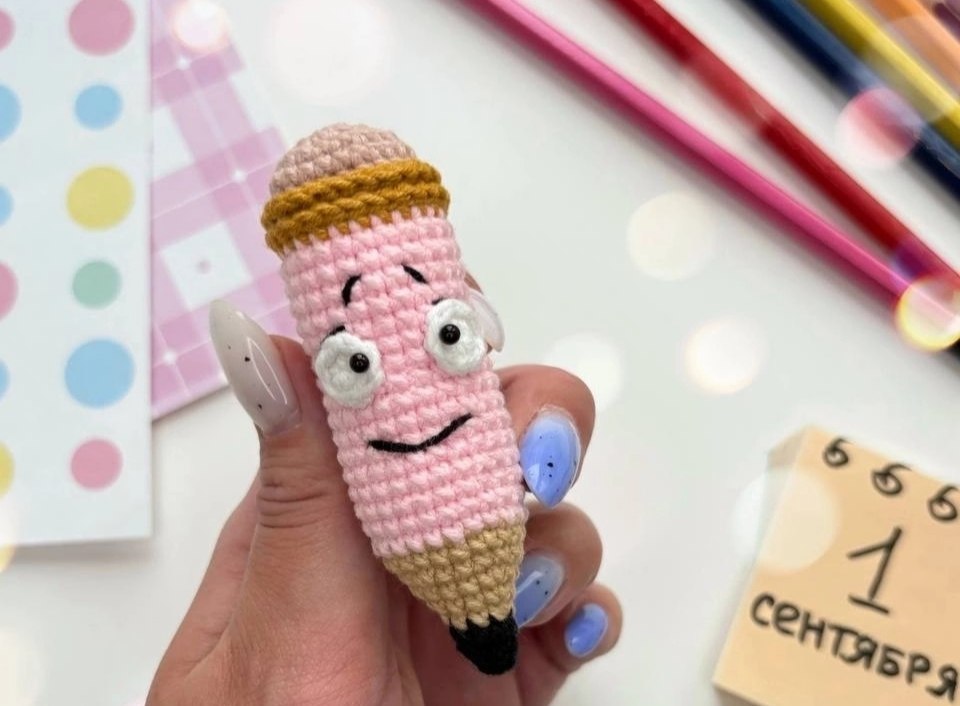
Looking for a quick and adorable crochet project to brighten up your desk or give as a sweet gift to a favorite teacher? This cute crochet pencil amigurumi is the perfect project for you! Whether you are a seasoned pro or a beginner looking to practice your shaping and color changes, this pattern is designed to be accessible, fun, and rewarding.
Amigurumi (the Japanese art of knitting or crocheting small, stuffed yarn creatures) is all about the details. In this tutorial, we will walk you through creating a tiny, personified pencil complete with a little smiley face. This project is a great way to use up scrap yarn in your stash, and because it is worked in the round, it comes together surprisingly quickly.
Materials & Abbreviations
To get started, gather your supplies. For the best results, I recommend using a cotton yarn or a high-quality acrylic that holds its shape well. Since we are working with amigurumi, using a hook slightly smaller than what the yarn label suggests will help ensure your stuffing doesn’t peek through the stitches.
Supplies Needed
- Yarn: Medium weight (4) yarn in the following colors:
- Black (for the graphite tip)
- Beige or Tan (for the wood)
- Bright Pink (for the main body)
- Mustard or Gold (for the ferrule/metal band)
- Pale Pink or Powder Pink (for the eraser)
- White (for the eyes)
- Crochet Hook: 2.5mm or 3.0mm (depending on your tension)
- Stuffing: Polyester fiberfill or polyfill
- Tools: Yarn needle, scissors, and stitch markers
- Embroidery Thread: Black thread for the face details
Abbreviations (US Terms)
- MR: Magic Ring
- sc: Single crochet
- inc: Increase (two single crochet stitches in the same stitch)
- dec: Decrease (single crochet two stitches together)
- BLO: Back Loop Only
- FLO: Front Loop Only
- sl st: Slip stitch
- st: Stitch
Step-by-Step Instructions
This pencil is worked from the tip upward. We will be working in a continuous spiral, so using a stitch marker is highly recommended to keep track of the beginning of each round.
Part 1: The Graphite Tip and Wood
Start with your Black yarn to create the sharpened lead of the pencil.
- Round 1: 6 sc in MR (6)
- Round 2: (1 sc, inc) * 3 (9)
- Round 3: 9 sc
Now, switch to the Beige yarn. To make the transition seamless, pull the beige yarn through the last loop of the black stitch. Fasten off the black yarn and weave in the end.
Pro Tip: Start adding a small amount of stuffing to the tip now. Make sure it is firm so the pencil keeps its pointed shape!
- Round 4: (2 sc, inc) * 3 (12)
- Round 5: (3 sc, inc) * 3 (15)
- Round 6: 2 sc, inc, (4 sc, inc) * 2, 2 sc (18)
- Round 7: (5 sc, inc) * 3 (21)
- Round 8: 3 sc, inc, (6 sc, inc) * 2, 3 sc (24)
Part 2: The Pencil Body
Change your yarn to Bright Pink. Fasten off the beige yarn and secure it inside the body of the pencil.
- Rounds 9–24: 24 sc (16 rounds total)
Continue stuffing the body firmly as you work. You want the pencil to be sturdy enough to stand or lay flat without sagging.
Part 3: The Ferrule and Eraser
Now we will create the metal band (the ferrule) and the eraser. We will use a specific technique here to create a ridge for the band.
Change to Mustard/Gold yarn.
- Round 25: 24 sc
- Round 26: 24 sc, working in BLO (Back Loop Only)
Change to Pale Pink yarn. Fasten off the gold yarn and hide the tail inside.
- Round 27: 24 sc, working in BLO
- Round 28: 24 sc (work through both loops now)
- Round 29: (2 sc, dec) * 6 (18)
- Round 30: (1 sc, dec) * 6 (12)
Fill the top of the eraser firmly with stuffing.
- Round 31: 6 dec (6)
Finish with a slip stitch, cut the yarn, and leave a long tail for sewing. Use the tail to weave through the remaining 6 stitches and pull tight to close the hole completely.
Part 4: The Eraser Holder Detailing
To give the pencil a professional, polished look, we are going to go back to those front loops we left behind in Rounds 25 and 26.
Join your Mustard/Gold yarn into the front loops (FLO) of Round 25. Work 24 slip stitches evenly around the circle. Fasten off and weave in the end. Repeat this process for the front loops of Round 26. This creates two distinct ridges that look like the metal band of a real pencil!
Part 5: Creating the Eyes
Using White yarn, we will make two small eyes.
- Eye 1 & 2: 6 sc in MR (6). Sl st to the first stitch and fasten off, leaving a long tail for sewing.
Finishing Touches
Now comes the best part—giving your pencil a personality! This is where the character comes to life.
Assembling the Face
- Eyes: Sew the white eyes onto the pink body between rounds 16 and 20. Space them about 2 to 3 stitches apart.
- Pupils: Use black embroidery thread or a small scrap of black yarn to sew a small dot or vertical line in the center of each eye.
- Details: Embroider a small, curved smile below the eyes. Add two little arched eyebrows and tiny eyelashes to give your pencil a whimsical, sleepy, or happy expression.
Tips for Success
If you want your crochet pencil to look its best, keep these few tips in mind:
- Consistent Tension: Keep your stitches tight! Amigurumi relies on tight stitches so that the stuffing doesn’t show through. If you see gaps, try dropping down a hook size.
- Invisible Decreases: For the eraser section, use the “invisible decrease” method (working into the front loops only of the two stitches) to avoid seeing bumps in the shaping.
- Color Changes: When changing colors, always make the change on the last pull-through of the previous stitch. This ensures the color change happens exactly at the start of the new round.
- Customization: Feel free to change the colors! You could make a blue pencil, a green pencil, or even a rainbow one by changing colors every few rounds of the body.