Snuggle a Smile: Free New Year’s Gnome Crochet Pattern in Plush Yarn
Hello, cozy makers! Is there anything more heartwarming than a little gnome peeking out from a bookshelf or nestled under the tree? These tiny guardians of the home are symbols of good luck, warmth, and a touch of whimsy, and today, I’m just thrilled to share a pattern for your very own pocket-sized friend.
This isn’t just any gnome—this is a whole-crochet wonder! That’s right, we’re starting from the tip of his hat and crocheting all the way down to his toes in one go, with no complicated body parts to sew together (well, except for one adorable, fluffy beard!). This makes it a wonderfully satisfying and fast project, perfect for a relaxing evening or a last-minute handmade gift.
Designed with wonderfully soft plush yarn, this gnome is as snuggly as he is cute. He’s the perfect project if you’re new to plush yarn or amigurumi, as the fuzzy texture is very forgiving and his simple shapes are oh-so-practiced. We’ll walk through every step together, from his perky little nose to his curly-toed boots.
Whether you’re making a whole festive family for your mantel, a special guardian for a friend’s new home, or just a cheerful companion for your own cozy corner, this gnome is ready to bring a smile. So, let’s gather our softest yarn, a warm drink, and pour a little magic into our hooks. Your new tiny friend is waiting to be made
Gathering Your Gnome-Making Magic: Materials
Let’s get your basket ready with everything you’ll need to create this fuzzy friend.
- Yarn: Plush Yarn (100g/120m). You’ll need:
- Main Color (MC): For the hat and body (traditional red, blue, or any color you love!).
- Contrast Color 1 (CC1): For the nose and feet.
- Contrast Color 2 (CC2): White or cream for the beard trim and hat pom-pom.
- Crochet Hook: 3.75 mm
- Notions:
- Toy stuffing
- Yarn/tapestry needle (for closing the piece and sewing)
- Stitch marker
- Scissors
Special Stitches (Don’t worry, they’re easy!):
- “4dc-cl” (for Nose & Feet): 4 Double Crochets all worked into the same stitch and joined together at the top. The pattern calls this “4ССН в одну петлю с одной вершиной.”
- “3dc-cl” (for Hands): 3 Double Crochets worked the same way. The pattern calls this a “шишечка” (little bobble)
Speaking Crochet: Abbreviations
Here’s your quick-reference guide to keep by your side.
- MR: Magic Ring
- sc: single crochet
- inc: increase (2 sc in the same stitch)
- dec: decrease (sc2tog – single crochet two stitches together)
- ch: chain
- sl st: slip stitch
- ch-sp: chain space
- hdc: half double crochet
- dc: double crochet
- FLO: work in Front Loops Only
- BLO: work in Back Loops Only
Part 1: The One-Piece Wonder: Body, Hat & All!
The magic of this pattern is that we crochet the entire gnome from hat-tip to toes in a spiral. Let’s begin with the Main Color (MC).
We start at the very top of his hat.
- Round 1: 4 sc into a MR. (4)
- Round 2: (1 sc, inc) repeat 2 times. (6)
- Round 3: (1 sc, inc) repeat 3 times. (9)
- Round 4: 1 sc in each stitch. (9)
- Round 5: (2 sc, inc) repeat 3 times. (12)
- Round 6: Now, work this round in the Back Loops Only (BLO). This creates a ridge for attaching the beard later.
- Work 5 sc in BLO.
- Color Change for Nose: Switch to CC1 and in the next BLO, make a “3dc-cl” (hand bobble). This is his little nose!
- Switch back to MC and work 6 sc in BLO. (12)
- Round 7: (3 sc, inc) repeat 3 times. (15)
- Round 8: This is where we make the arms!
- 4 sc.
- Make Arm: Ch 4. Starting from the 2nd chain from the hook, work 1 sc in each of the next 3 ch. Sl st into the same body stitch you started from. This is one arm.
- 2 sc.
- Work 6 sc.
- Make Second Arm: Repeat the arm instructions (Ch 4, sc in 3 ch, sl st into body).
- Work 5 sc. (15 total body stitches)
- Round 9: (4 sc, inc) repeat 3 times. (18)
- Round 10: 1 sc in each stitch. (18)
- Round 11: Work in BLO again: (dec) repeat 9 times. (9)
- STUFF FIRMLY NOW. Fill the body and head with toy stuffing, getting it nice and round.
- Round 12: (dec) repeat 2 times. Switch to CC1.
- In the next stitch, make a “4dc-cl” (foot).
- In the following stitch, make another “4dc-cl” (second foot).
- Switch back to MC: dec, 1 sc. (6)
- Fasten off, leaving a tail. Add a bit more stuffing if needed. Use the yarn needle to close the small opening, weave in the end, and hide it inside the body.
Wow! Just look at that! Your gnome’s main body, with his nose, arms, and feet, is all done. See? No sewing parts together!
Part 2: The Fluffy White Details: Beard Trim & Beard
Now we go back to add the cozy, wintery details.
The Hat Trim:
- Locate Round 6, where we worked in BLO. The unused Front Loops (FLO) will be sitting there, waiting for you.
- Join your White (CC2) yarn into any front loop of Round 6.
- Work 1 sc in each of the 12 front loops around. Join with a sl st to the first sc. Fasten off and weave in the end. This creates a lovely white brim on his hat.
The Magnificent Beard (in White):
We will crochet this flat and then sew it on.
- Row 1: Ch 2. In the 2nd chain from the hook: inc. Ch 1, turn. (2)
- Row 2: Inc in each of the 2 stitches. Ch 1, turn. (4)
- Row 3: 1 sc in each of the 4 stitches. Ch 1, turn. (4)
- Row 4: Inc, 2 sc, inc. Ch 1, turn. (6)
- Row 5: 2 hdc. Do not turn. Now, we will work a border around the entire piece.
- Work 1 sc evenly down the side of the beard, across the bottom (working in remaining loops of starting chains), and up the other side.
- When you reach the starting point at the top, in the stitch from Row 1, work (inc, 1 sc, inc) to create a little rounded chin point.
- Continue sc border up to the corner of Row 5. Work 2 hdc into the two stitches of Row 5.
- Work a few sc across the top edge. Fasten off, leaving a very long tail for sewing.
Part 3: The Grand Finale: Assembly & Embellishment
Bringing your gnome to life is the best part!
- Attach the Beard: Position the beard on the body. The little “V” notch at the top should sit right up against the base of the nose. Pin it in place if it helps. Using the long tail, sew the top edge only of the beard to the body with a few secure stitches. Let the bottom of the beard flap free—it’s much cuter that way!
- Create the Hat Pom-Pom: You have two easy options!
- Option A (Embroidery): With white yarn, make several small, loose loops or “French knots” clustered at the very top of the hat. Fluff them up to look like a pom-pom.
- Option B (Crochet): For a more defined look, you could start the entire pattern by making Round 1 in White, then switch to your Main Color for Round 2 onward. This gives him a white tip!
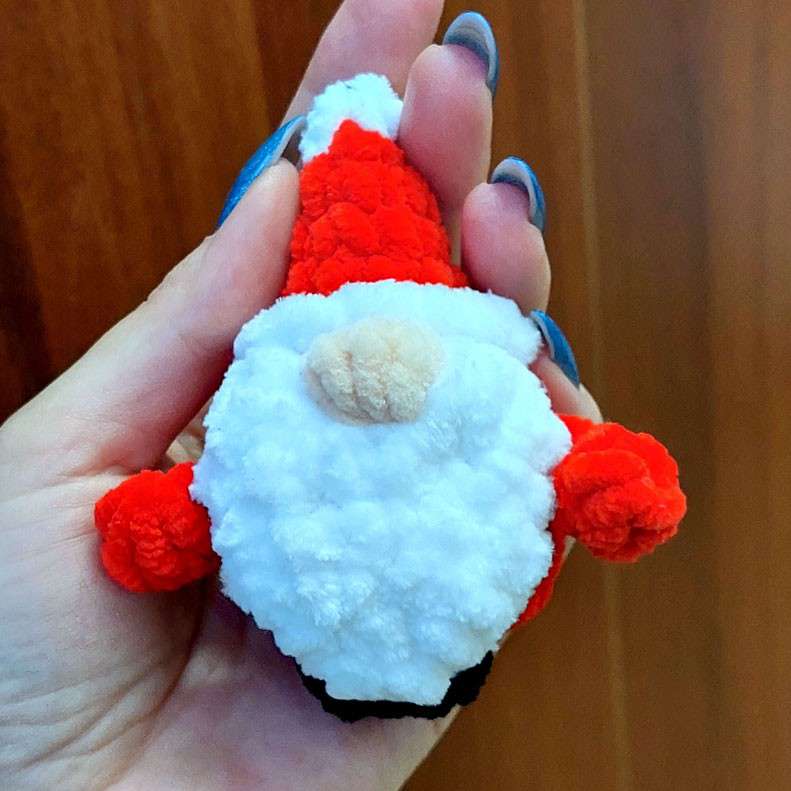
Your Cozy Guardian is Complete!
And there he is! Your very own one-piece plush gnome, full of charm and ready for adventures. Give him a gentle fluff, straighten his beard, and find him the perfect home—perched on a stack of books, guarding the tea cupboard, or waiting to wish someone a Happy New Year