Snapdragon Dragon Tower Crochet Pattern
Tower Shell Assembly
- Cut a plastic canvas strip to match Panel A and Panel B, ensuring you cut out corresponding window holes.
- Sandwich the plastic canvas between Panel A (Exterior Gradient) and Panel B (Interior).
- Join: Single crochet around the perimeter of the U-shaped shell, changing your yarn color to match the gradient zone (Lemon Yellow at the bottom, transition through Sunset Orange, to Fiery Red at the top) for a seamless finish.
- Shape: Carefully bend the assembled panel into a tall U-shape arch. Sew the bottom edges of this U-shape to the sealed Lemon Yellow Floor Base.
- Back Wall: Create a separate solid sandwich panel for the back, following the same Lemon Yellow, Sunset Orange, and Fiery Red color change pattern to close the back of the tower.
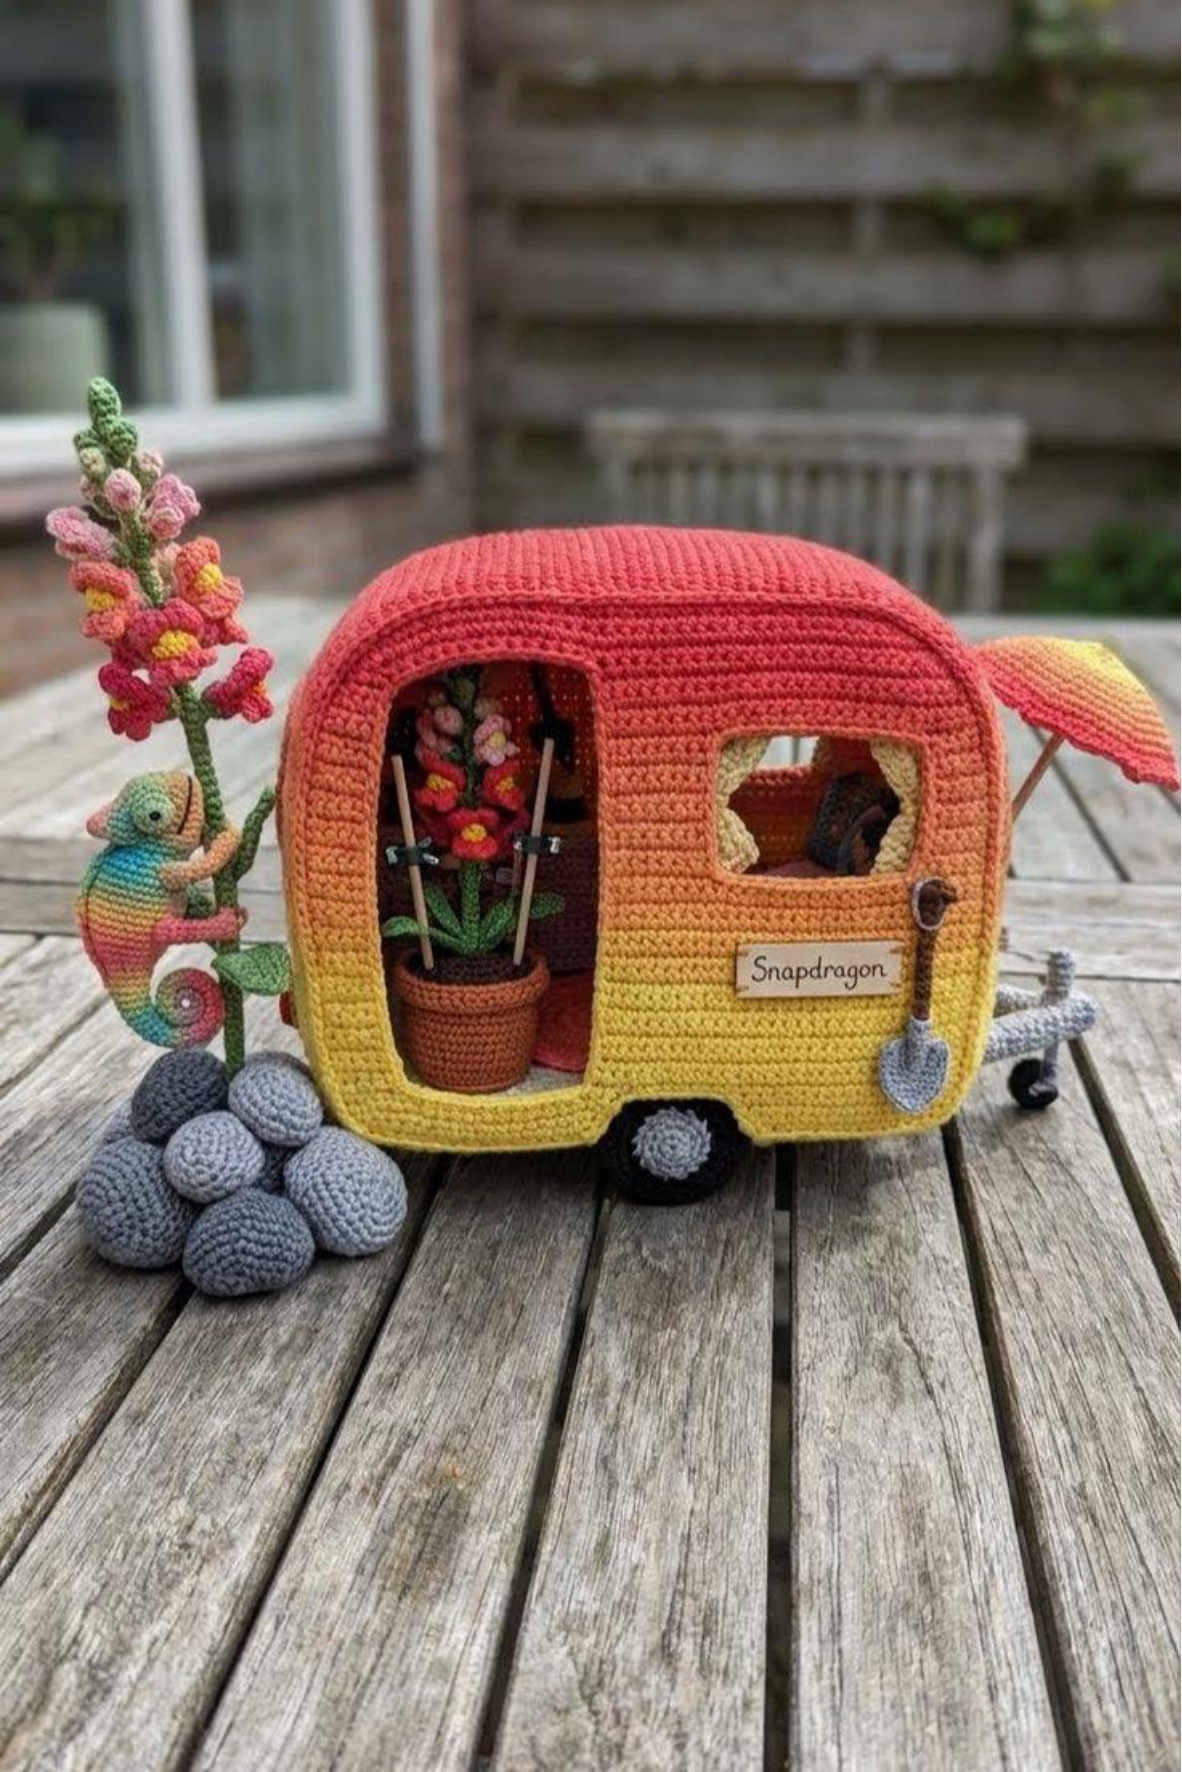
The “Snapdragon” Nameplate
Give your Dragon Tower a personalized touch.
- Plate: Using Wood Brown or Beige yarn, Ch 10. Sc 4 rows to form a small rectangle.
- Text: Embroider “Snapdragon” onto the plate using black thread.
- Placement: Glue the finished nameplate to the side of the caravan, specifically in the Lemon Yellow section.
Part 2: The Snapdragon Plants (Maximalism)
IMPORTANT: Switch to your 1.0mm Hook for these intricate botanical details. Snapdragon florets have complex, jaw-like shapes.
The Flower Spike (The Stem)
These will form the tall, upright stems inside and outside the tower.
- Wire Core: Cut a 6-inch piece of floral wire. This is essential for structural support.
- Covering: Strictly wrap the floral wire with Leaf Green yarn, or crochet a very thin tube (e.g., Ch 4, join with sl st to form a ring, then sc around) and slide it over the wire.
The “Dragon Mouth” Florets
Make 15-20 florets per stem to create a lush look. Arrange them in a color gradient from Yellow at the bottom to Pink at the top.
- The Jaw (Bottom Lip): Ch 4. In the first chain from the hook, work 3 Dc. Ch 1, turn. Sc 3 across the DCs. Gently fold to shape.
- The Hood (Top Lip): Ch 4. In the first chain from the hook, work 2 Tr, Ch 2, then Sl st into the same first chain.
- Assembly: Carefully stitch the “Jaw” and “Hood” pieces together at their base. When finished, it should resemble a small, open mouth.
- Placement: Securely glue these florets along the top 3 inches of your prepared flower stem. Place the Lemon Yellow florets lower on the stem, transitioning to Pink florets higher up.
- Buds: At the very tip of the stem, glue tiny green or pink knots (formed by Ch 2, sl st) to represent unopened flower buds.
Gardening Accessories
Use your 1.0mm – 1.25mm Hook for these tiny details.
- Support Stakes: Use bamboo toothpicks. Color the tips brown with a marker or paint. These will be pushed into the pot next to the plant stem for support.
- Stem Clamps: Using black thread, tie tiny loops to connect the plant stem to its support stake, mimicking realistic clamps.
- Nameplates: Cut a tiny rectangle of white cardstock. Write “Antirrhinum” or “Snapdragon” on it. Glue the cardstock to a toothpick and stick it into the pot’s “soil.”
- Terracotta Pot: Using Terracotta yarn, start with MR 6 sc. Increase to 15 stitches. Work BLO Sc upwards for several rounds. Sc 6 regular rounds. Stiffen the pot with fabric glue if desired. Fill the finished pot with brown “soil” (crocheted brown yarn pieces or fiberfill).
Part 3: Gardening Tools
Use Hook Size: 1.25mm for these miniature tools.
Small Shovel
- Blade: Using Stone Grey yarn, Ch 5. Sc 4 rows. Decrease 1 stitch at each end to create a pointed blade shape.
- Curve: Gently press the blade into a slight curve while spraying with starch or fabric glue to hold its shape.
- Handle: Using Wood Brown yarn, Ch 10 (make a tight chain).
- Grip: Form a D-shaped handle at the top of the chain.
- Assembly: Glue the blade securely to the handle. This miniature shovel can be hung on the exterior wall of the caravan or leaned against a pot.
Gradient Sunshade (Umbrella)
Provide some shade for your miniature garden.
- Canopy: Start with Lemon Yellow yarn (MR 6 sc). Increase to 12. Change to Sunset Orange yarn, increase to 18. Change to Fiery Red yarn, increase to 24. Work 2 rounds without increases to create a gentle curve downwards for the canopy shape.
- Pole: Use brown wire wrapped tightly in Wood Brown yarn to create a slender pole.
- Assembly: Glue the finished sunshade to the side of the caravan (awning style) or create a base for it to stand separately.
Part 4: The Exterior Scene & Chameleon
The Chameleon
Use your 1.0mm Hook and Variegated/Rainbow yarn for this intricate creature.
- Head: MR 6 sc, Inc to 12. Sc 3 rounds.
- Crest (Casque): On the back of the head, Ch 3, Picot, Ch 3, Picot.
- Eyes: Make 2 separate Popcorn stitches (5 dc in one st, pull through) to create the large, bulging eyes. Sew these to the sides of the head. Use a small black bead for each pupil.
- Body: MR 6 sc, Inc to 14. Sc 8 rounds (slightly flattened laterally). Dec to close.
- Tail: Ch 20. Sc back down the chain. Insert a thin wire into the tail. Coil the wire-supported tail tightly into a spiral.
- Legs: Ch 6. Sc back down the chain. Make 4 identical legs.
- Toes (Zygodactyl Feet): At the end of each leg, Ch 2 and split to create the characteristic two-toed structure.
- Pose: Insert floral wire into the legs to make them posable. Pose the chameleon so it appears to be gripping the stem of the tall exterior Snapdragon plant.
Gray Wool Rockery
Use 2.5mm Hook and Stone Grey yarn to create a natural base.
- Rocks: Make 5-7 distinct rocks of varying shapes and sizes.
- Rock A (Lump Shape): MR 6 sc, Inc to 18. Sc 2 rounds. Decrease randomly to create an irregular, lumpy shape. Stuff firmly with fiberfill.
- Rock B (Elongated Shape): MR 6 sc, Inc to 12, then continue to shape into an elongated form with random increases/decreases.
- Assembly: Glue the finished rocks together in a pile (cairn style) or a clustered formation. This rockery will serve as the base for the exterior tall flower.
Wheels
- Tire: Using Black yarn, MR 6 sc, Inc to 12, (1 sc, Inc) around to 18 stitches. Sc 2 rounds to give it thickness.
- Hubcap: Using Stone Grey yarn, MR 6 sc. Add texture with a star stitch if desired for detail.
- Assembly: Sew two completed wheels to the sides of the caravan, positioning them in the Lemon Yellow section of the tower.
Final Assembly & Finishing Steps
Bringing all the elements of your Snapdragon Dragon Tower together is where the magic happens!
- Structural Check: Double-check that your Ombre walls are standing tall and perfectly straight. The “3-Layer Sandwich Method” is paramount for this stability and rigidity. Ensure the gradient flows smoothly from Lemon Yellow at the base, through Sunset Orange, to Fiery Red at the top.
- Interior Cultivation:
- Firmly glue the Terracotta Pot to the Lemon Yellow floor of the caravan.
- Insert the tall Snapdragon stem (with its wire core) into the pot, ensuring it stands upright.
- Add the miniature Support Stake and secure the plant stem to it using the tiny Black Clamps.
- Place the Small Shovel, either hanging on an interior wall or leaning against the pot, completing your botanist’s vertical laboratory scene.
- Exterior Styling:
- Position the Gray Rockery near the front exterior of the caravan.
- “Plant” a second tall Snapdragon stem, emerging naturally from the rocks.
- Carefully attach the intricately crocheted Chameleon to this exterior stem, posing it to look as though it’s blending seamlessly with the flowers.
- Attach the Gradient Sunshade to the side of the caravan, if you chose to include this charming detail.
Congratulations! You have successfully built the “Snapdragon” Dragon Tower. This vertical, colorful, and highly detailed miniature masterpiece is a fiery and unique addition to any crochet collection or miniature garden scene.