Sihirli Halka Mini Character Crochet Patterns
Amigurumi Essentials: Materials, Abbreviations, Gauge & Size
Before diving into these delightful amigurumi patterns, let’s gather our materials and understand the essential crochet terms. These patterns are designed by Burcu BÜLBÜL, Sihirli_Halka, providing detailed instructions to create your own beloved characters.
Materials You’ll Need
While specific yarn colors are listed under each character, the following tools are generally required for all patterns:
- Hook: 2.20mm crochet hook
- Fiberfill: For stuffing your amigurumi projects
- Marker: Stitch marker to keep track of rounds
- Tapestry Needle: For sewing pieces together and weaving in ends
- Scissors: Essential for cutting yarn
- Glue: Craft glue suitable for fabric (e.g., for felt pieces or securing hair/mouth)
- Blush or Paint: To add color to cheeks or other facial features
- Black & White Thread: For embroidering details
- Black Felt: For facial features on Cookie Monster and Elmo
Abbreviations (Crochet Terms)
Familiarize yourself with these standard crochet abbreviations used throughout the patterns:
- Ch: Chain
- Sc: Single crochet
- Inc: Increase (two single crochets in one stitch)
- Dec: Decrease (single crochet two stitches together)
- Hdc: Half double crochet
- Dcinc: Increase double crochet (two double crochets in one stitch)
- Dc: Double crochet
- Trinc: Increase treble crochet (two treble crochets in one stitch)
- Tr: Treble crochet
- W: 3 single crochets into the same stitch
- 3tog: Crochet three stitches together
- Slst: Slip stitch
- (…)*: Repeat instructions within parentheses the specified number of times
- Flo: Front loop only
- Blo: Back loop only
- Mr: Magic Ring (also known as Magic Circle or Adjustable Ring)
Gauge & Finished Size
Please note that the pattern does not specify a particular gauge or finished size. The final dimensions of your amigurumi will depend on your yarn choice, hook size, and personal tension. Consistent tension is key for even stitches and a well-formed toy.
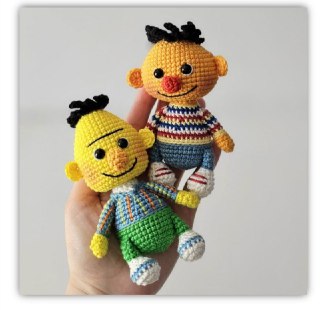
Mini Bert & Ernie Crochet Pattern
Create these iconic Sesame Street characters, Bert and Ernie, with this detailed amigurumi pattern. Each character has specific yarn requirements and step-by-step instructions for a fun crochet project.
Bert Amigurumi Pattern
Bert’s Materials
- Yarn: CATANIA ORIGINALS
- Apricot (299)
- Nature (105)
- Black (110)
- Fresh (295)
- Signal Red (115)
- Sallow Blue (269)
- Royal (201)
- Cherry (424)
- Safety Eye: 7mm Safety Eye
- Thread: Black & white thread
Bert’s Head Construction (Stuff as you go)
Begin crocheting Bert’s head with Apricot yarn. Remember to stuff firmly as you crochet to maintain shape.
- Round 1: Start with a magic ring, 6sc (6 stitches)
- Round 2: 6inc (12 stitches)
- Round 3: (1sc, 1inc)*6 (18 stitches)
- Round 4: (2sc, 1inc)*6 (24 stitches)
- Round 5: 1sc, 1inc, (3sc, 1inc)*5, 2sc (30 stitches)
- Round 6: 6sc, 3inc, 12sc, 3inc, 6sc (36 stitches)
- Round 7: 8sc, 3inc, 15sc, 3inc, 7sc (42 stitches)
- Round 8: 42sc (42 stitches)
- Round 9: 10sc, 3inc, 18sc, 3inc, 8sc (48 stitches)
- Rounds 10-16: 48sc (48 stitches)
Eye Placement: Insert the 7mm safety eyes between rows 11 and 12, leaving 4 stitches between them. Ensure the eyes are centered with the increases made on either side of the head.
- Round 17: (6sc, 1dec)*6 (42 stitches)
- Round 18: (5sc, 1dec)*6 (36 stitches)
- Round 19: (4sc, 1dec)*6 (30 stitches)
- Round 20: (3sc, 1dec)*6 (24 stitches)
- Round 21: (2sc, 1dec)*6 (18 stitches)
- Rounds 22-28: 18sc (18 stitches). Cut the yarn.
Head Shaping Tip: Push the part crocheted from row 22 inwards to create Bert’s distinct head shape, as shown in the provided images.
Bert’s Ears (Make 2)
With Apricot yarn:
- Start with a magic ring, 8hdc. Cut the yarn, leaving a long tail for sewing.
Assembly: Sew the ears to the head between rows 11 and 13, ensuring there are 22 single crochets between them.
Bert’s Nose (Do Not Stuff)
With Signal Red yarn:
- Round 1: Start with a magic ring, 5sc (5 stitches)
- Round 2: 5inc (10 stitches)
- Round 3: 10sc (10 stitches)
- Round 4: 5dec (5 stitches), 1slst. Cut the yarn, leaving a long tail for sewing.
Assembly: Sew the nose to the head between rows 13 and 14.
Mouth Embroidery: Using a tapestry needle and black thread, embroider the mouth between rows 16 and 17.

Embroidering Bert’s smile.