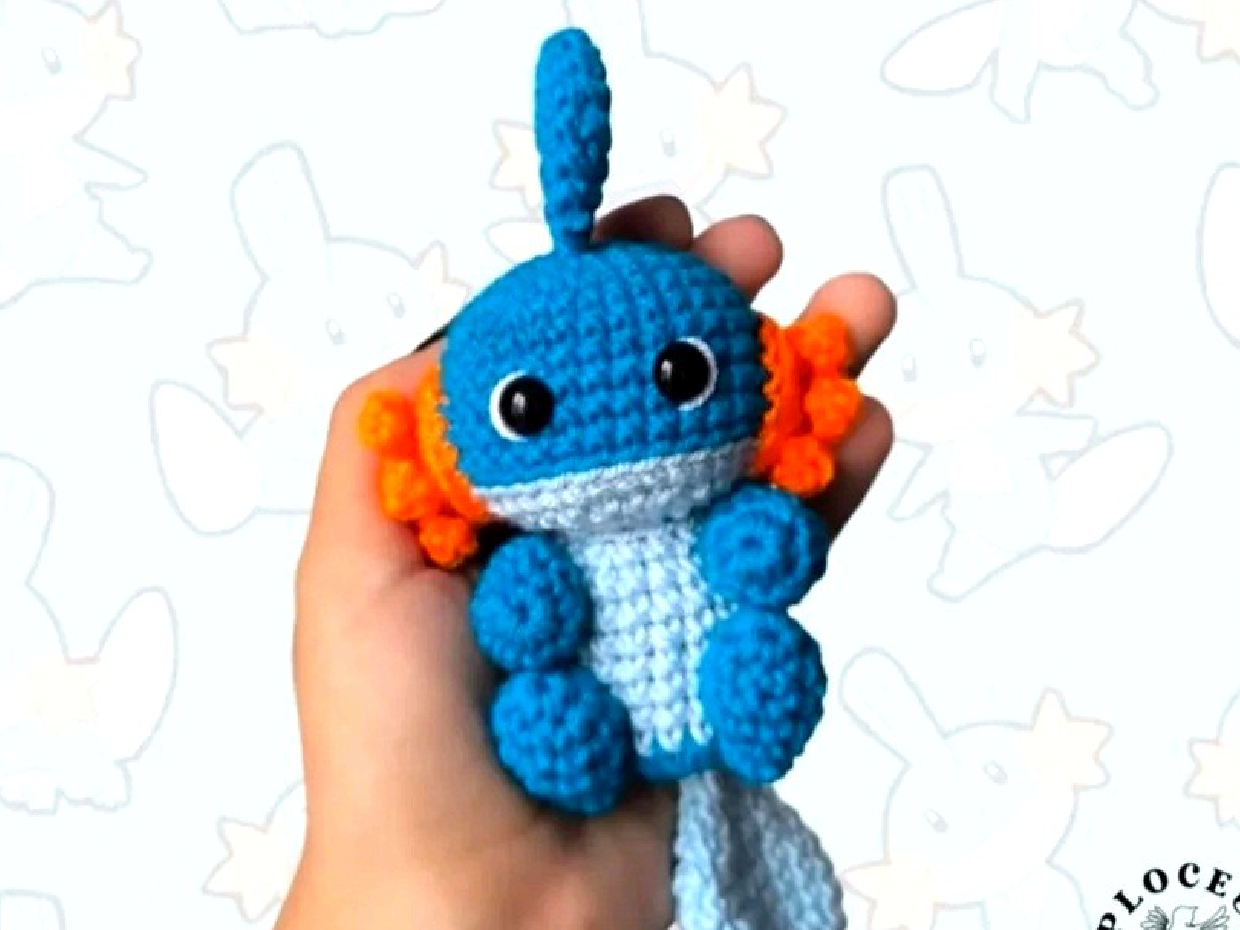
Mudkip Amigurumi Crochet Pattern
Building the Body
The body involves a color change to create Mudkip’s light blue belly. This section will eventually be sewn to the head.
Yarn Color: Dark Blue, with Light Blue color changes
- 1st rnd: Create a Magic Ring with 6 single crochets (6 sc).
- 2nd rnd: Work 6 increases (inc) around (12 sc).
- 3rd rnd: Repeat (1 sc, 1 inc) 6 times (18 sc).
- 4th-11th rnds: For 8 rounds, work the following color sequence: 4 sc in dark blue, then 10 sc in light blue, then 4 sc in dark blue (18 sc per round).
- 12th rnd: Repeat (2 sc, 1 dec) 6 times (12 sc). Ensure color changes are maintained across decreases for a clean look.
Fasten off, stuff the body firmly, and leave a long tail for sewing to the head.
Shaping the Fin
Crochet the dorsal fin for Mudkip using dark blue yarn. This piece will be attached to Mudkip’s back.
Yarn Color: Dark Blue
- 1st rnd: Create a Magic Ring with 6 single crochets (6 sc).
- 2nd rnd: Work 6 increases (inc) around (12 sc).
- 3rd rnd: Repeat (1 sc, 1 inc) 6 times (18 sc).
- 4th-5th rnds: Single crochet 18 stitches around for 2 rounds (18 sc).
- 6th rnd: 1 decrease (dec), 7 sc, 1 decrease (dec), 7 sc (16 sc).
- 7th rnd: Work single crochets and decreases to reduce the stitch count to 11 single crochets (11 sc).
- 8th rnd: Join the ends together with 4 single crochets, flattening the piece (4 sc).
Fasten off and leave a tail for sewing. This fin will be attached to Mudkip’s back.
Crocheting the Legs (Make 4)
Mudkip has four short, stubby legs. Crochet each one individually with dark blue yarn.
Yarn Color: Dark Blue
- 1st rnd: Create a Magic Ring with 6 single crochets (6 sc).
- 2nd rnd: Repeat (1 sc, 1 inc) 3 times (9 sc).
- 3rd-4th rnds: Single crochet 9 stitches around for 2 rounds (9 sc).
- 5th rnd: Repeat (1 sc, 1 dec) 3 times (6 sc).
- 6th rnd: Work 6 decreases (dec) around (3 sc).
Fasten off, stuff lightly, and leave a tail for sewing to the body.
Making the Cheeks (Make 2) and Points
These orange accents bring Mudkip’s face to life, including its unique “points” or gills. Crochet two cheeks and then create the distinct points.
Yarn Color: Orange
Cheeks (Make 2)
- 1st rnd: Create a Magic Ring with 6 single crochets (6 sc).
- 2nd rnd: Work 6 increases (inc) around (12 sc).
- 3rd rnd: Repeat (1 sc, 1 inc) 6 times (18 sc).
Fasten off and leave a tail for sewing to the head.
Points (These appear to be three distinct spikes created on a chain base, likely attached near the cheeks or facial area. Follow these steps carefully.)
- First Point: Chain 6. Then chain 2 more. Make 1 single crochet in the 2nd chain from hook (of the last 2 chains you just made). Then slip stitch into the 4th chain of your initial 6-chain base.
- Second Point: Chain 2. Make 1 single crochet in the 2nd chain from hook. Close with a slip stitch into the 3rd chain of your initial 6-chain base.
- Third Point: Chain 2. Make 1 single crochet in the 2nd chain from hook. Close with a slip stitch into the 1st chain of your initial 6-chain base.
Crafting the Tail
Create Mudkip’s signature tail with light blue yarn. This piece is crocheted in the round and then flattened at the end for attachment.
Yarn Color: Light Blue
- 1st rnd: Create a Magic Ring with 6 single crochets (6 sc).
- 2nd rnd: Work 6 increases (inc) around (12 sc).
- 3rd rnd: Repeat (1 sc, 1 inc) 6 times (18 sc).
- 4th-6th rnds: Single crochet 18 stitches around for 3 rounds (18 sc).
- 7th rnd: Repeat (1 sc, 1 dec) 6 times (12 sc).
- 8th rnd: Single crochet 12 stitches around (12 sc).
- 9th rnd: Work 6 decreases (dec) around (6 sc).
- 10th rnd: Single crochet 6 stitches around (6 sc).
Close with 2 sc (this typically means crocheting the two sides of the opening together with two single crochet stitches to flatten the piece). Fasten off and leave a tail for sewing.
Assembly and Finishing
Once all the individual Mudkip pieces are crocheted and stuffed, it’s time for the exciting part: bringing them all together! Careful assembly ensures a charming final result.
- Attach Head to Body: Using the long yarn tails you left, carefully sew the head to the body. Ensure it’s centered, positioned correctly, and securely attached for durability.
- Attach Fin: Position and sew the dark blue dorsal fin to the top/back of Mudkip’s body.
- Attach Legs: Sew the four legs symmetrically onto the bottom of the body. Proper placement helps Mudkip stand or sit nicely.
- Attach Cheeks and Points: Sew the orange cheek pieces to Mudkip’s face. If the “Points” are separate elements, sew them into position on or around the cheeks as depicted in Mudkip’s design.
- Attach Tail: Sew the light blue tail to the back of the body, making sure it’s securely fastened and positioned correctly.
- Insert Safety Eyes: Carefully insert the safety eyes onto the head. Refer to reference images for accurate placement, typically between rounds 6-7 of the head, centered above the cheek line.
- Embroider Details: Use white yarn to embroider any additional facial details, such as small highlights in the eyes or a subtle smile, to give your Mudkip more personality.
- Weave in Ends: Securely weave in all remaining yarn tails into your amigurumi. This gives your finished piece a clean, professional look and prevents unraveling.
Tips for Amigurumi Beginners
Crocheting amigurumi can be a delightful and rewarding experience! If this is one of your first amigurumi projects, here are a few general tips to help you succeed with your Mudkip and future creations:
- Maintain Tight Stitches: For amigurumi, aiming for tight, even stitches is crucial. This prevents the stuffing from showing through your work and helps the piece maintain its intended shape. If your stitches seem too loose, try using a smaller crochet hook.
- Utilize Stitch Markers: When working in continuous rounds (which is common for most amigurumi patterns), always place a stitch marker in the first stitch of each round. This simple habit will save you from miscounting and frustration.
- Stuff Gradually and Evenly: Stuff your pieces little by little, ensuring the fiberfill is distributed evenly. Use small bits of stuffing to reach tight spots and avoid lumps. Stuffing firmly helps the amigurumi hold its shape.
- Count Your Stitches Diligently: It cannot be overstated how important it is to count your stitches at the end of every round. Even one missed stitch can throw off the entire shape of your piece.
- Read Through the Pattern First: Before you even pick up your hook, take a moment to read through the entire pattern. This helps you understand the construction, anticipate color changes, and identify any potentially tricky sections in advance.
- Patience is a Virtue: Crochet is a journey, not a race. If you make a mistake, don’t be afraid to unravel (frogging!) and re-do. The satisfaction of a well-made item is worth the extra effort.
Congratulations, trainer! Mudkip has chosen you as its crafter! Thank you for bringing this adorable Pokémon to life with your hands. I hope you enjoyed every stitch and that this amigurumi accompanies you as a loyal companion on all your adventures.
If you share your crocheted Mudkip on social media, don’t forget to tag the original designer, @ploceus.tejeril, so they can see your wonderful creation swim through the virtual world. Thank you for supporting this woven journey.
See you in the next pattern, trainer!
“`