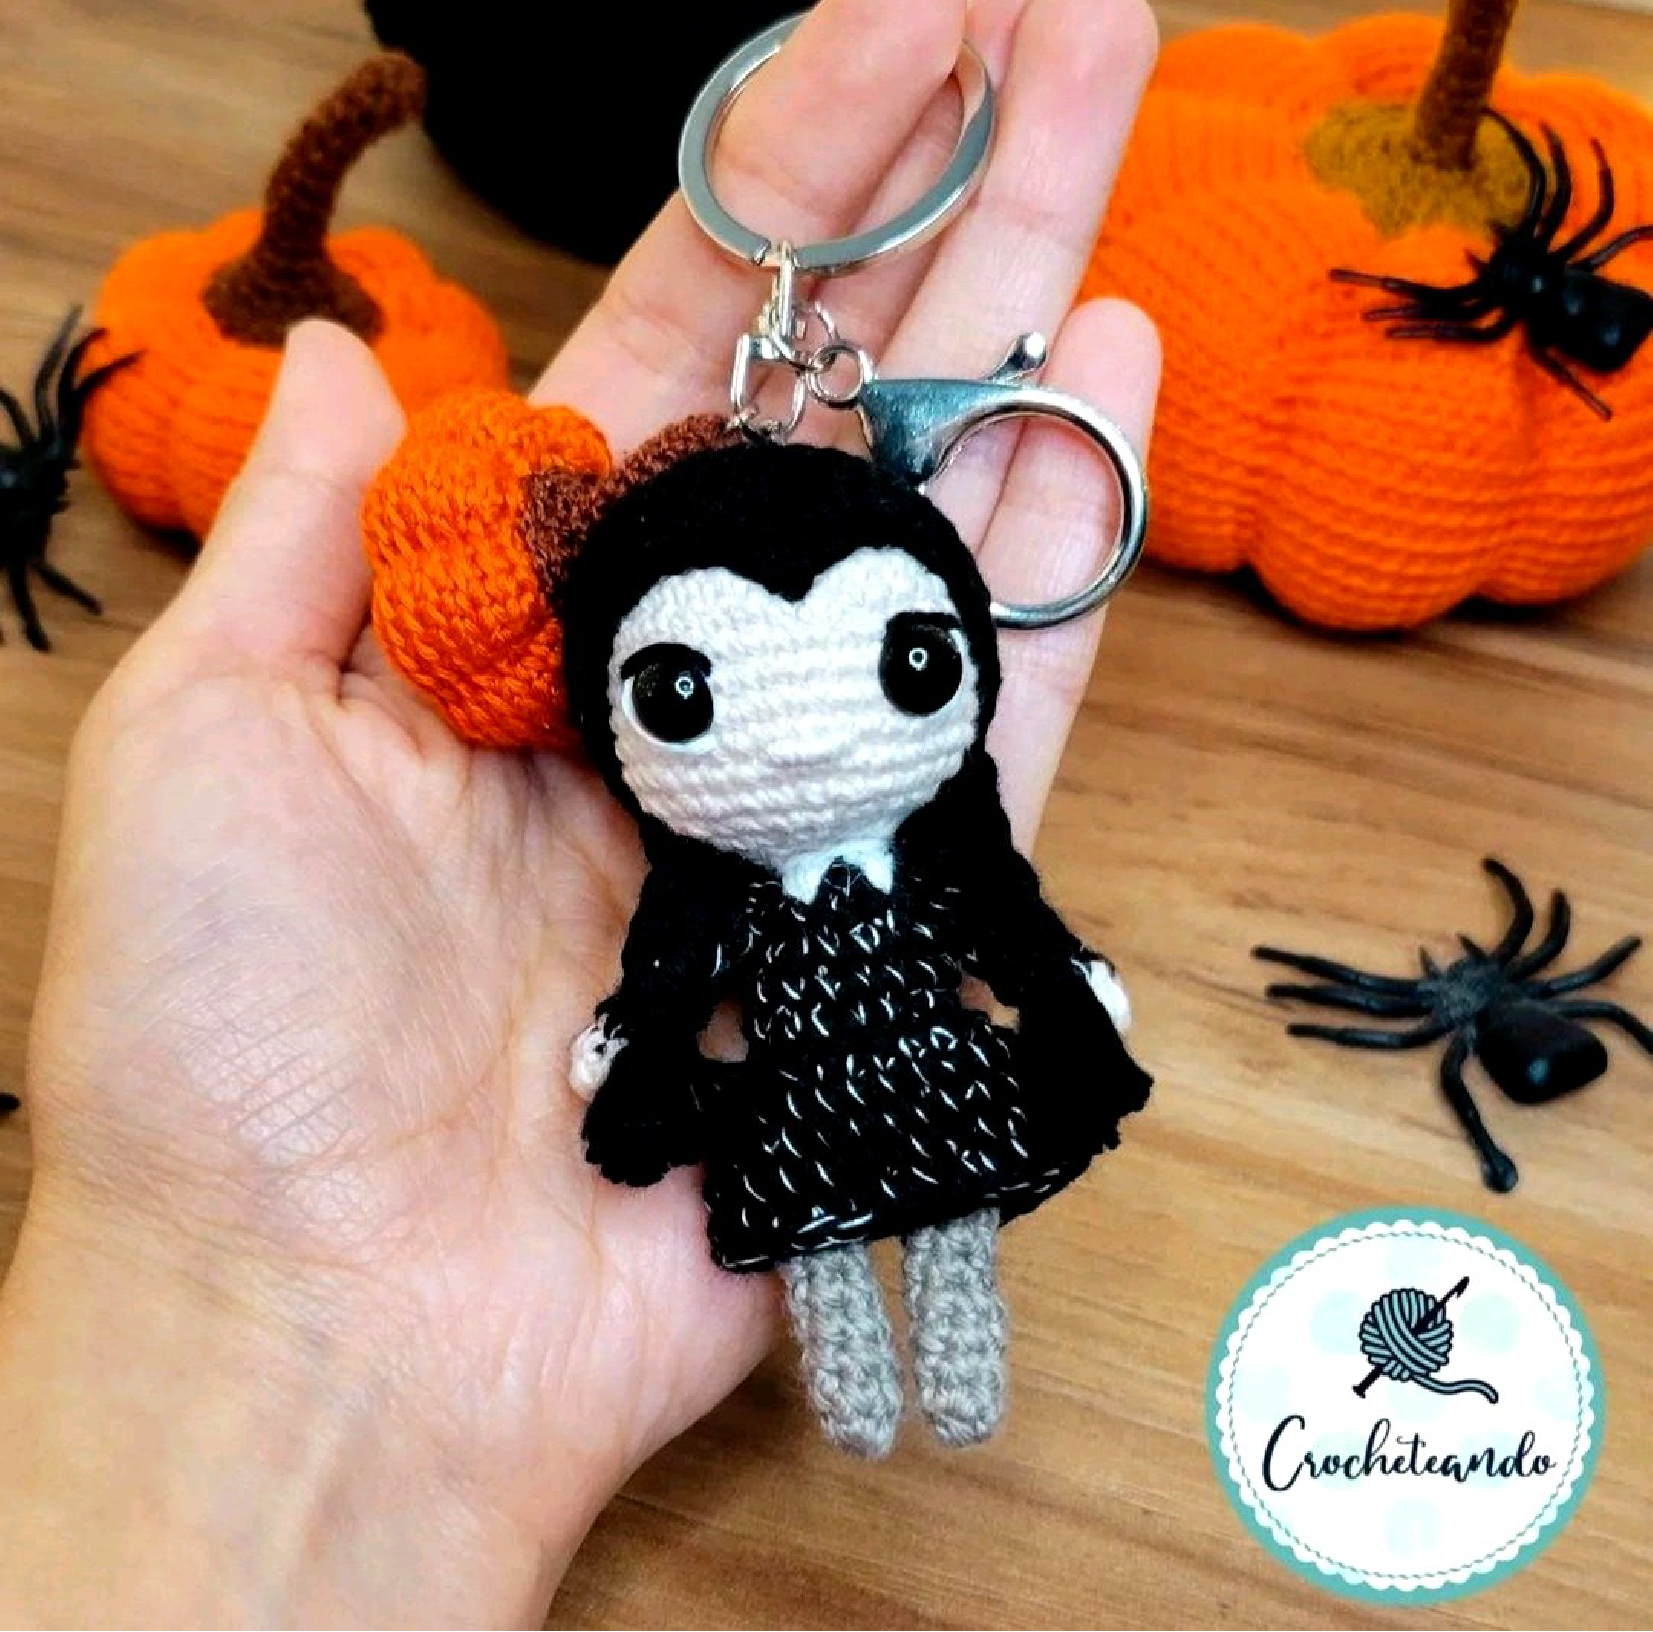
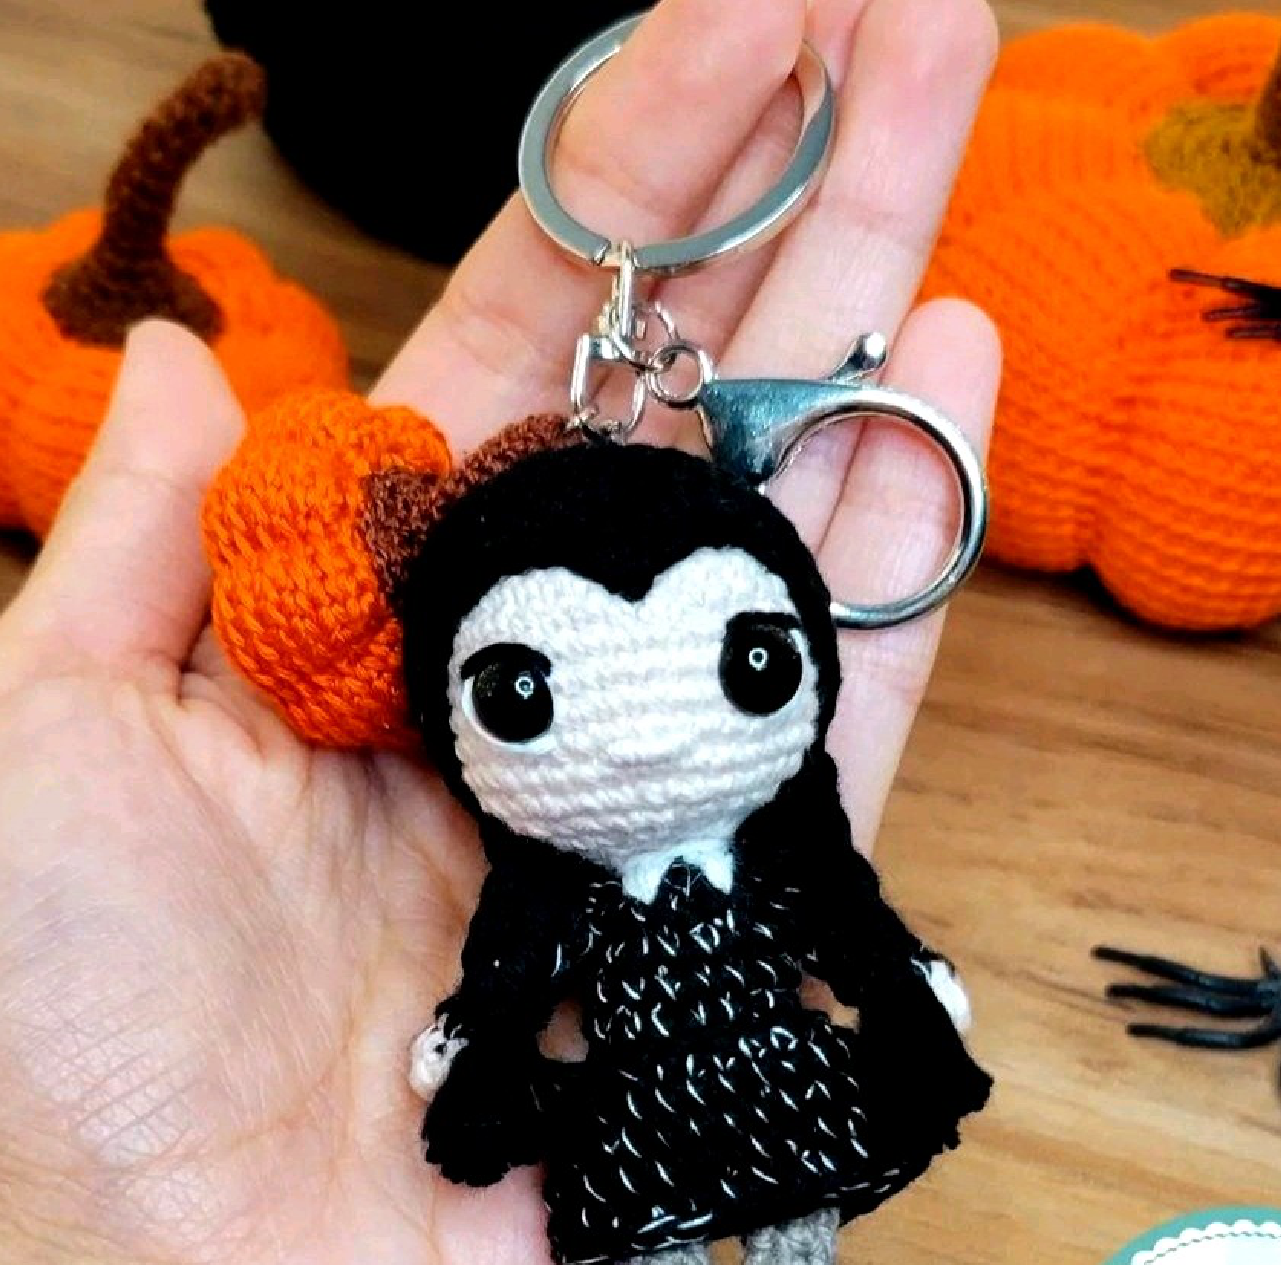
Mini Merlina Free Crochet Pattern
Materials
To crochet your very own Mini Wednesday Addams inspired doll, gather these essential amigurumi supplies. The pattern primarily uses black and grey yarn, with a skin tone for the head.
- Yarn:
- Black yarn (DK or worsted weight recommended for amigurumi)
- Grey yarn (DK or worsted weight)
- Skin-tone yarn (DK or worsted weight)
- Crochet Hook: Size appropriate for your chosen yarn (typically smaller than the yarn label suggests for amigurumi to create tight stitches, e.g., 2.0mm – 3.0mm).
- Stuffing: Polyester fiberfill for shaping your doll.
- Safety Eyes: Small black safety eyes (e.g., 5mm-6mm) for expressive features.
- Tapestry Needle: For weaving in ends and assembling parts.
- Stitch Markers: Essential for tracking rounds in amigurumi.
- Scissors: For cutting yarn.
Abbreviations
Understanding these standard crochet abbreviations will help you follow the pattern seamlessly:
- R: Round
- MR: Magic Ring
- sc: Single Crochet
- inc: Increase (2 single crochet stitches in one stitch)
- dec: Decrease (single crochet 2 together)
- ch: Chain
- sl st: Slip Stitch
- hdc: Half Double Crochet
- dc: Double Crochet
- x: Repeat
- (): Indicates the total number of stitches in the round.
Gauge
Gauge is not provided for this pattern. For amigurumi, it’s generally recommended to use a hook size smaller than your yarn suggests to create tight stitches that prevent stuffing from showing through.
Finished Size
The finished size of the Mini Wednesday doll is not specified. The final size will vary depending on your chosen yarn weight and hook size, as well as your personal tension.
Instructions: Craft Your Mini Wednesday Doll
Follow these step-by-step instructions to crochet each part of your Mini Wednesday Addams doll. Work in continuous rounds unless otherwise specified.
Head
Begin with your chosen skin-tone yarn to create the foundation for the head. Remember to stuff firmly before completely closing.
- R1: Start with a Magic Ring (MR) and work 6 single crochets (sc) into it. (6)
- R2: 6 increases (inc). (12)
- R3: (1 sc, 1 inc) x 6. (18)
- R4: (1 sc, 1 inc, 1 sc) x 6. (24)
- R5: (3 sc, 1 inc) x 6. (30)
- R6: (2 sc, 1 inc, 2 sc) x 6. (36)
- R7-R13: Single crochet in each stitch around for 7 rounds. (36)
- R14: (2 sc, 1 decrease (dec), 2 sc) x 6. (30)
- R15: (3 sc, 1 dec) x 6. (24)
- R16: (1 sc, 1 dec, 1 sc) x 6. (18)
- R17: 6 decreases (dec). (6)
Fasten off, leaving a long tail for sewing. Stuff the head firmly with fiberfill.
Legs & Body
Start with the legs in grey yarn, then join them to form the base of the body, transitioning to black yarn for the torso. Make two identical legs.
Legs (Make 2)
Using grey yarn:
- R1: Magic Ring with 6 sc. (6)
- R2-R8: Single crochet in each stitch around for 7 rounds. (6)
Fasten off the first leg. For the second leg, do not fasten off; continue to the body instructions.
Joining Legs and Body
Continue from the second leg.
- Add 2 chains (ch) to the 2nd leg.
- R9: Join legs with single crochet (sc) across both legs and into the chains. (6 sc on first leg + 2 sc into chain + 6 sc on second leg + 2 sc into chain = 16 sc)
Switch to black yarn:
- R10-R15: Single crochet in each stitch around for 6 rounds. (16)
- R16: (2 sc, 1 dec) x 4. (12)
- R17: 6 decreases (dec). (6)
Fasten off, leaving a long tail for sewing. Stuff the body firmly as you go.
Arms
Create two small arms using black yarn. These will be lightly stuffed or left unstuffed depending on your preference.
Arms (Make 2)
Using black yarn:
- R1: Magic Ring with 6 sc. (6)
- R2-R7: Single crochet in each stitch around for 6 rounds. (6)
Fasten off, leaving a long tail for sewing. Do not stuff or stuff very lightly.
Skirt
The skirt is crocheted separately and then attached to the body. Use black yarn to create the signature Mini Wednesday dress element.
Using black yarn:
- Chain (ch) 18, then join ends with a slip stitch to form a ring.
- R1: Single crochet in each chain around. (18)
- R2: (2 sc, 1 inc) x 6. (24)
- R3: (3 sc, 1 inc) x 6. (30)
- R4-R6: Single crochet in each stitch around for 3 rounds. (30)
Fasten off, leaving a long tail for sewing the skirt to the body.
Hair
This section forms the hair cap for your Mini Wednesday doll, providing a base for her iconic braids. Use black yarn.
Using black yarn:
- R1: Magic Ring with 6 sc. (6)
- R2: 6 inc. (12)
- R3: (1 sc, 1 inc) x 6. (18)
- R4: (1 sc, 1 inc, 1 sc) x 6. (24)
- R5: (3 sc, 1 inc) x 6. (30)
- R6: (2 sc, 1 inc, 2 sc) x 6. (36)
- R7-R11: Single crochet in each stitch around for 5 rounds. (36)
- R12: 14 sc, 2 slip stitches (sl st), 1 sc, 1 half double crochet (hdc), 1 double crochet increase (dc inc), 1 hdc, 1 sc, 2 sl st, 14 sc. (This shapes the hairline).
Fasten off, leaving a long tail for sewing the hair cap to the head.
Braids
Add Wednesday’s signature braided pigtails to complete her look.
To create the braids:
- Cut 12 pieces of black yarn, each roughly 1.5 to 2 times the desired length of the finished braid.
- For each braid, take 6 pieces of yarn (12 strands total per braid).
- Insert the center of these 6 yarn pieces into the front loop of a stitch on each side of the hair cap, typically along the edge of R12.
- Evenly divide the 12 strands into three sections and braid them securely. Tie off the ends of the braids.
Assembly & Finishing Your Amigurumi Doll
Bringing all the crocheted pieces together is where your Mini Wednesday truly comes to life. Follow these steps for a polished finish.
- Attach Eyes: On the crocheted head, securely insert the safety eyes between R10 and R11, with approximately 6 single crochet stitches apart.
- Sew Head to Body: Using the long tail left on the head, carefully sew the stuffed head to the top of the stuffed body, ensuring it is centered and firmly attached.
- Attach Skirt: Position the crocheted skirt over the second black row of the body. Using the tail left on the skirt, sew it securely around the body.
- Attach Arms: Sew the two arms to the sides of the body, typically around R10-R11 of the black body section, ensuring they are evenly placed.
- Attach Hair: Place the crocheted hair cap onto the head. Using the tail, sew the hair cap firmly to the head, aligning the shaped hairline (R12) as desired.
- Create Braids: Follow the instructions for inserting yarn pieces and braiding them on each side of the hair cap.
- Weave in Ends: Carefully weave in any remaining loose yarn ends using your tapestry needle to hide them inside the doll.
Congratulations! Your Mini Wednesday Addams inspired amigurumi doll is now complete.
Tips for Amigurumi Beginners
Crocheting amigurumi dolls involves small stitches and careful assembly. Here are some tips to help you succeed, especially if you’re new to the craft:
- Use Stitch Markers: Always use a stitch marker at the beginning of each round when working in continuous spirals. This prevents you from losing your place and ensures accurate stitch counts.
- Stuff Firmly and Evenly: Stuff your doll pieces (head, body) firmly and consistently. Use small amounts of fiberfill at a time to avoid lumps and ensure a smooth, well-shaped finish. Over-stuffing can stretch stitches, while under-stuffing can make your doll floppy.
- Practice Invisible Decrease: While the pattern uses a standard decrease (sc2tog), learning the invisible decrease (inv dec) can create a much smoother, less noticeable decrease line, especially on the face and body.
- Tight Stitches are Key: For amigurumi, it’s crucial to have tight stitches to prevent the stuffing from showing through. If your stitches are too loose, try going down a hook size.
- Read Through First: Before you start crocheting, read through the entire pattern. This helps you understand the flow and anticipate any tricky sections.