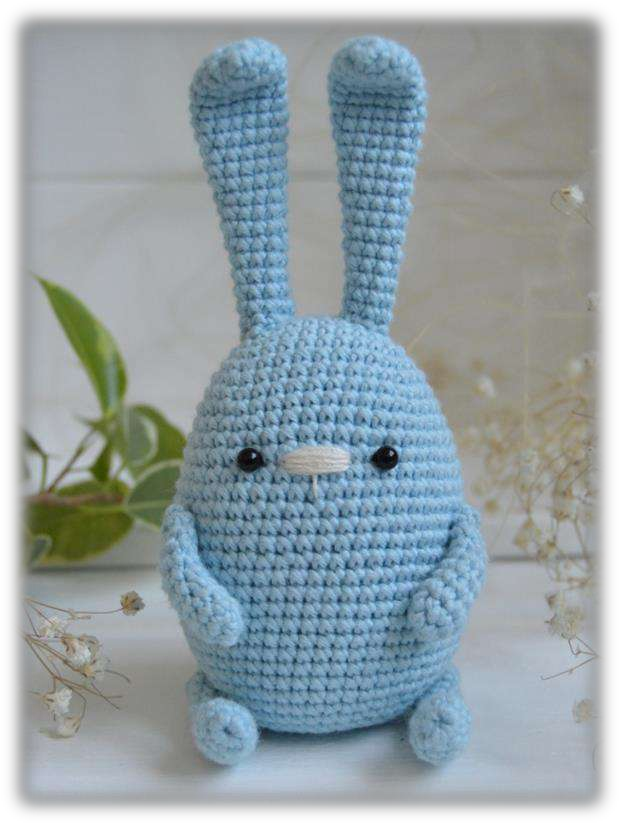
Meet the Spring Bunny: A Sweet and Floppy-Eared Amigurumi Friend
Hello, lovely hooksters! Spring is in the air, and what better way to celebrate than by welcoming a new floppy-eared friend into your home? Today, I’m absolutely delighted to share this precious Spring Bunny pattern from the incredibly talented Lyusya Rozonova (@lucy_rose_toys). With her sweet expression, poseable limbs, and the cutest little tail, she’s the kind of bunny that makes you smile just by looking at her.
There’s something so magical about bunnies, isn’t there? They’re gentle, curious, and remind us of new beginnings and fresh starts—perfect for springtime! This little bunny captures all of that sweetness in a beautifully crafted amigurumi form. Whether you’re making her as an Easter gift, a nursery companion, or just because you need a little bunny love in your life, she’s sure to become a treasured friend.
What I love most about this pattern is the attention to detail. The ears have a lovely gentle taper, the limbs are designed with a special stitch to create adorable little feet, and the shaping of the body gives this bunny such a sweet, sitting posture. You can even use thread or button joints to make the arms and legs movable—how fun is that? Plus, that little pom-pom tail is just the perfect finishing touch!
This pattern is wonderfully accessible for adventurous beginners and intermediate crocheters alike. You’ll practice working in rounds, shaping with increases and decreases, and assembling multiple parts. The result is a bunny that stands about 11.5–12.5 cm tall (depending on your yarn choice)—the perfect size for little hands to hold and big hearts to love.
So grab your soft cotton yarn in those perfect bunny shades, and let’s create a little springtime magic together
Materials & Tools
Yarn: Choose your favorite yarn! Two options are recommended:
- Option 1: Vita Soft Cotton (50 g / 175 m) in color 1822—finished bunny size: 12.5 cm sitting
- Option 2: Drops Nord (50 g / 170 m) in color 08—finished bunny size: 11.5 cm sitting
Feel free to use any yarn of similar weight—the bunny will adjust in size accordingly!
Hook: Size appropriate for your chosen yarn:
- For Vita Soft Cotton: 1.5 mm hook
- For Drops Nord: 1.3 mm hook
Eyes:
- Two black beads, 4 mm diameter (or black safety eyes)
Needles:
- Tapestry needle with a large eye for sewing
- Long needle for thread or button jointing
- Thin needle for embroidery
Thread:
- Cream or light pink embroidery thread for the nose
- Black thread for the eyes (if using beads)
- Strong thread in matching yarn color for attaching limbs (I use YarnArt Canarias)
Other Supplies:
- Polyester fiberfill (holofiber or synthetic down)
- Buttons (optional, for button jointing if desired)
- If using fluffy yarn, a hook-and-loop tape strip for brushing/fuzzing
Finished Size: Approximately 11.5–12.5 cm tall sitting
Abbreviations (US Terms)
- KA (MR): magic ring / кольцо амигуруми
- ch: chain / воздушная петля (в.п.)
- sc: single crochet / столбик без накида (сбн)
- hdc: half double crochet / полустолбик с накидом (пссн)
- sl st: slip stitch / соединительный столбик (сс)
- inc: increase / прибавка (пр) — 2 sc in one stitch
- dec: decrease / убавка (уб) — single crochet 2 together
- (…) x n: repeat instructions in parentheses n times
Let’s Begin! The Spring Bunny Pattern
Arms (Make 2)
These sweet little arms are worked in continuous rounds.
- R1: 6 sc in a magic ring. (6)
- R2: (inc, 2 sc) x 2. (8)
- R3: 8 sc.
- R4: 1 dec, 6 sc. (7)
- R5 – R9: 7 sc. (5 rounds)
Add a small amount of stuffing just at the beginning of the arm.
- R10: 2 dec. (5)
Fasten off, leaving a long tail. Use the needle to pull the opening closed and hide the end inside the arm.
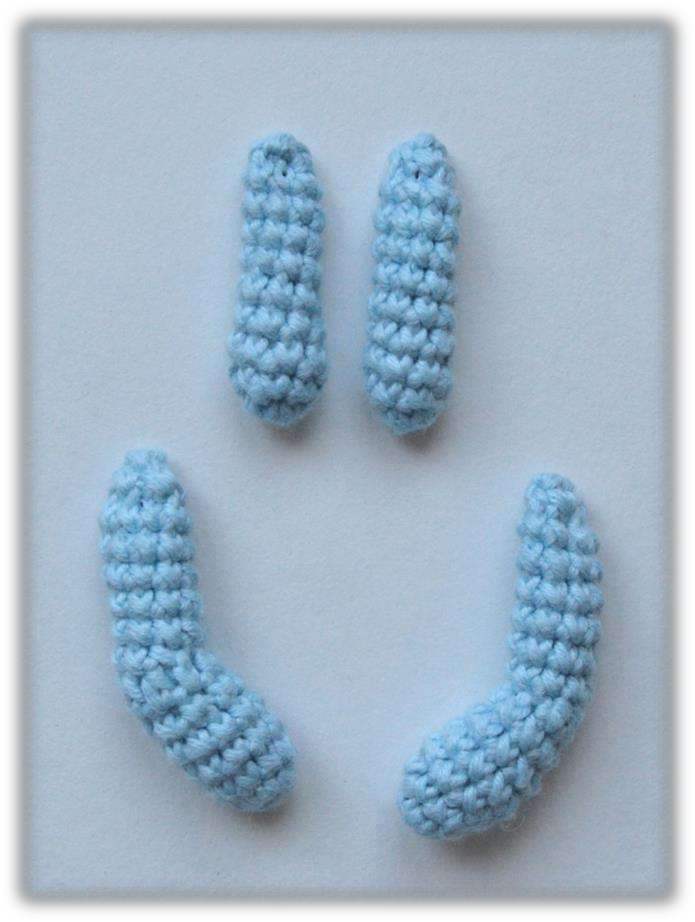
Legs (Make 2)
The legs have a special heel shaping using half double crochets!
- R1: 6 sc in a magic ring. (6)
- R2: (1 sc, inc) x 3. (9)
- R3 – R4: 9 sc. (2 rounds)
- R5: 7 sc, 1 dec. (8)
- R6: 8 sc.
- R7: 4 hdc, 4 sl st. (8) This creates the little heel!
- R8 – R13: 8 sc. (6 rounds)
Stuff the lower half of the leg firmly up to the bend; the upper part only lightly.
- R14: 3 dec. (5)
Fasten off, leaving a long tail. Use the needle to pull the opening closed and hide the end inside the leg.
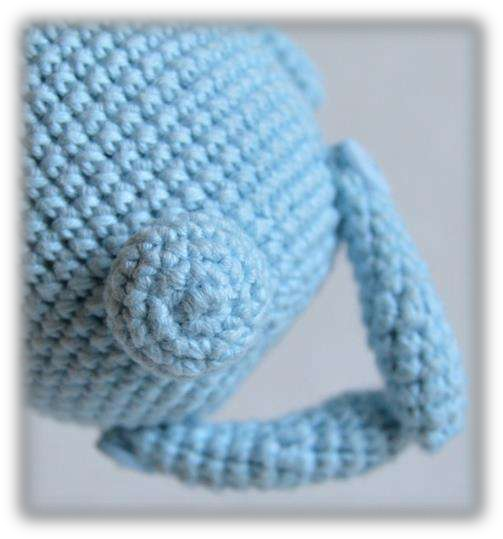
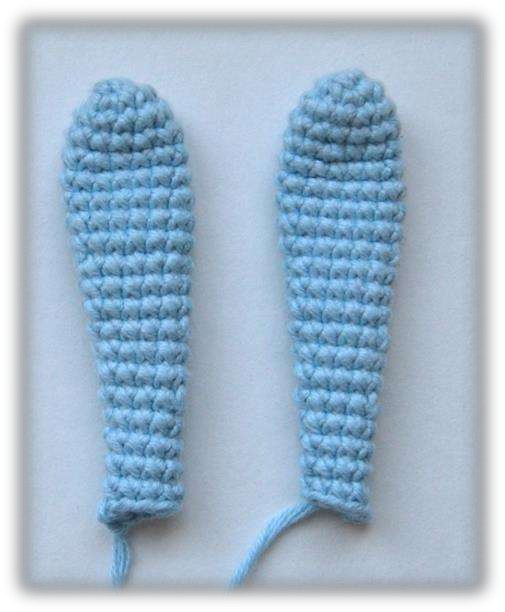
Ears (Make 2)
These floppy ears have a beautiful tapered shape!
- R1: 6 sc in a magic ring. (6)
- R2: 6 inc. (12)
- R3 – R4: 12 sc. (2 rounds)
- R5: (inc, 5 sc) x 2. (14)
- R6 – R9: 14 sc. (4 rounds)
- R10: (dec, 5 sc) x 2. (12)
- R11 – R13: 12 sc. (3 rounds)
- R14: (dec, 4 sc) x 2. (10)
- R15 – R16: 10 sc. (2 rounds)
- R17: (dec, 3 sc) x 2. (8)
- R18 – R21: 8 sc. (4 rounds)
Leave a long tail for sewing. Do not stuff the ears—they should remain floppy!
Tail
This little pom-pom style tail is the perfect finishing touch!
- R1: 6 sc in a magic ring. (6)
- R2: 6 inc. (12)
- R3: (1 sc, inc) x 6. (18)
- R4 – R5: 18 sc. (2 rounds)
- R6: (1 sc, dec) x 6. (12)
Leave a long tail for sewing. Lightly stuff the tail if desired.
Body
The body is worked in a continuous oval shape, starting with a chain.
- R1: Ch 9. Starting from the second chain from the hook: inc in the first stitch (2 sc), 6 sc, 3 sc in the last chain (to turn the corner). Continue on the other side of the chain: 7 sc. (18)
- R2: 18 sc.
- R3: 2 inc, 6 sc, 3 inc, 6 sc, 1 inc. (24)
- R4: (1 sc, inc) x 2, 6 sc, (1 sc, inc) x 3, 7 sc, 1 inc. (30)
- R5: 30 sc.
- R6: (2 sc, inc) x 2, 6 sc, (2 sc, inc) x 3, 8 sc, 1 inc. (36)
- R7: 36 sc.
- R8: (3 sc, inc) x 2, 6 sc, (3 sc, inc) x 3, 9 sc, 1 inc. (42)
- R9: 42 sc.
- R10: 4 sc, inc, 20 sc, inc, 16 sc. (44)
- R11: 44 sc.
- R12: 5 sc, inc, 21 sc, inc, 16 sc. (46)
- R13: 46 sc.
- R14: 6 sc, inc, 22 sc, inc, 16 sc. (48)
- R15: 48 sc.
- R16: 7 sc, inc, 23 sc, inc, 16 sc. (50)
- R17 – R22: 50 sc. (6 rounds)
- R23: 7 sc, dec, 23 sc, dec, 16 sc. (48)
- R24 – R25: 48 sc. (2 rounds)
- R26: 7 sc, dec, 22 sc, dec, 15 sc. (46)
- R27: 46 sc.
- R28: 2 sc, (dec, 3 sc) x 3, 8 sc, (dec, 3 sc) x 3, 6 sc. (40)
- R29 – R30: 40 sc. (2 rounds)
- R31: (3 sc, dec) x 8. (32)
- R32: (2 sc, dec) x 8. (24)
- R33: (1 sc, dec) x 8. (16)
Stuff the body firmly.
- R34: 8 dec. (8)
Add more stuffing if needed.
- R35: 4 dec. (4)
Use the needle to pull the opening closed. Secure the yarn and hide it inside the body. Tip: When hiding the final thread, pull the bottom inward slightly to create a flat sitting surface!

Assembly: Bringing Your Spring Bunny to Life
Positioning and Sewing
- Ears: Sew the ears to the sides of the top of the head. Let them flop naturally!
- Arms: Attach the arms between Rounds 14 and 15 of the body. Position them not directly on the sides, but slightly toward the front (toward the tummy). For movable limbs, use thread jointing or button jointing—this allows the arms to swing sweetly!
- Legs: Attach the legs to the sides of the body, at the same level as the ears (approximately between Rounds 27-28). Use thread or button jointing for movable legs as well.
- Tail: Sew the tail to the back center of the body. It will also serve as extra support when the bunny sits!
Face Embroidery
- Nose: Using cream or light pink embroidery thread, embroider a small nose between Rounds 11 and 12. The nose should be about 3-4 stitches wide.
- Eyes: Attach or sew the 4 mm black beads at the same level as the nose (between Rounds 11-12), with 2 stitches between the nose and each eye. If using beads, sew them on securely.
Optional: Fluffing Up
If you used fluffy yarn, gently brush your bunny with a hook-and-loop tape strip (like Velcro) to fluff up the fibers. This gives an extra soft, fuzzy look!
Your Spring Bunny Is Complete!
Congratulations, dear crocheter! You’ve just created the sweetest little springtime friend. Give yourself a big round of applause—this bunny is absolutely adorable!
I love how this pattern captures the gentle, curious nature of rabbits. Those floppy ears, the sweet embroidered nose, and those poseable little limbs all come together to create a bunny with real personality. She’s the kind of friend who sits on a shelf and makes you smile, or snuggles into tiny hands for comfort and play.
This pattern is perfect for:
- Easter baskets and spring gifts
- Nursery decorations (she’s so sweet and gentle!)
- Little hands to love—the perfect size for cuddling
- Amigurumi collections—she’ll fit right in with your other critters
- Just because—sometimes we all need a little bunny love!
Tips for Success
- Yarn Choice: Both recommended yarns are soft cotton blends that show stitch definition beautifully. If you use a fluffier yarn, remember to brush it at the end for that extra fuzzy bunny look!
- Movable Limbs: For thread jointing, use strong thread in a matching color. Sew through the limb and body several times, leaving a little slack so the limb can move freely. Button jointing uses small buttons on the outside for a charming vintage look.
- Heel Shaping: The half double crochets in Row 7 of the legs create the little heel bump. Don’t skip this—it’s what gives the feet their adorable shape!
- Tail Support: The tail isn’t just cute—it also helps the bunny sit upright! Make sure it’s attached securely.
- Stuffing: Stuff the body firmly for a nice round shape, but keep the ears and the upper parts of the arms and legs lightly stuffed so they stay floppy and poseable.
- Bottom Flattening: When you close the body and hide the final thread, gently pull the bottom inward. This creates a flat surface so your bunny sits nicely without wobbling!
A Final Word from Our Cozy Corner
There you have it, dear friends—your very own Spring Bunny, ready to hop into your heart! I hope this pattern brought you joy and that your bunny brings you even more.
There’s something so special about handmade toys, isn’t there? Every stitch holds a little piece of love, and this bunny is no exception. Whether you’re making her for a little one who needs a cuddly friend, a loved one who adores bunnies, or just for yourself because you deserve something sweet, she’s sure to be treasured.
When you share photos of your finished bunny, please tag Lyusya Rozonova (@lucy_rose_toys)—she would be so happy to see your beautiful work! And if you’re sharing the pattern, please remember to credit her as the author.
Thank you for spending your precious crochet time with me. Now go give your bunny a little hug—she’s waiting
Happy crocheting, and happy spring