Honey Bee Haven Crochet Pattern
Assembly of the Honeycomb Shell
- Cut a plastic canvas strip to fit. Important: Cut the canvas specifically so it curves inwards at the top. This will create a dome-like tension when the piece is bent, helping to form the desired arched shape.
- Sandwich the cut plastic canvas between Panel A (Exterior) and Panel B (Interior).
- Join: Single crochet around the perimeter using Brown yarn. This creates a neat, defined frame for your shell.
- Shape: Gently bend the joined piece into a deep U-shape or arch. Carefully sew the bottom edges of this arch to the Oval Floor Base you created earlier.
- Back Wall: Crochet a solid sandwich panel to close the back of the caravan, using Golden Yellow for the exterior and Pale Yellow for the interior.
3. The Sunflower Roof Canopy
Use 2.5mm Hook and Golden Yellow/Mustard yarn.
- Petals (Make 12-15):
- Chain 10. Single crochet (sc) in the 2nd chain from the hook, then Half Double Crochet (hdc), Double Crochet (dc), Treble Crochet (tr), Treble Crochet (tr), Double Crochet (dc), Half Double Crochet (hdc), Single Crochet (sc).
- Tip: Chain 1, then turn and work single crochet stitches back down the other side of the original chain to create a fuller teardrop or petal shape.
- Detail: For added realism, surface slip stitch a line down the center of each petal using Brown yarn.
- Assembly: Arrange and sew these crocheted petals around the front upper rim of the caravan, overlapping them slightly like shingles or a flower calyx. They should gracefully overhang the entrance, creating a charming awning for your bee haven.
Part 2: The Hexagonal Interior
IMPORTANT: Switch to 1.5mm – 2.5mm Hook depending on the item for these intricate interior details, requiring precision crochet skills.
1. The Honeycomb Shelving Unit
Use 2.5mm Hook and Beige/Wood yarn.
- The Cells (Make 7-10):
- Chain 18. Single crochet for 4 rows to form a strip.
- Sew the ends of this strip together to create a ring.
- Gently pinch the ring into a distinct hexagon shape. Stiffen the hexagon using diluted fabric glue or by inserting a thin layer of plastic canvas inside the strip.
- Assembly: Glue the finished hexagons together side-by-side and stacked to construct a realistic honeycomb shelving unit.
- Filling: Crochet flat yellow hexagons (start with MR 6 sc, then increase to 18 sc or desired size) and glue them into the back of some cells to simulate full honey stores. Finally, glue the entire shelving unit securely to the back interior wall of the caravan.
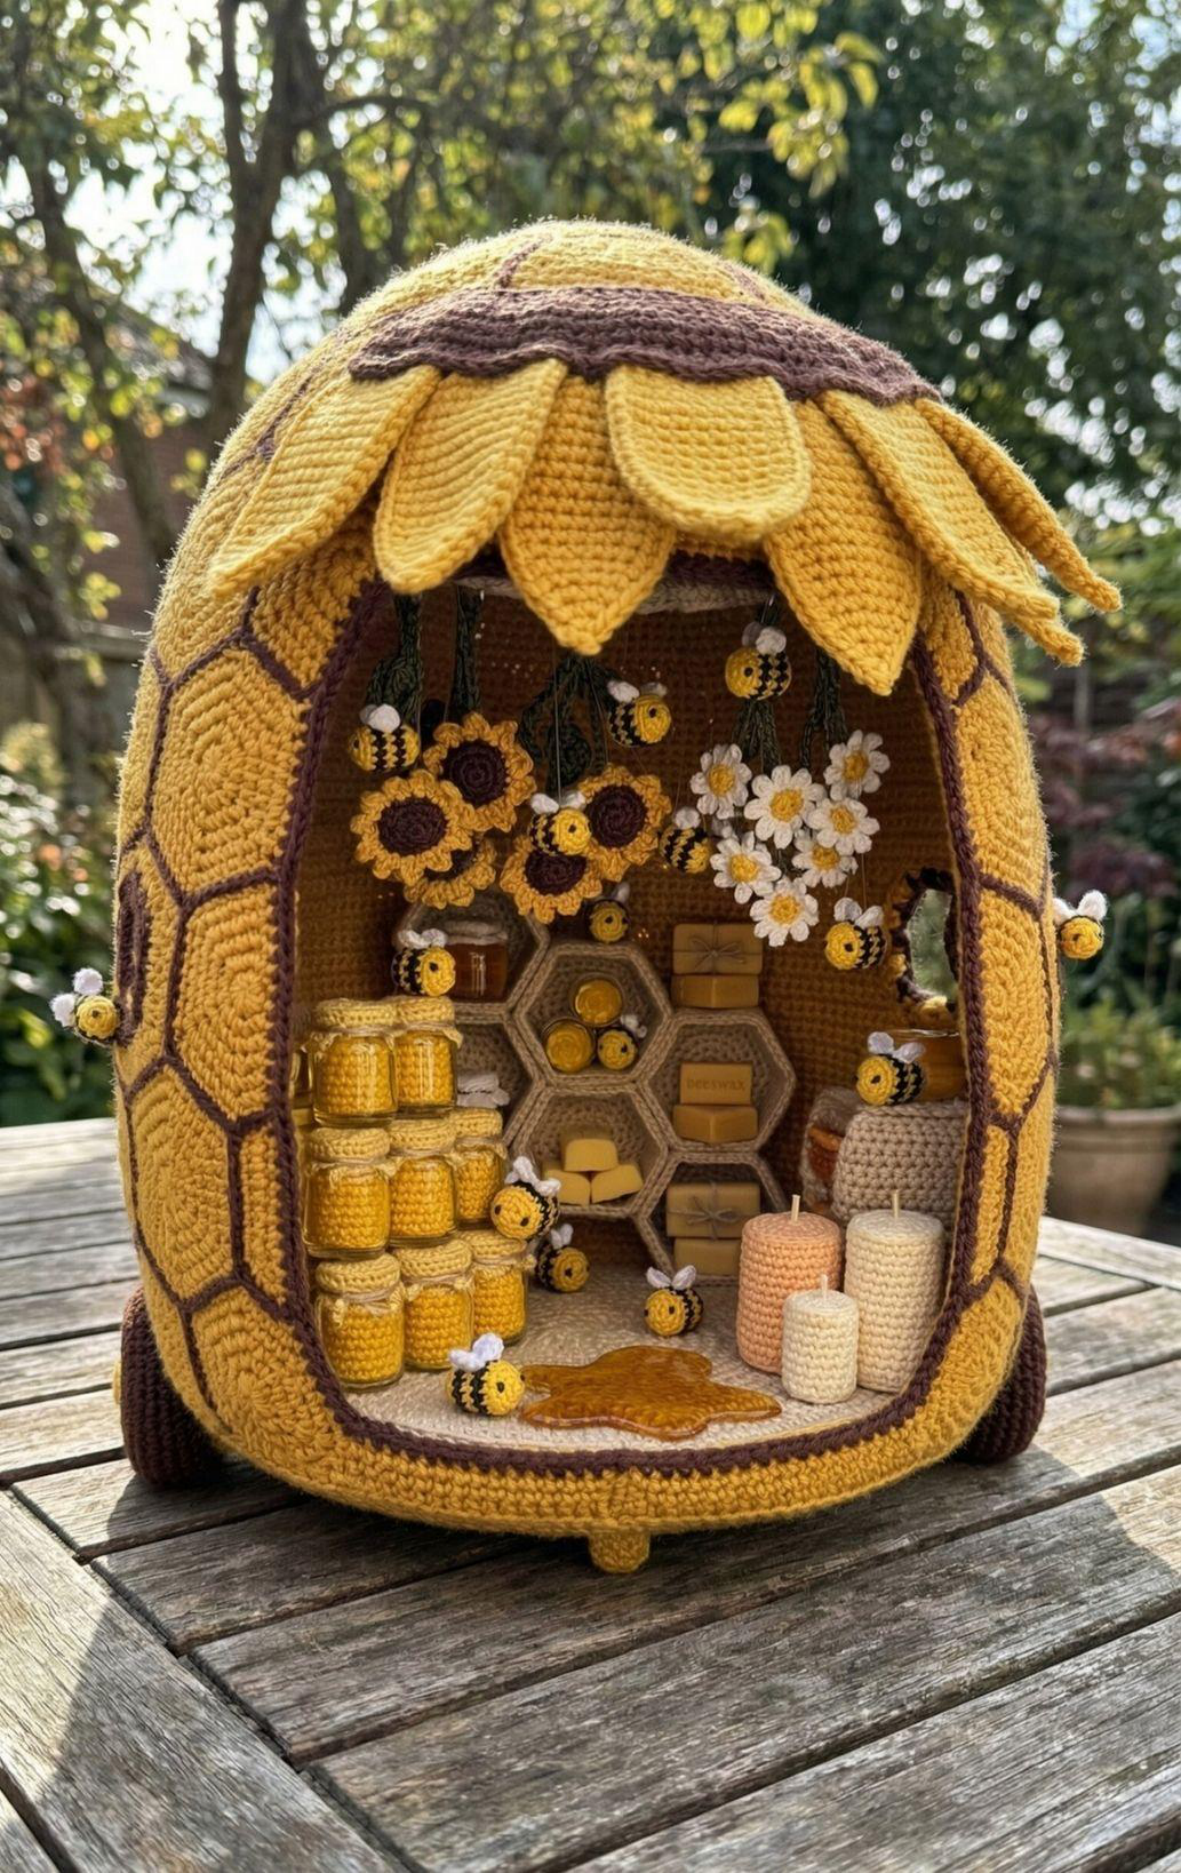
A detailed interior view of the Honey Bee Haven, featuring the hexagonal shelving unit brimming with miniature honey jars and beeswax blocks.
2. Honey Jars
Use 1.5mm Hook.
- Jar Body: Using Golden Yellow yarn, begin with a Magic Ring (MR) of 6 single crochet (sc). Increase to 12 sc. Work 6 rounds in the Back Loop Only (BLO) to create a neat cylindrical jar body.
- Lid: With Gold or Beige yarn, create a Magic Ring (MR) of 6 sc, then increase to 12 sc. Sew this piece securely onto the top of the jar body.
- Detail: For an authentic touch, tie a tiny piece of twine around the neck of each jar. Make 15-20 miniature honey jars to stock your haven. Stack them artfully on the floor and within the honeycomb shelves.
3. Beeswax Blocks
- Block: Using Pale Yellow yarn, chain 6. Single crochet for 4 rows. Create 6 such sides and carefully sew them together to form a small, rectangular beeswax brick. Make 5-6 blocks and stack them to enhance your crochet decor.
4. Pillar Candles
- Candle: Using Cream/Apricot yarn, start with a Magic Ring (MR) of 6 sc. Increase to 12 sc. Work 10 rounds in the Back Loop Only (BLO) to form the pillar.
- Wick: Attach a tiny black thread knot on top to represent the wick.
- Group: Glue 3 candles of varying heights together on the caravan’s floor for a cozy display.
5. Spilled Honey
- Puddle: With Amber/Gold yarn, crochet a freeform flat shape using a random sequence of single crochet (sc), half double crochet (hdc), and double crochet (dc) stitches to mimic a natural honey splat. Sew this realistic puddle to the floor near your stacked honey jars for an extra touch of realism.
Part 3: The Hanging Flora
Use Hook Size: 1.5mm for these delicate floral accents.
1. Hanging Sunflowers
- Flower: Create a Brown center with a Magic Ring (MR) of 5 sc. For the petals, Chain 3 and then slip stitch (sl st) back into the center ring. Make 5 tiny flowers.
- Stem: Use green craft wire for the stems. Glue the flowers securely to the end of the wire. Bunch them upside down and elegantly hang them from the ceiling of your caravan, adding to the miniature garden theme.
2. White Chamomile/Daisies
- Flower: Form a Yellow center using a French knot. For the white petals, create small loops of white thread.
- Bunch: Assemble a dense bunch of these delicate white dots on green stems. Hang them alongside the sunflowers for a charming floral display, enhancing the natural feel of the bee haven.
Part 4: The Bees & Exterior Details
1. The Tiny Bees
Use 1.5mm Hook. Make 10 or more of these adorable miniature bees.
- Body:
- Start with Yellow yarn: Magic Ring (MR) of 4 sc.
- Rnd 2 (Black): Increase to 8 sc.
- Rnd 3 (Yellow): Single crochet around.
- Rnd 4 (Black): Single crochet around.
- Rnd 5 (Yellow): Decrease to 4 sc. Fasten off.
- Wings: Using White yarn, Chain 2, then work 2 half double crochet (hdc) stitches into the first chain. Sew two such wings to the back of each bee body.
- Placement: Use craft wire to make some bees appear to “fly” near the flowers. Glue others crawling on the honey jars, the exterior walls, and around the caravan entrance to create a dynamic, buzzing miniature world.
2. Wheels
Use 2.5mm Hook.
- Tire: Using Brown yarn (to complement the rustic theme), start with a Magic Ring (MR) of 6 sc. Increase to 12 sc. Then, crochet (1 sc, Increase) around to 18 sc. Work 2 additional rounds of single crochet.
- Hubcap: With Golden Yellow yarn, create a Magic Ring (MR) of 6 sc.
- Assembly: Sew the completed wheels to the sides of your caravan.
Final Assembly & Finishing
Bring your “Honey Bee Haven” to life with these final assembly steps for your crochet miniature.
- Structural Check: Double-check that the Hive shell is beautifully curved and holds its shape. The brown embroidered hexagonal grid on the exterior should be neat, precise, and geometrically pleasing, forming the iconic honeycomb texture.
- Interior Stocking:
- Securely glue the Hexagon Shelving Unit to the back interior wall.
- Carefully glue the crocheted Honey Jars into stable stacks on both the caravan’s floor and within the shelves.
- Artfully place the Beeswax Blocks and Pillar Candles.
- Arrange and secure the “Spilled Honey” puddle in its intended spot.
- Ceiling Decor:
- Using thread or wire, elegantly hang the bunches of Sunflowers and Chamomile from the roof of the caravan, adding to the charm of this miniature world.
- The Swarm:
- Distribute your Tiny Bees creatively throughout the scene. Position one entering a window, another on a honey jar, and several hovering gracefully near the hanging flowers to create a dynamic, buzzing atmosphere in your unique crochet project.
Tips for Crocheters & Project Overview
The “Honey Bee Haven” is a buzzing sanctuary dedicated to the tireless work of our pollinator friends. This unique crochet caravan breaks away from traditional boxy shapes, adopting the organic, rounded silhouette of a classic bee skep or hive. Its exterior boasts a stunning Golden Amber, textured with an intricate hexagonal honeycomb grid, while the roof is crowned with a magnificent canopy of giant sunflower petals. The interior, designed to appear dripping with liquid gold, features a massive hexagonal shelving unit mimicking honeycomb cells, stocked with honey jars, beeswax blocks, and rustic candles.
This project presents a unique structural challenge due to its curved, egg-like “Hive” silhouette. To ensure the walls hold this rounded shape without collapsing and to support the weight of the interior shelving, we strictly use the “3-Layer Sandwich Method” (Yarn – Plastic Canvas – Yarn). This technique is critical as it allows you to bend the crocheted panels into a sturdy arch while keeping the surface flat enough for the intricate honeycomb embroidery. For the delicate details like tiny bees and flower elements, a precision micro-hook (1.5mm) is essential. While this crochet pattern strives for accuracy, occasional errors can happen. Enjoy the process of creating this sweet, busy spot in your miniature world and master these advanced crochet techniques