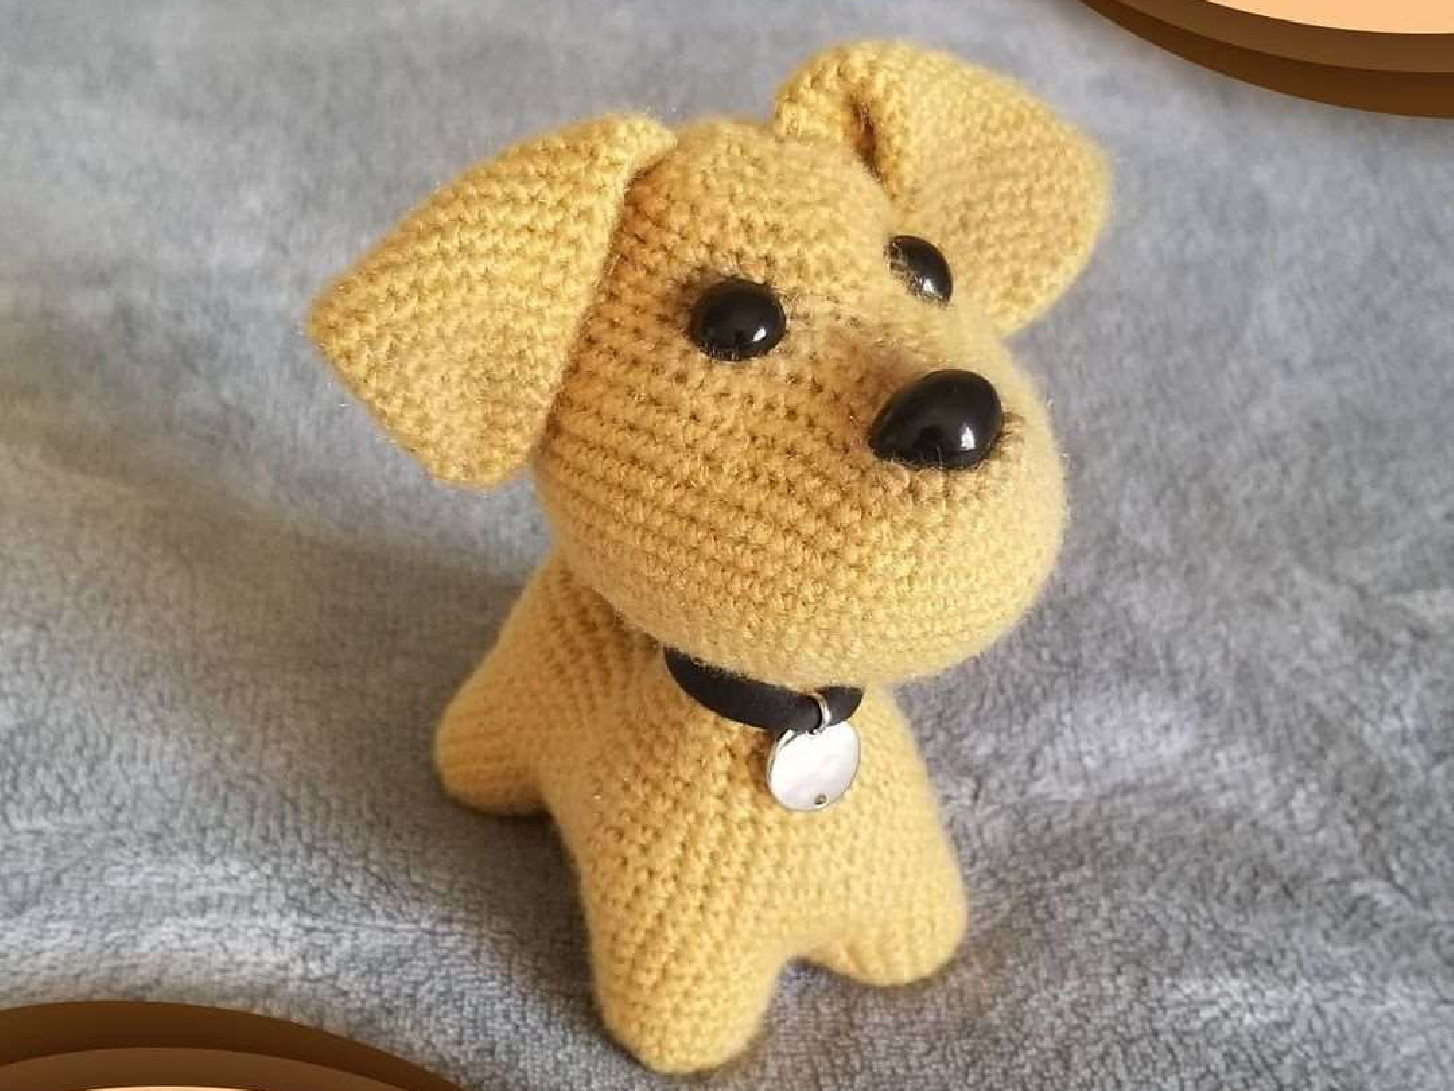
Free Crochet Puppy Pattern
Body Construction
Stuff the body tightly as you go to achieve a firm and well-defined shape for your amigurumi puppy.
Belly (Hexagon Base)
Begin by crocheting the belly as a hexagon, which will form the base for the body:
- 6sc in a magic ring
- 6 inc [=12]
- (1sc – inc)x6 [=18]
- (2sc – inc)x6 [=24]
- (3sc – inc)x6 [=30]
- (4sc – inc)x6 [=36]
Attaching Legs to Body
Now, carefully attach the previously made legs to the body base, ensuring they are evenly spaced around the belly:
- Place the legs in front of the belly. Crochet:
- 6sc, joining the first leg and the belly together.
- 6sc, joining the second leg and the belly together.
- 6sc, crocheting only into the belly stitches.
- 6sc, joining the third leg and the belly together.
- 6sc, joining the fourth leg and the belly together.
- 6sc, crocheting only into the belly stitches. [=36 total stitches]
- In this round, you will crochet around the remaining unworked stitches of each leg and the belly sections:
- 12sc around the first leg.
- 12sc around the second leg.
- 6sc into the belly.
- 12sc around the third leg.
- 12sc around the fourth leg.
- 6sc into the belly. [=60 total stitches]
Body Shaping (Continued)
Continue working on the body, shaping it with decreases as instructed.
- 60sc [3 rounds]
- (4sc – dec – 5sc – dec – 5sc – dec – 10sc)x2 [=54]
- 54sc [3 rounds]
- (7sc – dec)x6 [=48]
Attaching the Tail
Attach the tail in the same manner as the legs. Before you begin, check the beginning of your round; it should be in the middle of the chest to ensure proper tail placement at the back.
- Place the tail in front of the body. Crochet:
- 8sc into the body stitches.
- 4sc, joining the tail and the body together.
- 36sc into the body stitches. [=48 total stitches]
- Repeat for the second part of the tail attachment, ensuring it’s securely integrated:
- 8sc into the body stitches.
- 4sc, joining the tail and the body together.
- 36sc into the body stitches. [=48 total stitches]
Forming the Back and Neck
- 8sc – 2dec – then slst 19 stitches, joining both sides of the body together to form the back. Continue with 24sc into the remaining stitches. [You should have a round of 24sc after this step to form the base of the neck.]
- dec – 20sc – dec [=22]
- 1sc – dec – 16sc – dec – 1sc [=20]
- 2sc – dec – 12sc – dec – 2sc [=18]
- (4sc – dec)x3 [=15]
Fill the body and neck firmly with fiberfill. Use a wooden stick to ensure tight stuffing, especially in the neck area, to prevent it from flopping. Do not cut the thread; you will continue directly to crochet the head.
Head Construction
Continue stuffing the head tightly as you go to maintain its round and firm shape, giving your amigurumi puppy a cute expression.
- 15 inc [=30]
- (2sc – inc – 2sc)x6 [=36]
- (5sc – inc)x6 [=42]
- (3sc – inc – 3sc)x6 [=48]
- (7sc – inc)x6 [=54]
- (4sc – inc – 4sc)x6 [=60]
- (9sc – inc)x6 [=66]
- (5sc – inc – 5sc)x6 [=72]
- 72sc [6 rounds]
Forming the Nose and Face
Ensure the beginning of the round is in the middle of the back of the head for proper nose placement, which will define your puppy’s face.
- 12sc – (3sc – dec – 3sc)x6 – 12sc [=66]
- 9sc – (3sc – dec – 3sc)x6 – 9sc [=60]
- 6sc – (3sc – dec – 3sc)x6 – 6sc [=54]
- 3sc – (3sc – dec – 3sc)x6 – 3sc [=48]
- 22sc – 2dec – 6sc, joining both sides of the head together – 12sc. [You should have a round of 24sc after this step.]
At this point, insert your safety nose. It should be positioned within the 6sc section where you joined the head sides, creating the snout.
- 10sc – 2dec – 10sc [=22]
- (dec – 3sc – dec – 4sc)x2 [=18]
Now, insert the safety eyes between rounds 42 and 43, ensuring they are approximately 8 stitches apart from each other for a balanced look.
Fill the head firmly with fiberfill, using a wooden stick to get into all contours and achieve a smooth, well-shaped head.
- (1sc – dec)x6 [=12]
- 6dec [=6]
Finish off by sewing the remaining hole closed neatly. Cut yarn and weave in the end.
Assembly and Finishing
Bring your adorable crochet puppy to life with these final touches, adding personality and charm to your handmade creation:
- Sew Ears: Using the long thread left on your ears, carefully sew them onto the head. Position them symmetrically on either side of the head, adjusting until you like their placement before securing them.
- Make a Collar: Cut a strip from leather material (or felt, if preferred). Wrap it around your puppy’s neck, adjusting for a comfortable, snug fit. Carefully glue the overlapping edges of the strip together to secure the collar. For an extra special touch, you can decorate the collar with a small dog locket or charm.
Tips for Beginners
This crochet puppy pattern involves several shaping techniques and assembly steps, making it a rewarding project. Here are some beginner-friendly tips to help you succeed in creating your amigurumi dog:
- Stitch Markers are Essential: For patterns worked in continuous rounds, always use a stitch marker to mark the first stitch of each round. This simple habit will prevent you from losing your place and ensure accurate stitch counts.
- Tight Stitches for Amigurumi: Aim for tight, consistent single crochet stitches. This is crucial for amigurumi to prevent the stuffing from showing through and to help your puppy maintain its shape. If your stitches seem loose, try using a smaller crochet hook.
- Mastering Stuffing: The pattern emphasizes “stuff tightly” for good reason. A wooden stick, chopstick, or the back of a crochet hook can help push fiberfill into tight spots like the snout, neck, and legs, ensuring an even and firm result without lumps. Stuff gradually, shaping as you go.
- Reading Amigurumi Patterns: Pay close attention to the parentheses `(…)xN` for repeats and `[=N]` for stitch counts. Double-checking your stitch count at the end of each round will save you from unraveling later. Don’t be afraid to reread a section if you’re unsure.
- Invisible Decrease (Optional): While the pattern uses a standard ‘dec’ (sc2tog), an invisible decrease (inv dec) can create a cleaner, less noticeable decrease line, which is often preferred in amigurumi. You can find many tutorials online if you wish to try this technique for a smoother finish.
- Strategic Placement of Features: When inserting safety eyes and the nose, pin them in place first. Step back and look at your puppy from different angles to ensure they are symmetrical and positioned to your liking before securing them permanently. Small adjustments can make a big difference to your puppy’s overall expression!
Enjoy the process of bringing your adorable crochet puppy to life, stitch by stitch!