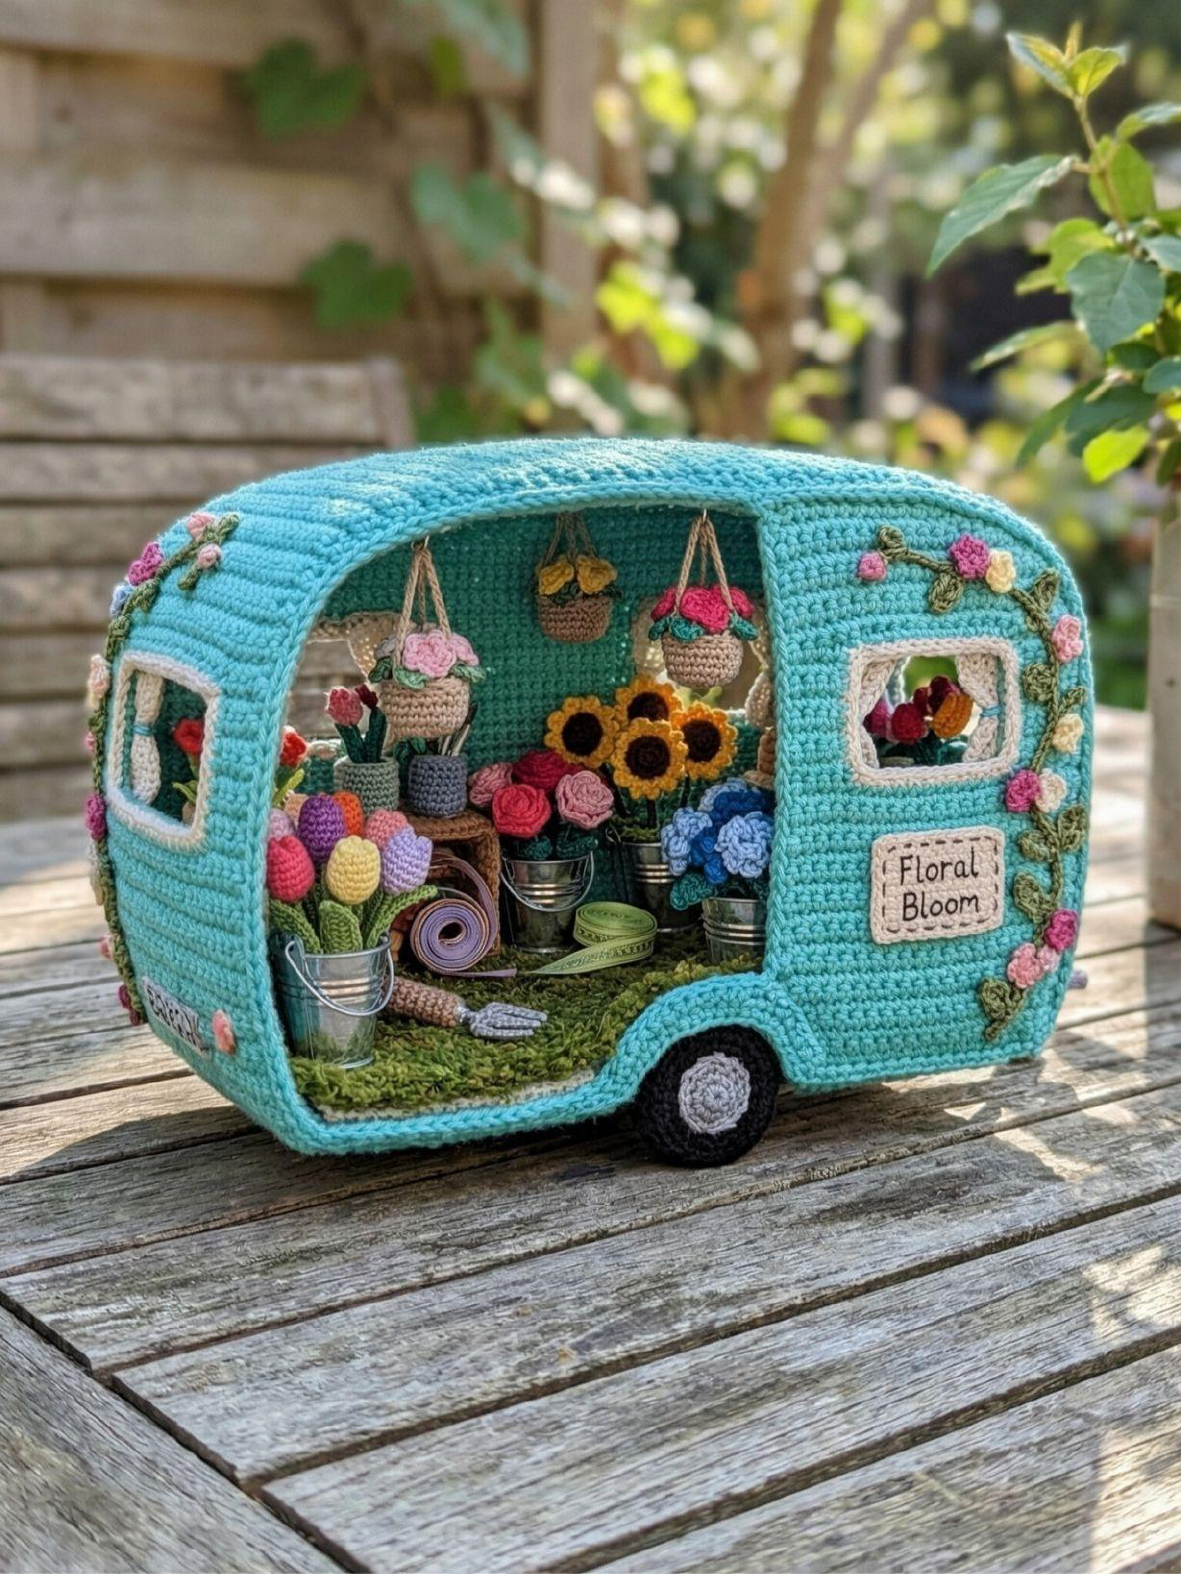
Floral Bloom Florist Caravan Crochet Pattern
Materials & Tools for Your Crochet Floral Bloom Florist Caravan
To embark on creating your enchanting miniature florist caravan, gather the following essential materials and tools:
Yarn
- Sport or DK weight cotton yarn: Mercerized cotton is highly recommended for achieving crisp flower definition.
- Turquoise Blue: For the main exterior and interior walls of the caravan.
- Moss Green: For the interior floor, aiming for a textured look like grass or moss.
- Leaf Green: Essential for all vines, flower stems, and leaves.
- Flower Colors: A vibrant palette including Pink, Yellow, Red, Purple, White, Orange, and Blue (specifically for hydrangeas).
- Silver/Grey: For crafting the miniature buckets and garden fork.
- Wood Brown: To create crates and the frame for your sign.
- Beige/Cream: For the sign background and hanging baskets.
- Black: For the caravan’s tires.
Crochet Hooks
- 2.5mm (Size C/2): Used for the larger components, specifically the caravan shell and the base of the floor.
- 1.5mm (Steel Hook): CRITICAL for all delicate, tiny elements, including individual flowers, leaves, miniature buckets, and tools. This precision micro-hook is key to achieving the intricate details of your miniature flower shop.
Structural & Finishing Supplies
- Plastic Canvas: 7-8 sheets of 7-mesh stiffness plastic canvas are vital for creating the rigid, box-like structure of the caravan walls, preventing sagging.
- Fiberfill Stuffing: For shaping and filling various components.
- Craft Wire: Essential for adding structure to flower stems and forming hooks for hanging baskets.
- Fabric Glue: For securing embellishments and assembly.
- Tapestry Needle: For weaving in ends and assembly.
- Small Beads (Optional): Can be used for decorative flower centers to add extra sparkle.
Crochet Abbreviations (US Terms)
Familiarize yourself with these standard US crochet terms to effortlessly follow the pattern instructions for your Floral Bloom project:
- MR: Magic Ring
- Ch: Chain
- Sc: Single Crochet
- Hdc: Half Double Crochet
- Dc: Double Crochet
- Inc: Increase (working 2 single crochet stitches into one stitch)
- Dec: Decrease (invisible decrease is recommended for a cleaner finish)
- BLO: Back Loop Only
- Sl st: Slip Stitch
- Bobble: A textured stitch specifically used for hydrangeas in this pattern.
- Picot: Chain 3, then slip stitch into the first chain to create a small loop.
Gauge & Sizing for Your Miniature Florist Caravan
This “Floral Bloom” florist caravan project focuses on miniature scale and intricate detail rather than a specific numerical gauge. The specified hook sizes are crucial for achieving the intended delicate scale of the components. The 2.5mm hook is used for the main caravan structure, providing a sturdy base, while the 1.5mm steel hook is indispensable for crafting the tiny flowers, leaves, buckets, and tools, ensuring they are perfectly proportioned for your miniature scene. No specific finished dimensions are provided, allowing for some flexibility while maintaining a charming miniature size.
Crafting Your Floral Bloom Florist Caravan: Step-by-Step Instructions
Step into a world of eternal spring with the “Floral Bloom” Florist Caravan. This enchanting mobile flower shop is a celebration of color and nature, designed to look like a rolling garden. The exterior is crocheted in a vibrant Turquoise Blue, accented with climbing vines of pink and yellow roses that frame the windows and corners, giving it a fairy-tale cottage feel. A rustic sign proudly announces “Floral Bloom” to all passersby. The interior is a maximalist dream for any flower lover, featuring a “mossy” green rug, silver buckets overflowing with colorful blooms, hanging baskets, and various florist accessories. This project is a masterclass in miniature floral crochet, offering endless opportunities to customize your blooms.
Part 1: The Florist Structure (Sandwich Method)
This foundational section focuses on building the caravan’s robust shell using the critical “3-Layer Sandwich Method” (Yarn – Plastic Canvas – Yarn) to prevent sagging. Use the 2.5mm hook for all steps in this part.
The Mossy Floor
Create two identical panels to form the base of your caravan.
- Base Panel (Bottom): Using Dark Green or Brown yarn, chain 26. Work 40 rows of single crochet (sc).
- Top Panel (Interior): Using Moss Green yarn, create a textured surface. You can achieve this by working in Loop Stitch or using a textured “scrubby” yarn. If using normal yarn, work a mesh pattern of *Sc, Ch 1, Sk 1*, then surface crochet loops into the resulting gaps to mimic grass or moss.
- Assembly: Cut a piece of plastic canvas to match the size of your crocheted panels. Sandwich the plastic canvas between the two panels. Securely single crochet around the entire perimeter to seal and enclose the plastic canvas.
The Turquoise Shell (U-Shaped Caravan Body)
This section forms the left wall, roof, and right wall of your caravan in one continuous piece.
- Panel A (Exterior – Turquoise): Chain 91 stitches (this length should cover the left wall, roof, and right wall). Work 35 rows of single crochet (sc), resulting in 90 stitches per row.
- Window Cutouts: Strategically create rectangular window openings within the side wall sections by chaining 10 stitches and skipping 10 stitches in a row. Continue crocheting around these openings.
- Window Frames: Once the panel is complete, surface crochet a border in Cream yarn around each window opening. Add a decorative “sill” by working a row of front loop only (FLO) single crochet along the bottom edge of each frame. Fasten off.
- Panel B (Interior – Turquoise or White): Create a second panel. You can use Turquoise yarn to match the exterior or White yarn to provide a contrasting background that makes your miniature flowers pop. Ensure this panel matches the dimensions and window cutout placements of Panel A precisely.
- Assembly: Cut a plastic canvas strip, including corresponding window holes, to fit between Panel A and Panel B. Sandwich the plastic canvas between your exterior and interior panels. Join these layers by single crocheting around the entire perimeter using Turquoise yarn.
- Shape & Attach: Gently bend the assembled U-shaped panel into an arch. Sew the bottom edges of this U-shaped structure securely to the Mossy Floor Base.
- Back Wall: Create a separate solid sandwich panel for the back of the caravan using Turquoise yarn, mirroring the sandwich method used for the main shell. Attach this to close the back of your caravan structure.