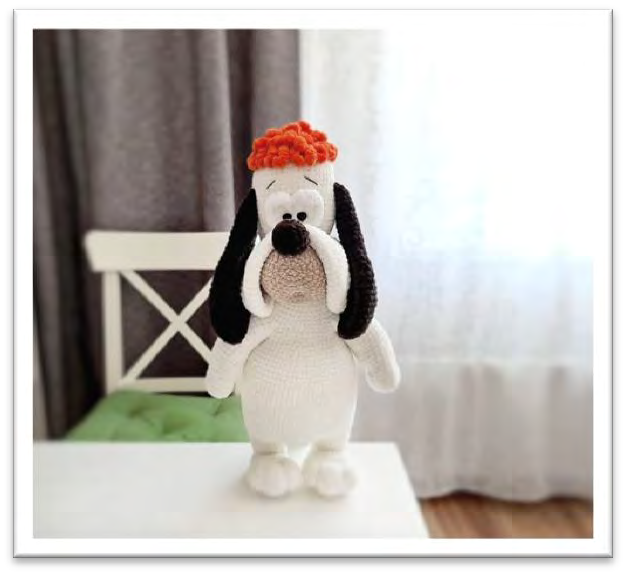
Droopy Amigurumi Master Class
Body
The body is crocheted from bottom to top using your main body color. This section involves attaching the legs and arms as you go.
- Row 1: 6 sc in amigurumi ring (6 sc)
- Row 2: (inc) x 6 times (12 sc)
- Row 3: (1 sc, inc) x 6 times (18 sc)
- Row 4: (2 sc, inc) x 6 times (24 sc)
- Row 5: (3 sc, inc) x 6 times (30 sc)
Next, attach the previously made legs. Make sure they are positioned correctly before joining.
Observe the side view of the body with the legs attached.
- Row 6: 6 sc (body + 1 leg), 8 sc (back), 6 sc (body + 2 leg), 10 sc (front) (30 sc)
- Row 7: 18 sc (body + 1 leg), 8 sc (back), 18 sc (body + 2 leg), 10 sc (front) (54 sc)
A close-up of the legs joined with a stitch marker visible.
Top view of the body showing how the legs are attached.
- Row 8: (inc, 1 sc) x 2 times, 6 sc, inc, 24 sc, inc, 5 sc, (inc, 1 sc) x 6 times, 1 sc (64 sc)
- Row 9: 12 sc, inc, 25 sc, inc, 25 sc (66 sc)
- Row 10: 12 sc, inc, 8 sc, inc, 10 sc, inc, 8 sc, inc, 24 sc (70 sc)
- Row 11: inc, 11 sc, inc, 8 sc, inc, 12 sc, inc, 9 sc, inc, 10 sc, inc, (6 sc, inc) x 2 times (78 sc)
- Rows 12-21: 78 sc
- Row 22: 14 sc, dec, (17 sc, dec) x 2 times, 18 sc, dec, 4 sc (74 sc)
- Row 23: 14 sc, dec, 33 sc, dec, 23 sc (72 sc)
- Row 24: (10 sc, dec) x 6 times (66 sc)
- Row 25: (9 sc, dec) x 6 times (60 sc)
- Row 26: (8 sc, dec) x 6 times (54 sc)
- Row 27: (7 sc, dec) x 6 times (48 sc)
- Row 28: (6 sc, dec) x 6 times (42 sc)
- Rows 29-33: 42 sc
Add hollowfiber stuffing, ensuring even distribution.
Next, attach the arms to the body.
- Row 34: 6 sc (front), 10 sc (body + arm 1), 10 sc (back), 10 sc (body + arm 2), 6 sc (front) (42 sc)
- Row 35: 6 sc (front), 20 sc (body + arm 1), 10 sc (back), 20 sc (body + arm 2), 6 sc (front) (62 sc)
- Row 36: 62 sc
- Row 37: 15 sc, dec, 28 sc, dec, 15 sc (60 sc)
- Row 38: (8 sc, dec) x 6 times (54 sc)
- Row 39: 54 sc
- Row 40: (7 sc, dec) x 6 times (48 sc)
- Row 41: (6 sc, dec) x 6 times (42 sc)
The body with stuffed arms attached, forming the torso shape.
This image shows the partially stuffed body with arms attached, demonstrating the overall shaping.
Neck + Head
Continue directly from the body section, using your main body color.
- Rows 44-53: 42 sc
- Row 54: (6 sc, inc) x 6 times (48 sc)
- Rows 56-69: 48 sc
- Row 70: (6 sc, dec) x 6 times (42 sc)
- Row 71: (5 sc, dec) x 6 times (36 sc)
- Row 72: (4 sc, dec) x 6 times (30 sc)
- Row 73: (3 sc, dec) x 6 times (24 sc)
Add hollowfiber stuffing to the head and neck firmly.
- Row 74: (2 sc, dec) x 6 times (18 sc)
- Row 75: (1 sc, dec) x 6 times (12 sc)
- Row 76: (dec) x 6 times (6 sc)
If necessary, add more hollowfiber to ensure the head is firm and well-shaped. Close the remaining 6 stitches securely.
Hair
Use a contrasting yarn for the hair (e.g., 80337 for a fluffy look). At the top of the head in the center (where the amigurumi ring started), chain 6, turn and crochet 5 sc. Then, in the next stitch around the circle, chain 6 and also turn and crochet 5 sc. Continue this technique around the top of the head for 3 rows, skipping one row between rounds (e.g., crochet one row of hair, skip one row of head stitches, crochet another row of hair, skip another row, etc.) to create a textured, full look.
Observe the technique for crocheting the hair loops onto the head.
This shows the growing texture as more hair strands are added.
The completed crocheted hair should appear full and textured.
Assembly and Finishing Touches
Now that all the individual pieces are crocheted, it’s time to bring Droopy to life!
Sew on the Muzzle
Carefully position and sew the muzzle to the head. Add hollowfiber stuffing to the muzzle before completely closing the seam to give it shape and volume.
Attaching the muzzle to the head from a side view.
And a front view of the muzzle being attached.
Form the Mouth (Tightening)
Create the mouth indentation using a needle and YarnArt Jeans (white) thread. Insert the needle at the top of the muzzle (point 1), pass it down through the stuffing to where the mouth will be (point 2), pick up three stitches across (point 3), and return to the starting point (point 4, near point 1). Tighten well to form the mouth, tie a knot, and hide the thread in the work.
The muzzle after the mouth indentation has been made, giving expression to the face.
Sew on the Nose
Position the crocheted nose securely onto the center of the muzzle and sew it in place.
Sew on the Cheeks
Attach the two cheek pieces to the sides of the muzzle, shaping them to add character to the face.
Sew on the Ears
Attach the ears to the sides of the head. Experiment with placement to find the desired expression for your Droopy.
Sew on the Tail
Sew the tail onto the back of the body, centered around the 15th row from the bottom of the body.
Glue the Eyes and Embroider Eyebrows
Carefully glue the 8mm drop safety eyes into place. Position them centrally, ensuring only about half of the eye is visible, with the other part appearing like an eyelid to achieve Droopy’s characteristic look. Once the eyes are secure, use YarnArt Jeans (white) to embroider the eyebrows above the eyes, adding to the toy’s expression.
The completed face with eyes glued and eyebrows embroidered, bringing Droopy to life.
Tips for Beginners and Important Notes
This Droopy amigurumi pattern involves several smaller pieces and assembly, which can be a fun challenge for beginners. Don’t be afraid to take your time with each step.
- Stuffing: Ensure all parts are stuffed firmly but evenly. Over-stuffing can distort the shape, while under-stuffing can make the toy too flimsy.
- Sewing: Use stitch markers to temporarily hold pieces in place before sewing to ensure proper alignment. Take small, neat stitches for a seamless finish.
- Tightening: The tightening steps for the arms and feet are key for shaping. If you’re new to this technique, the provided video tutorials are invaluable resources.